Enabling local project collaboration with Gitea
Date: 2023-07-29
Popular hosted version control system (VCS) solutions such as GitHub and GitLab are filled with powerful enterprise features and enable large-scale collaboration and rapid iteration on public open source projects that power much of today’s Internet. On the other hand, while they enable the creation of private code repositories for projects not intended to be publicly accessible, often at no cost, they reside on third-party infrastructure which may raise data security, privacy and compliance concerns for businesses and organizations relying on them for internal projects and workflows.
While GitHub and GitLab do offer self-managed on premise or public cloud deployments of their integrated VCS solutions which alleviate some of those concerns, such offerings are geared towards larger enterprises and require more effort to properly configure, deploy and maintain. Furthermore, they often contain proprietary components and require the purchase of licenses to unlock the full range of features, which may be prohibitively costly for small-to-medium businesses.
Enter Gitea - a lightweight, cost-effective, open source VCS solution suitable for small-to-medium businesses released under the MIT license:
Gitea is a lightweight DevOps platform. It brings teams and developers high-efficiency but easy operations from planning to production.
Being fully open source means that unlike GitHub or GitLab, purchasing a license is not required to unlock the full range of features on your self-managed Gitea instance, though they provide an option for purchasing a support plan for businesses requiring a completely hands-free experience.
In the lab to follow, we’ll be deploying our very own Gitea instance to Kubernetes with a single command using Helm and exploring the basics of creating an organization, repository (repo) and pushing a commit containing our source code to the repo with Git.
Lab: Deploying Gitea to Kubernetes
Prerequisites
A basic awareness of software development tools and methodologies, Git and Kubernetes is assumed. If not, consider enrolling in the following self-paced online courses offered by The Linux Foundation on edX at no cost:
- LFD107x: Open Source Software Development: Linux for Developers
- LFD109x: Git for Distributed Software Development
- LFS158x: Introduction to Kubernetes
Setting up your environment
You’ll need a Linux environment with at least 2 vCPUs and 4G of RAM. The reference distribution is Ubuntu 22.04 LTS, though the lab should work on most other Linux distributions as well with little to no modification.
We’ll set up the following tools:
Installing Docker
Docker (hopefully) needs no introduction - simply install it from the system repositories and add yourself to the docker group:
sudo apt update && sudo apt install -y docker.io
sudo usermod -aG docker "${USER}"
Log out and back in for group membership to take effect.
Installing kind
kind is a conformant Kubernetes distribution which runs entirely in Docker and is great for development, testing and educational purposes.
Let’s first create a user-specific directory for storing binaries and add it to our PATH so subsequent installation of software will not require sudo:
mkdir -p "$HOME/.local/bin/"
echo "export PATH=\"\$HOME/.local/bin:\$PATH\"" >> "$HOME/.bashrc"
source "$HOME/.bashrc"
Now fetch kind from upstream and make it executable - we’ll be using version 0.20.0:
wget -qO "$HOME/.local/bin/kind" https://github.com/kubernetes-sigs/kind/releases/download/v0.20.0/kind-linux-amd64
chmod +x "$HOME/.local/bin/kind"
Installing kubectl
kubectl is the official command-line tool for interacting with Kubernetes clusters.
Let’s fetch kubectl from upstream and make it executable - we’ll be using version 1.27.3:
wget -qO "$HOME/.local/bin/kubectl" https://dl.k8s.io/release/v1.27.3/bin/linux/amd64/kubectl
chmod +x "$HOME/.local/bin/kubectl"
You might also find it useful to enable Bash completion for kubectl, which can save you quite a bit of typing:
echo "source <(kubectl completion bash)" >> "$HOME/.bashrc"
source "$HOME/.bashrc"
Care must be taken to match the kubectl (client) version and Kubernetes cluster (server) version - in particular, the client must not fall behind the server by more than 1 minor version. We chose v1.27.3 for our kubectl client since kind v0.20.0 corresponds to Kubernetes version 1.27.3.
Installing Helm
Helm is the official package manager for Kubernetes - it is effectively “orchestration for orchestration”.
Let’s fetch the archive from upstream and move helm to our PATH - we’ll be using version 3.12.2:
wget https://get.helm.sh/helm-v3.12.2-linux-amd64.tar.gz
tar xvf helm-v3.12.2-linux-amd64.tar.gz
mv linux-amd64/helm "$HOME/.local/bin/helm"
rm -rf helm-v3.12.2-linux-amd64.tar.gz linux-amd64/
Verifying everything is installed correctly
Run the following commands to check the version of each tool we just installed:
docker --version
kind --version
kubectl version --client
helm version
Sample output:
Docker version 20.10.21, build 20.10.21-0ubuntu1~22.04.3
kind version 0.20.0
WARNING: This version information is deprecated and will be replaced with the output from kubectl version --short.  Use --output=yaml|json to get the full version.
Client Version: version.Info{Major:"1", Minor:"27", GitVersion:"v1.27.3", GitCommit:"25b4e43193bcda6c7328a6d147b1fb73a33f1598", GitTreeState:"clean", BuildDate:"2023-06-14T09:53:42Z", GoVersion:"go1.20.5", Compiler:"gc", Platform:"linux/amd64"}
Kustomize Version: v5.0.1
version.BuildInfo{Version:"v3.12.2", GitCommit:"1e210a2c8cc5117d1055bfaa5d40f51bbc2e345e", GitTreeState:"clean", GoVersion:"go1.20.5"}
You can safely ignore any warnings printed to the console. As long as there are no errors, you should be good to go :-)
Creating a cluster
Creating a Kubernetes cluster with kind is easy - simply run kind create cluster and optionally give it a name, e.g. gitea-kind:
kind create cluster --name gitea-kind
Wait a minute or two, then query the status of the cluster:
kubectl get no
Sample output:
NAME                       STATUS   ROLES           AGE   VERSION
gitea-kind-control-plane   Ready    control-plane   22s   v1.27.3
Once you see a status of “Ready” as shown above then you’re good to go :-)
Deploying Gitea to the cluster
We’ll deploy Gitea to our Kubernetes cluster with a single command using Helm. It’s simple, fast, automated and allows us to leverage the various benefits of Kubernetes such as the ease of setting up high availability and scale horizontally as needed.
First go to Artifact Hub and search for “gitea”:
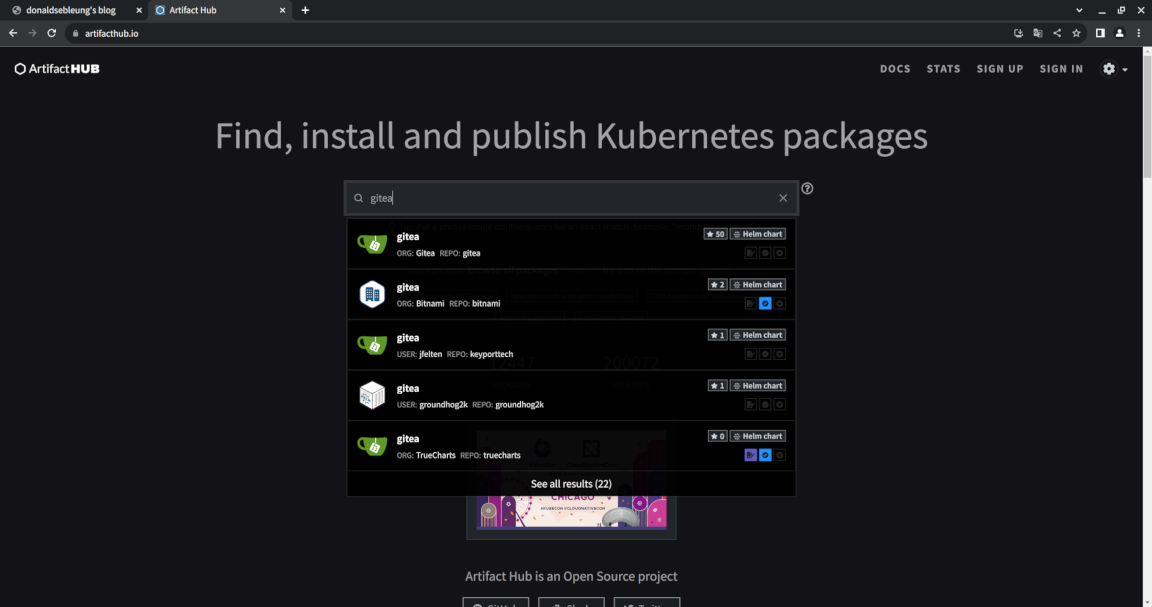
Let’s select the first option as it appears to be the official chart:
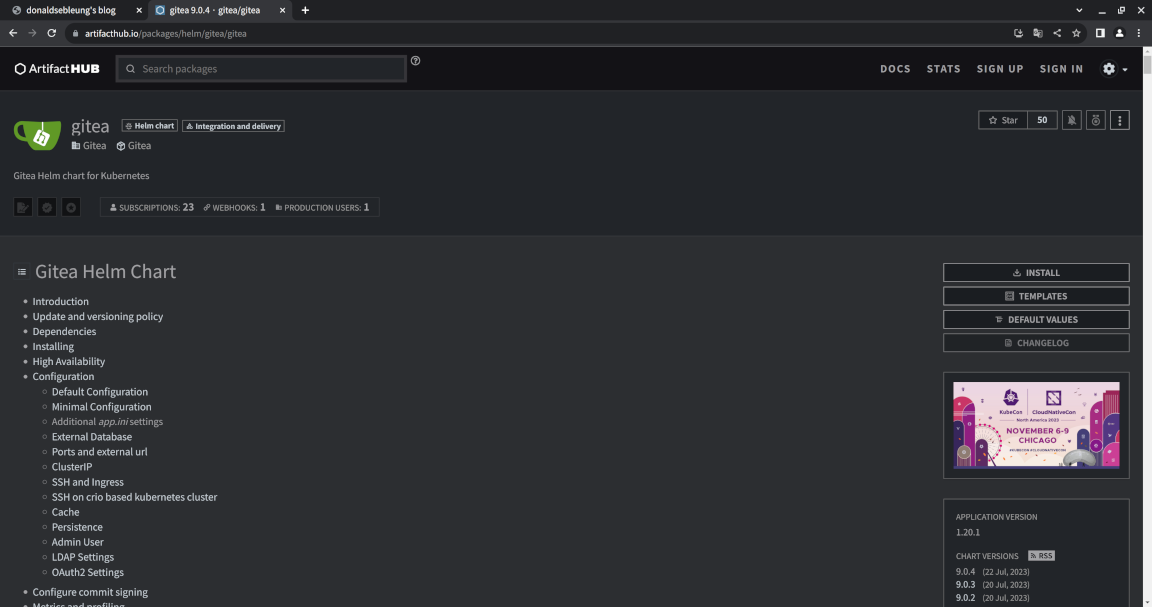
Feel free to take the time to read through the chart description. Now add the chart repository and trigger an update to fetch the latest metadata:
helm repo add gitea https://dl.gitea.io/charts
helm repo update
Sample output:
"gitea" has been added to your repositories
Hang tight while we grab the latest from your chart repositories...
...Successfully got an update from the "gitea" chart repository
Update Complete. ⎈Happy Helming!⎈
We’ll now deploy Gitea to the gitea namespace in our cluster. To ensure we get a usable instance on the get-go, we’ll need to create an admin user and work around an issue where Gitea submits a write request to a read-only PostgreSQL instance by disabling high availability (HA) for PostgreSQL - this is done by specifying the following chart values:
gitea.admin.username: giteagitea.admin.password: giteapostgresql-ha.enabled: falsepostgresql.enabled: true
For this simple case, we can specify the chart values directly on the command line, though for proper customization, you’ll probably want to download the chart instead and edit the appropriate templates and YAML files before deploying the modified chart to your cluster:
helm -n gitea install my-gitea gitea/gitea \
    --version 9.0.4 \
    --create-namespace \
    --set gitea.admin.username=gitea \
    --set gitea.admin.password=gitea \
    --set postgresql-ha.enabled=false \
    --set postgresql.enabled=true
Sample output:
NAME: my-gitea
LAST DEPLOYED: Thu Jul 27 14:44:42 2023
NAMESPACE: gitea
STATUS: deployed
REVISION: 1
NOTES:
1. Get the application URL by running these commands:
  echo "Visit http://127.0.0.1:3000 to use your application"
  kubectl --namespace gitea port-forward svc/my-gitea-http 3000:3000
Wait a few minutes for our instance to stabilize, then query its status and confirm that everything is ready:
kubectl -n gitea get svc,deploy,po
Sample output:
NAME                                      TYPE        CLUSTER-IP     EXTERNAL-IP   PORT(S)              AGE
service/my-gitea-http                     ClusterIP   None           <none>        3000/TCP             4m28s
service/my-gitea-postgresql               ClusterIP   10.96.108.54   <none>        5432/TCP             4m28s
service/my-gitea-postgresql-hl            ClusterIP   None           <none>        5432/TCP             4m28s
service/my-gitea-redis-cluster            ClusterIP   10.96.203.95   <none>        6379/TCP             4m28s
service/my-gitea-redis-cluster-headless   ClusterIP   None           <none>        6379/TCP,16379/TCP   4m28s
service/my-gitea-ssh                      ClusterIP   None           <none>        22/TCP               4m28s

NAME                       READY   UP-TO-DATE   AVAILABLE   AGE
deployment.apps/my-gitea   1/1     1            1           4m28s

NAME                            READY   STATUS    RESTARTS        AGE
pod/my-gitea-5b8f845c56-njmmj   1/1     Running   0               4m28s
pod/my-gitea-postgresql-0       1/1     Running   0               4m28s
pod/my-gitea-redis-cluster-0    1/1     Running   2 (3m33s ago)   4m28s
pod/my-gitea-redis-cluster-1    1/1     Running   2 (3m33s ago)   4m28s
pod/my-gitea-redis-cluster-2    1/1     Running   0               4m28s
pod/my-gitea-redis-cluster-3    1/1     Running   3 (3m9s ago)    4m28s
pod/my-gitea-redis-cluster-4    1/1     Running   2 (3m20s ago)   4m28s
pod/my-gitea-redis-cluster-5    1/1     Running   2 (3m13s ago)   4m28s
Now expose our web interface with kubectl port-forward:
kubectl -n gitea port-forward svc/my-gitea-http --address 0.0.0.0 3000:3000 >& /dev/null &
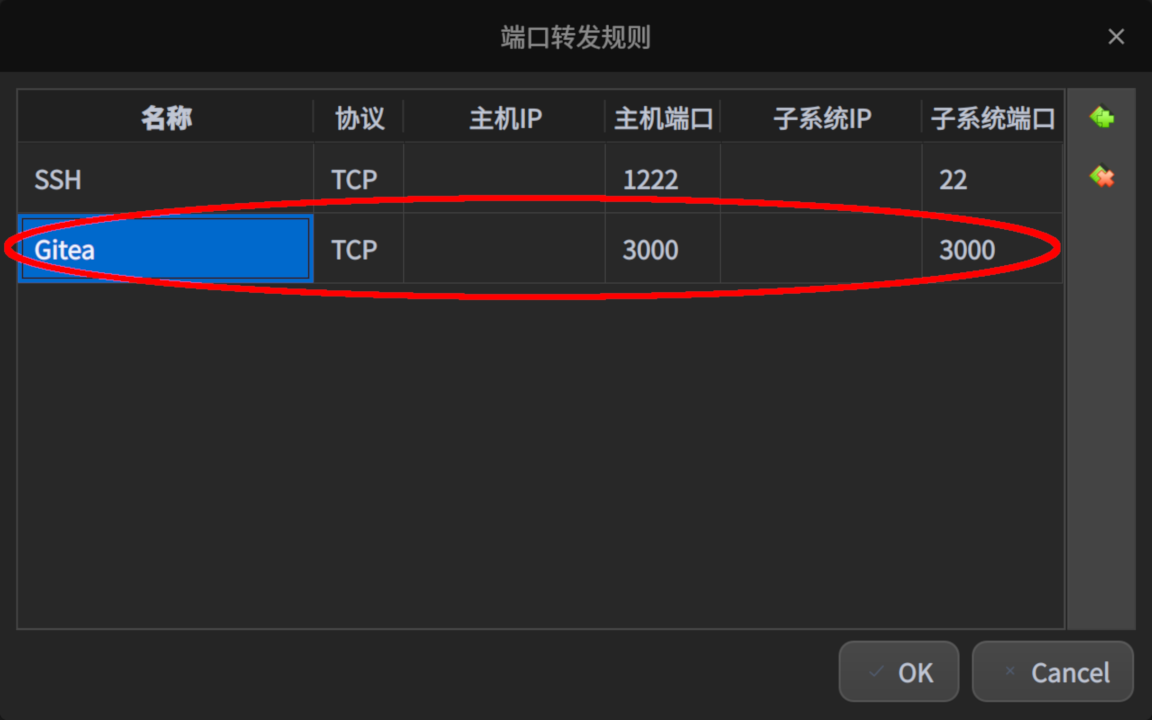
If you’re running your Linux environment in VirtualBox with the default NAT networking mode as I am, you’ll probably need to configure port forwarding in VirtualBox as well to expose the web interface to the host so it can be opened directly in your web browser:
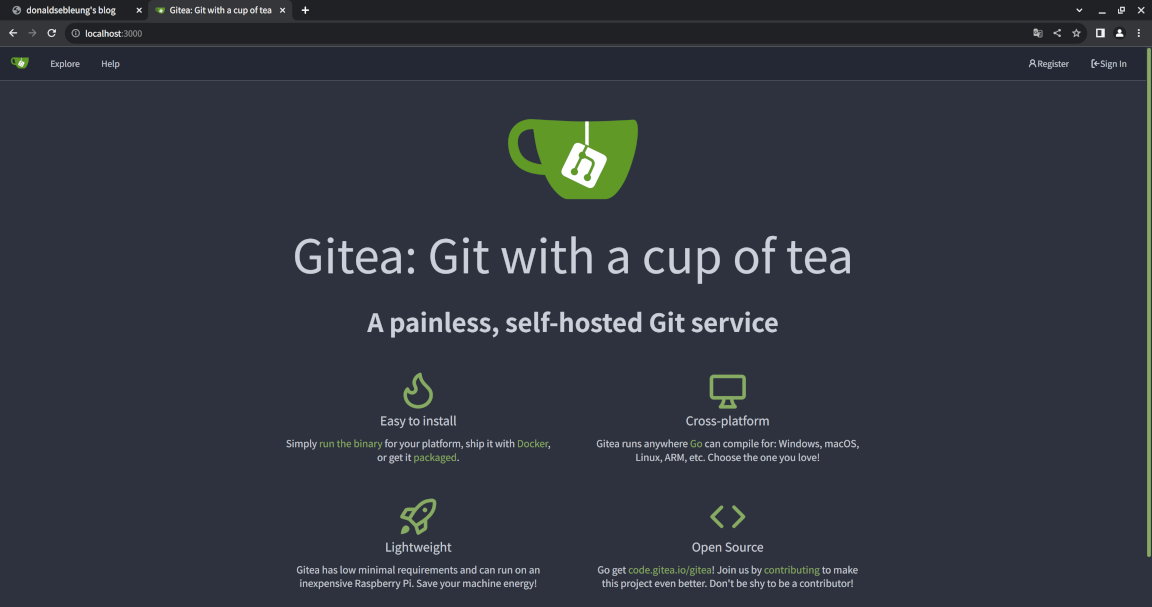
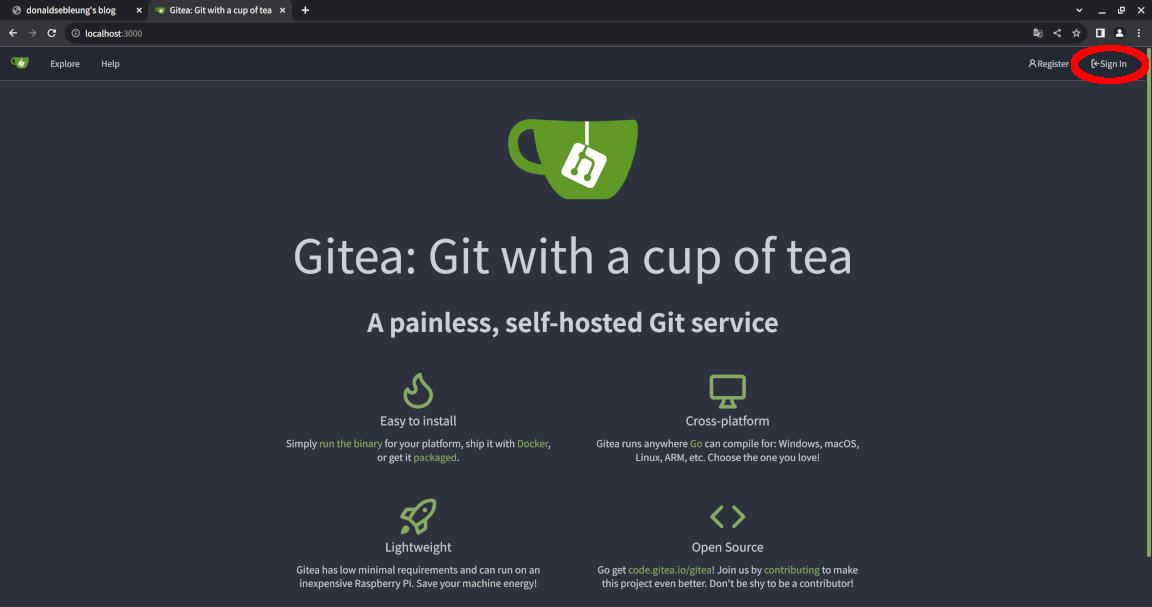
Now navigate to http://localhost:3000/ - if everything is working as expected, you should see the landing page of your local Gitea instance:
Creating your first Gitea organization and repository
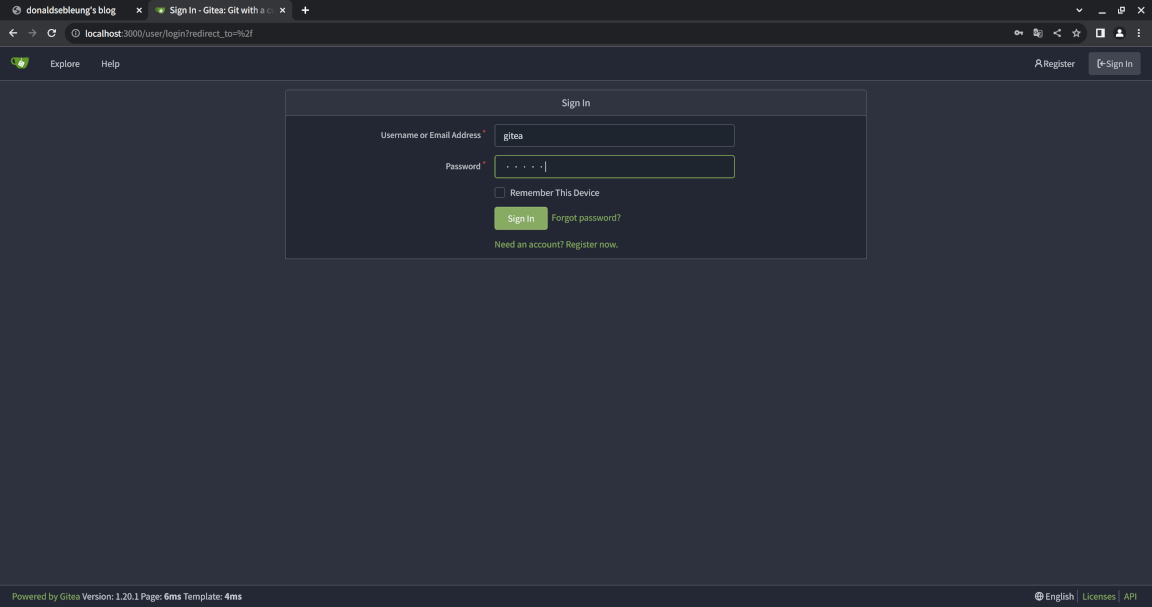
Let’s log in to our Gitea instance as the admin user. The username and password should both be gitea, or whatever you specified on the command line when deploying the chart.
You’ll see a rather empty-looking page - that’s because we haven’t yet any activity.
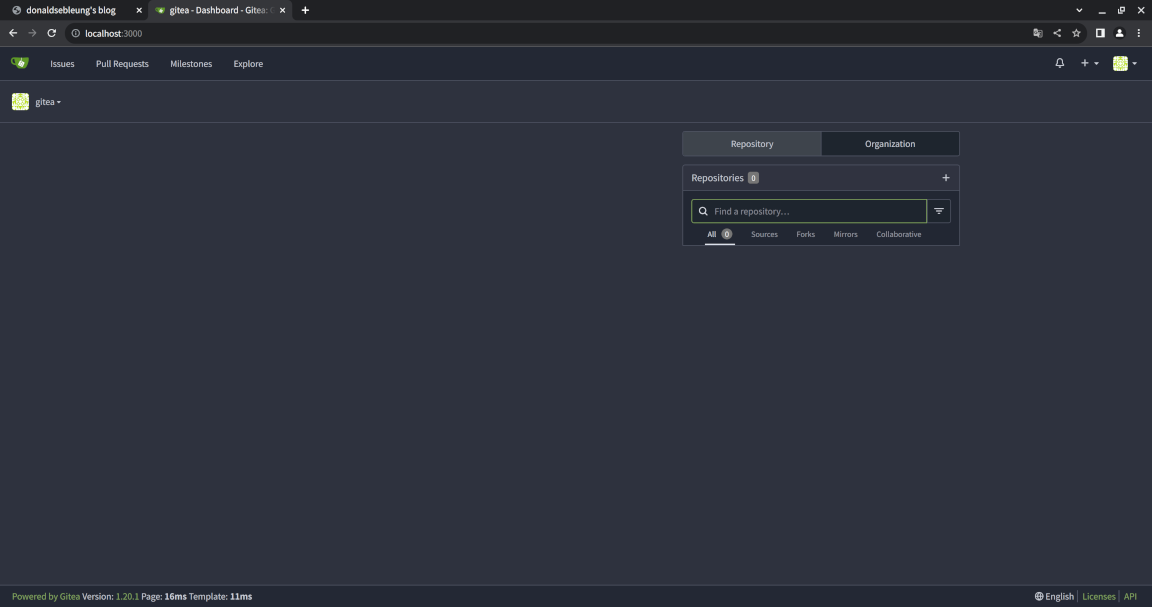
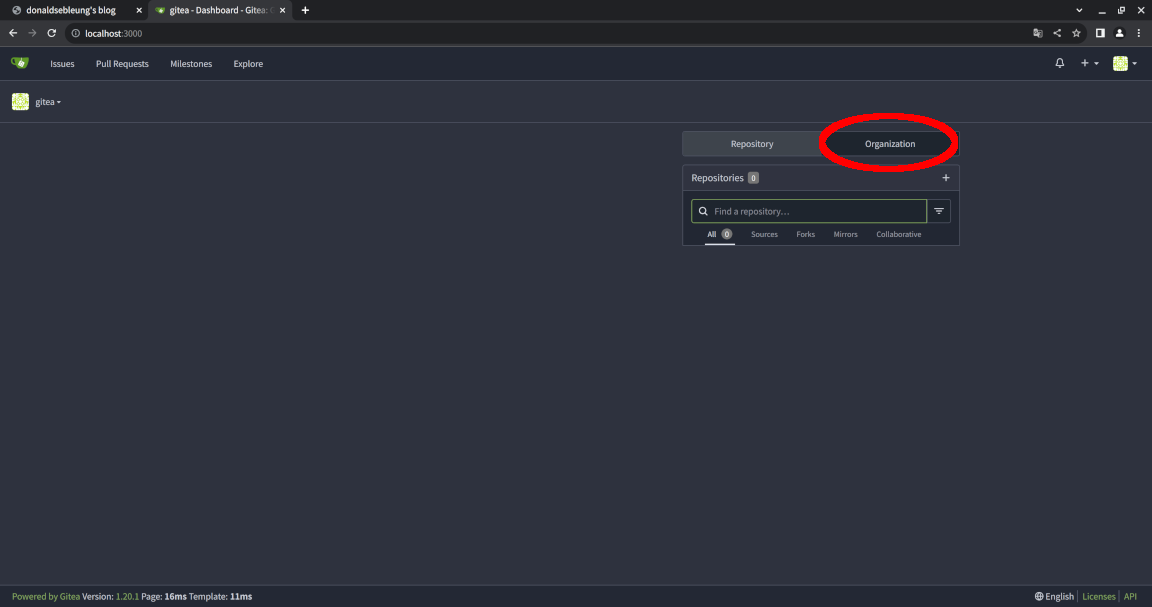
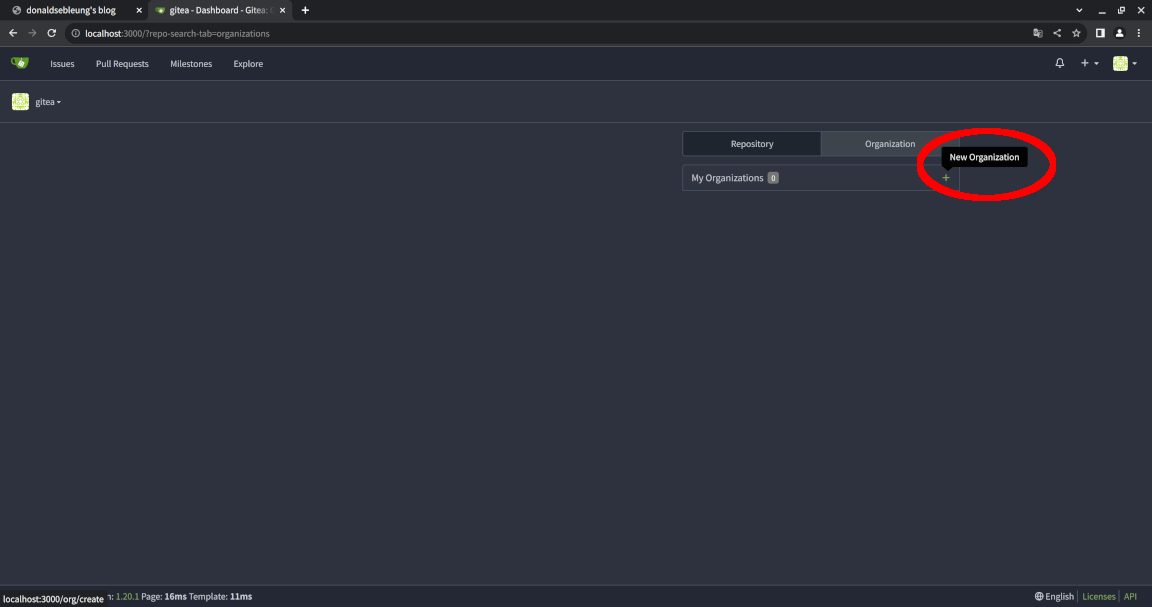
Notice to the right that we have “Repository” and “Organization”. Repositories (repos) contain the entire history of “point in time” snapshots (commits) of the source code pertaining to an independent software component or program, while organizations are typically used to group together a collection of related repositories into a large-scale software project or administrative umbrella.
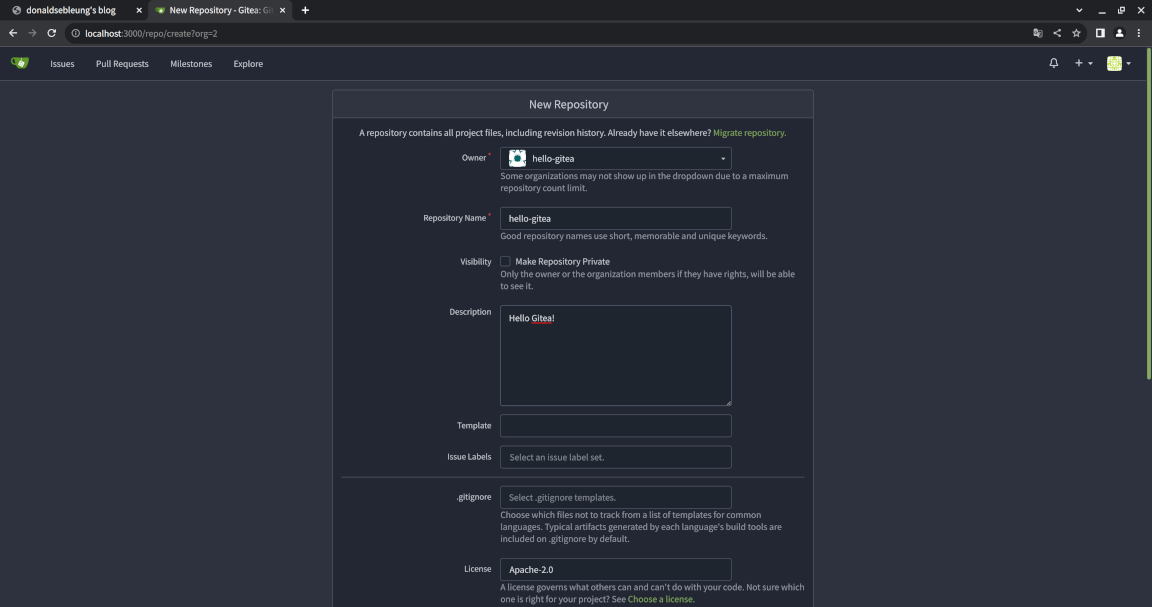
We’ll be creating an organization and our first repository under that organization, though note that repositories can definitely exist outside of organizations as long as they are tied to a specific user. Let’s name them both hello-gitea :-)
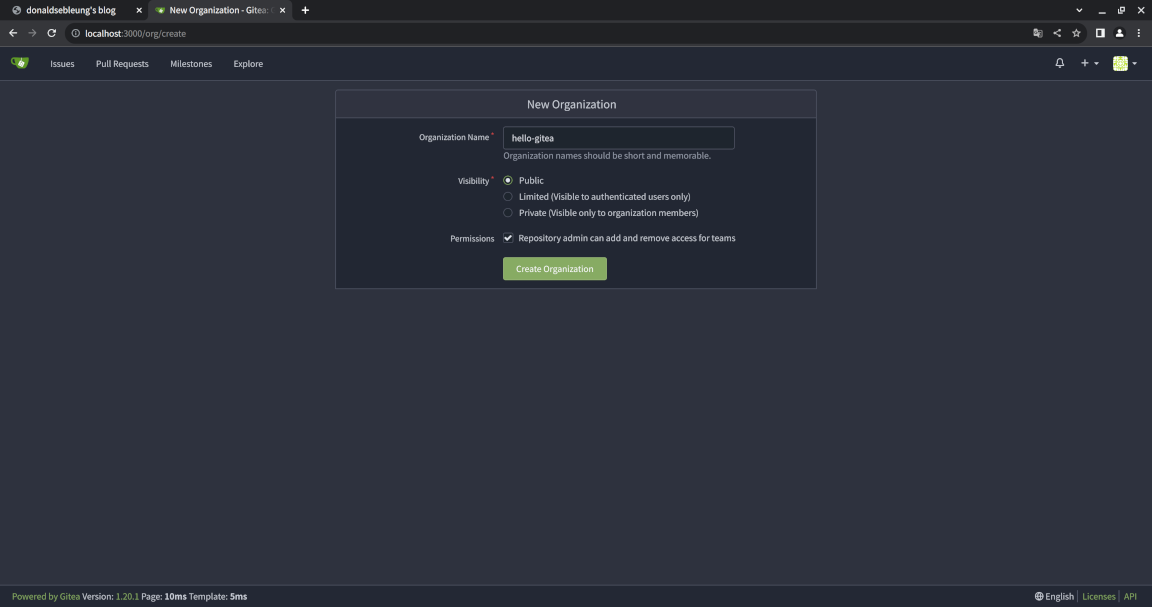
When creating the repository, you can optionally specify an open source license to adopt for the project - I’ve chosen Apache 2.0 in this example which is a commonly used permissive open source license.
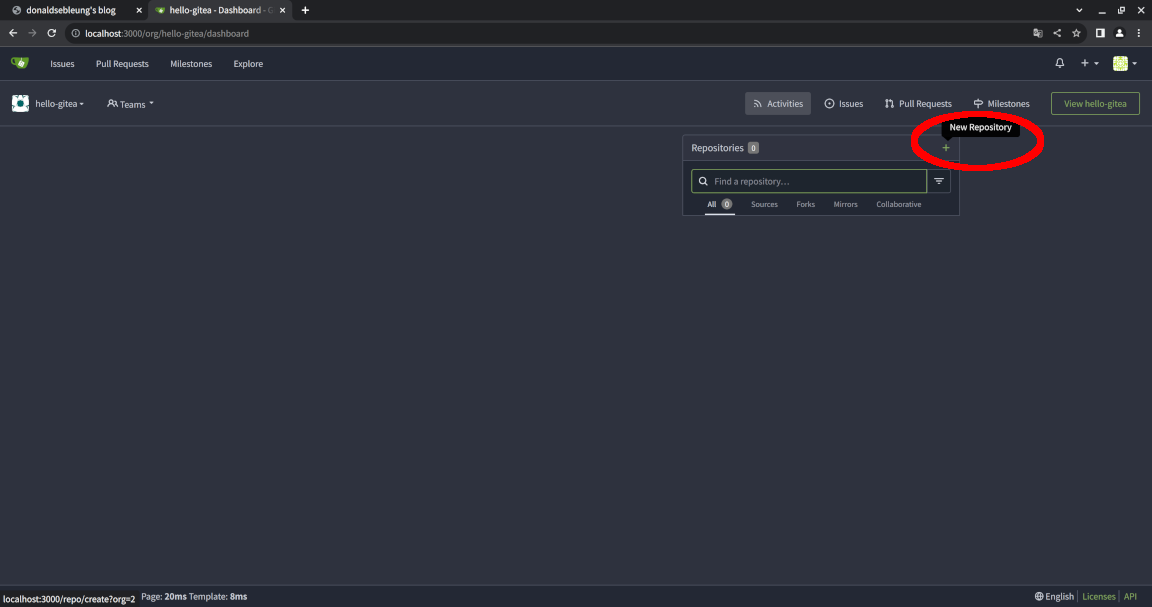
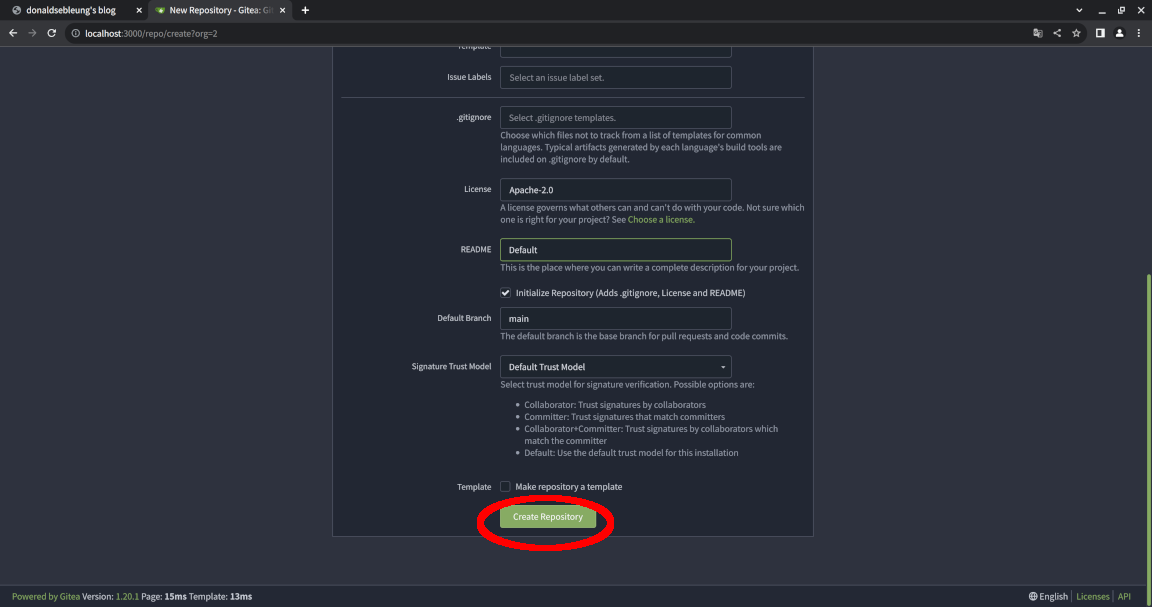
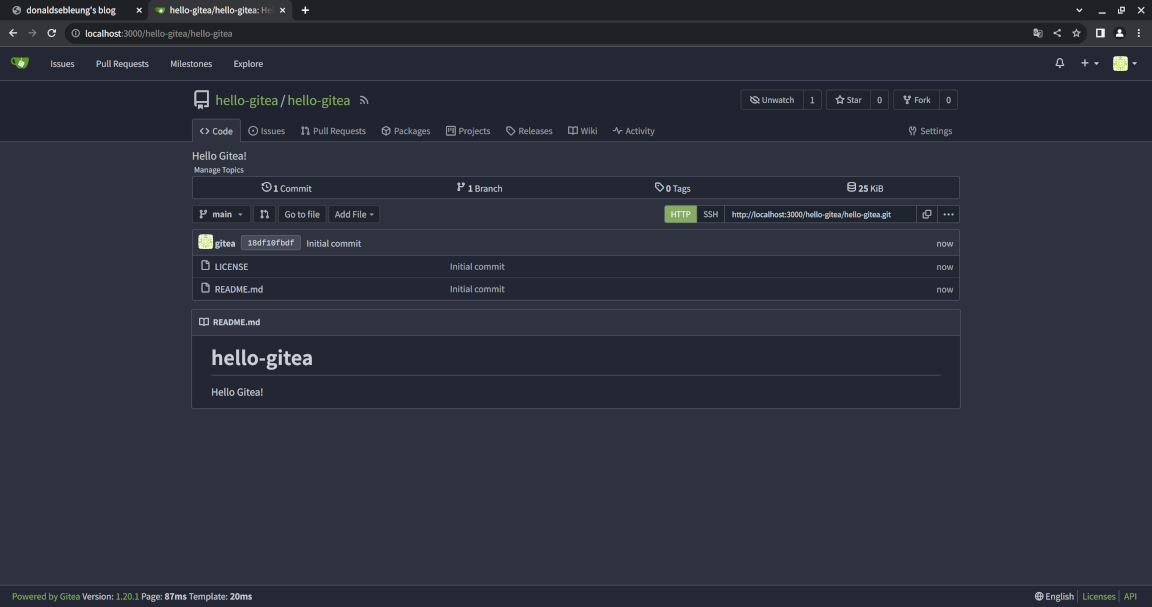
Congratulations - you’ve created your first organization and repo within your local Gitea instance!
Cloning the repo locally and pushing your first (second) Git commit
Now that we have a repo, let’s clone it locally via the command line with Git, write some code, commit our changes and push the changes back to the upstream repo as our “first” commit, though technically this is our second commit to the repo since the first commit was automatically created when we created the repository itself.
git clone http://localhost:3000/hello-gitea/hello-gitea.git
Notice the .git at the end of the URL; it’s actually optional and we could have specified http://localhost:3000/hello-gitea/hello-gitea for the URL instead but the suffix reminds us that this is a Git repository.
Let’s navigate to the project root of the cloned repository:
pushd hello-gitea/
Now let’s write a webpage which just shows “Hello Gitea!” in a large, top-level heading:
cat > index.html << EOF
<!DOCTYPE HTML>
<html>
  <head>
    <meta charset="utf-8" />
    <title>Hello Gitea!</title>
  </head>
  <body>
    <h1>Hello Gitea!</h1>
  </body>
</html>
EOF
View the changes to be staged:
git status
Sample output:
On branch main
Your branch is up to date with 'origin/main'.

Untracked files:
  (use "git add <file>..." to include in what will be committed)
        index.html

nothing added to commit but untracked files present (use "git add" to track)
Stage our newly added index.html file to the list of changes to be committed to our repository:
git add index.html
View the status again and notice how it has changed:
git status
Sample output:
On branch main
Your branch is up to date with 'origin/main'.

Changes to be committed:
  (use "git restore --staged <file>..." to unstage)
        new file:   index.html
Before we actually commit the changes, configure Git so it knows our username and email address - let’s just use gitea and gitea@local.domain respectively, though feel free to change them as desired:
git config --global user.name "gitea"
git config --global user.email "gitea@local.domain"
Now commit the changes to our local copy of the repo. We’ll need to provide a message to go with the commit - let’s keep it short and simple, something like “Add index.html”:
git commit -m "Add index.html"
Sample output:
[main c17e479] Add index.html
 1 file changed, 10 insertions(+)
 create mode 100644 index.html
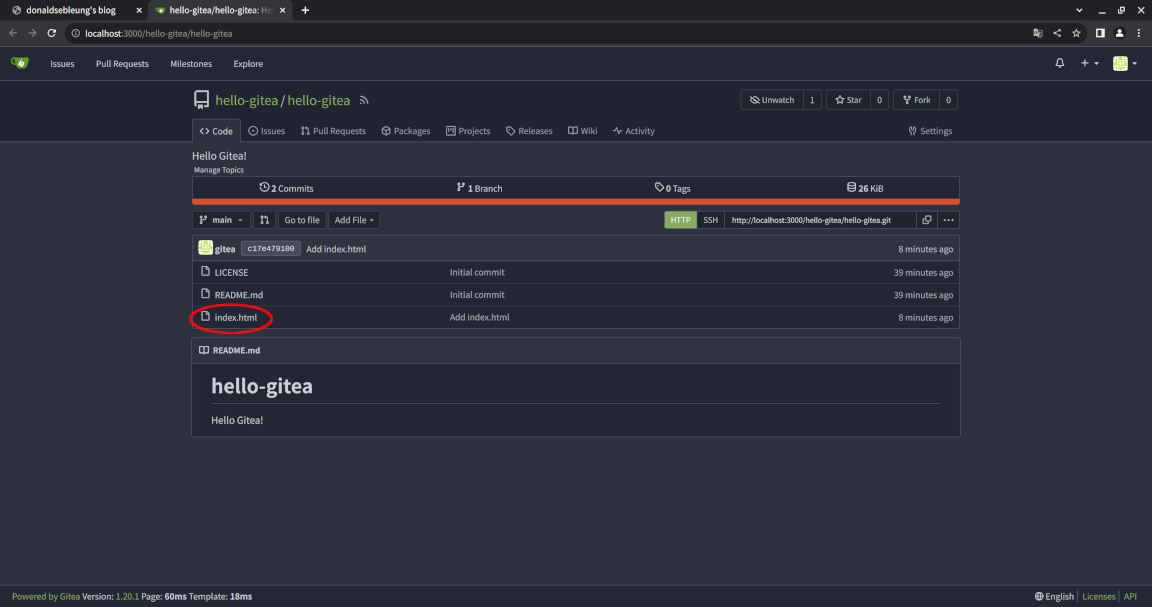
If you refresh the page at http://localhost:3000/hello-gitea/hello-gitea, notice how our index.html webpage hasn’t shown up yet. That’s because we haven’t pushed the changes from our local copy of the repo back to the upstream repo.
We’ll do just that right now - enter the admin username and password as prompted:
git push
Sample output:
Username for 'http://localhost:3000': gitea
Password for 'http://gitea@localhost:3000':
Enumerating objects: 4, done.
Counting objects: 100% (4/4), done.
Delta compression using up to 2 threads
Compressing objects: 100% (3/3), done.
Writing objects: 100% (3/3), 411 bytes | 411.00 KiB/s, done.
Total 3 (delta 0), reused 0 (delta 0), pack-reused 0
remote: . Processing 1 references
remote: Processed 1 references in total
To http://localhost:3000/hello-gitea/hello-gitea.git
   18df10f..c17e479  main -> main
Refresh the page and voila - our index.html webpage now appears in the upstream repository!
Let’s navigate out of the project root and feel free to delete our local copy of the repo as we won’t be needing it afterwards:
popd
rm -rf hello-gitea/
Concluding remarks and going further
We’ve seen how Gitea can be deployed to Kubernetes with a single command using Helm and how it could address data security, privacy and compliance concerns of small-to-medium businesses by enabling teams to collaborate on projects and repositories locally without relying on a third-party service such as GitHub.
While we’ve seen the basic usage of Gitea - how to create an organization, repository and commit code to that repository, there remains a ton of features we haven’t yet covered:
- Multi-user collaboration using Issues and Pull Requests
- Versioning and release management with tags and packages
- Project management and documentation using the Projects board and Wiki
- Creating a CI/CD pipeline for DevOps workflows with Gitea Actions (disabled by default, needs to be explicitly enabled at chart installation time)
… and much more.
I hope you enjoyed this article and stay tuned for more content ;-)
Subscribe:
![]()
![]()
![[Valid RSS]](/assets/images/valid-rss-rogers.png)
![[Valid Atom 1.0]](/assets/images/valid-atom.png)