Configuring a simple router with OpenBSD
Date: 2023-09-12
OpenBSD is a security-first Unix-like operating system belonging to the BSD family of operating systems. It is best known for the OpenSSH project founded in 1999 under the OpenBSD umbrella which has garnered widespread adoption beyond OpenBSD, including the infamous Linux operating system and even Microsoft Windows (since Windows 10).
While industrial adoption of OpenBSD is nowhere near as prevalent as Linux, it is nonetheless well-suited for use in self-managed firewalls and routers for individual technical enthusiasts and small to medium businesses alike, where product warranty, commercial support and compliance is not a major issue. Furthermore, unlike the industrial behemoth that Linux has become, OpenBSD has remained true to the Unix philosophy over the years which emphasizes the principle:
Do one thing, and do it well.
This is reflected in the overall lean, coherent design of the OpenBSD operating system featuring short, succint commands and configuration files that concisely perform their intended function with minimal syntactical and cognitive overhead, which makes it an arguably better choice than Linux for learning the basics of computer networking and security.
In the lab to follow, we will configure OpenBSD as a router for forwarding requests to the Internet and expose a traditional LAMP server to external clients via port forwarding with NAT. Don’t worry, no additional hardware equipment and setup is required - all you need for this lab is a laptop or workstation capable of running VirtualBox :-)
Lab: Modeling a simple network with a single LAMP server and router
Here’s a simple illustration of the network we’ll be building, with a web server placed behind a router:

Prerequisites
Familiarity with the Unix/Linux command line is assumed. If not, consider enrolling in LFS101x: Introduction to Linux which is offered by The Linux Foundation on edX at no cost.
A basic theoretical understanding of computer networking and communications is assumed. If not, consider studying an undergraduate-level textbook on the subject matter such as Computer Networking: A Top-Down Approach.
Last but not least, you should also be familiar with the concept of virtual machines and ideally experience in using a consumer-grade hypervisor such as VirtualBox.
System requirements
A laptop or workstation capable of running VirtualBox with hardware virtualization enabled, at least 2 CPU cores and 8G of RAM, though 16G+ of RAM is preferable.
It is assumed VirtualBox is already installed - if not, go ahead to download and install it.
Setting up our virtual router with OpenBSD
The latest stable version of OpenBSD at the time of writing is 7.3. Visit the downloads page and select install73.iso for the amd64 architecture.
Now create a new virtual machine with install73.iso for the installation disk and name it openbsd or any other name as desired. Feel free to leave the other settings at their defaults - 1024MB RAM, 1 vCPU and 16G of storage should suffice.
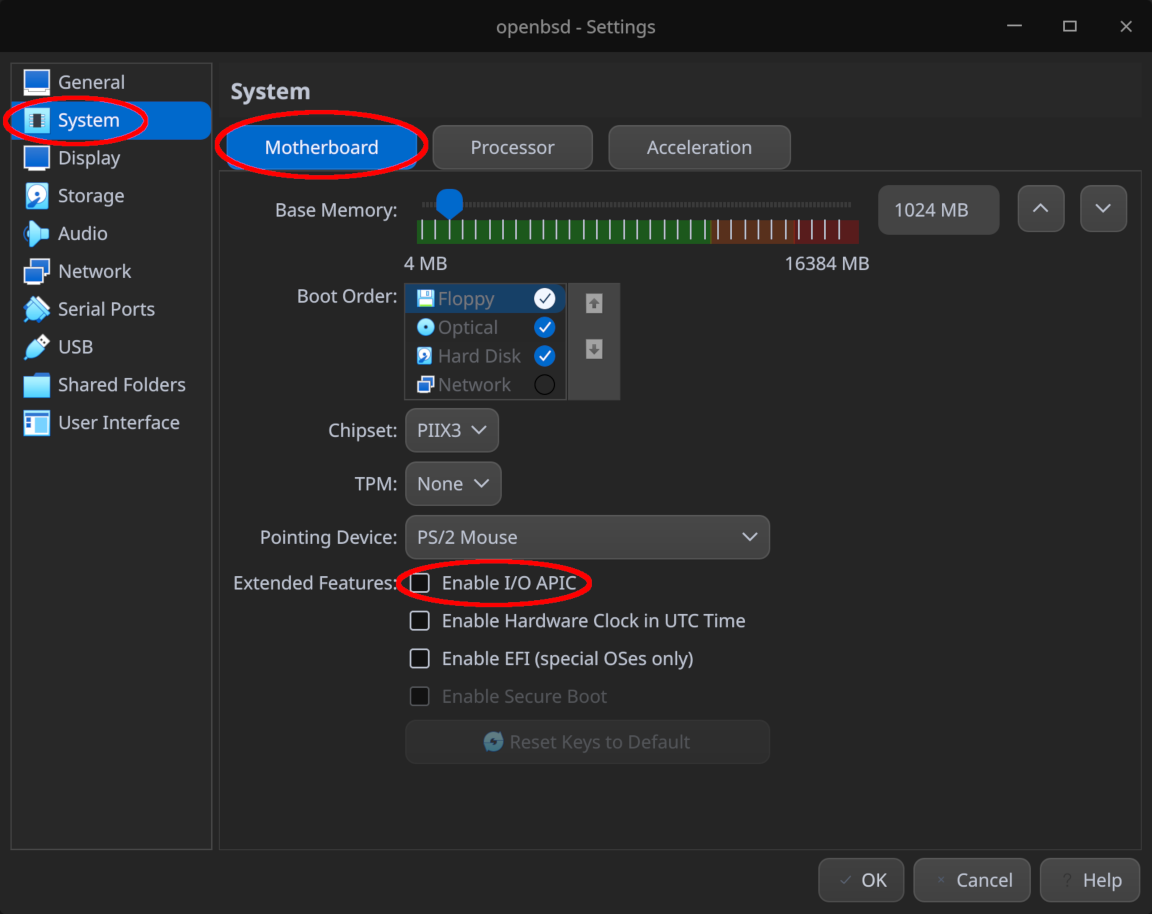
Before booting our virtual machine for the first time, go to the Settings page for this virtual machine and change the settings below:
- Ensure the “Enable I/O APIC” option is unchecked under “System > Motherboard” as leaving this option checked is known to cause kernel panics on OpenBSD
- Under “Network > Adapter 2”, ensure the second network adapter is enabled and attached to “Internal Network”, leaving the network name as the default “intnet”
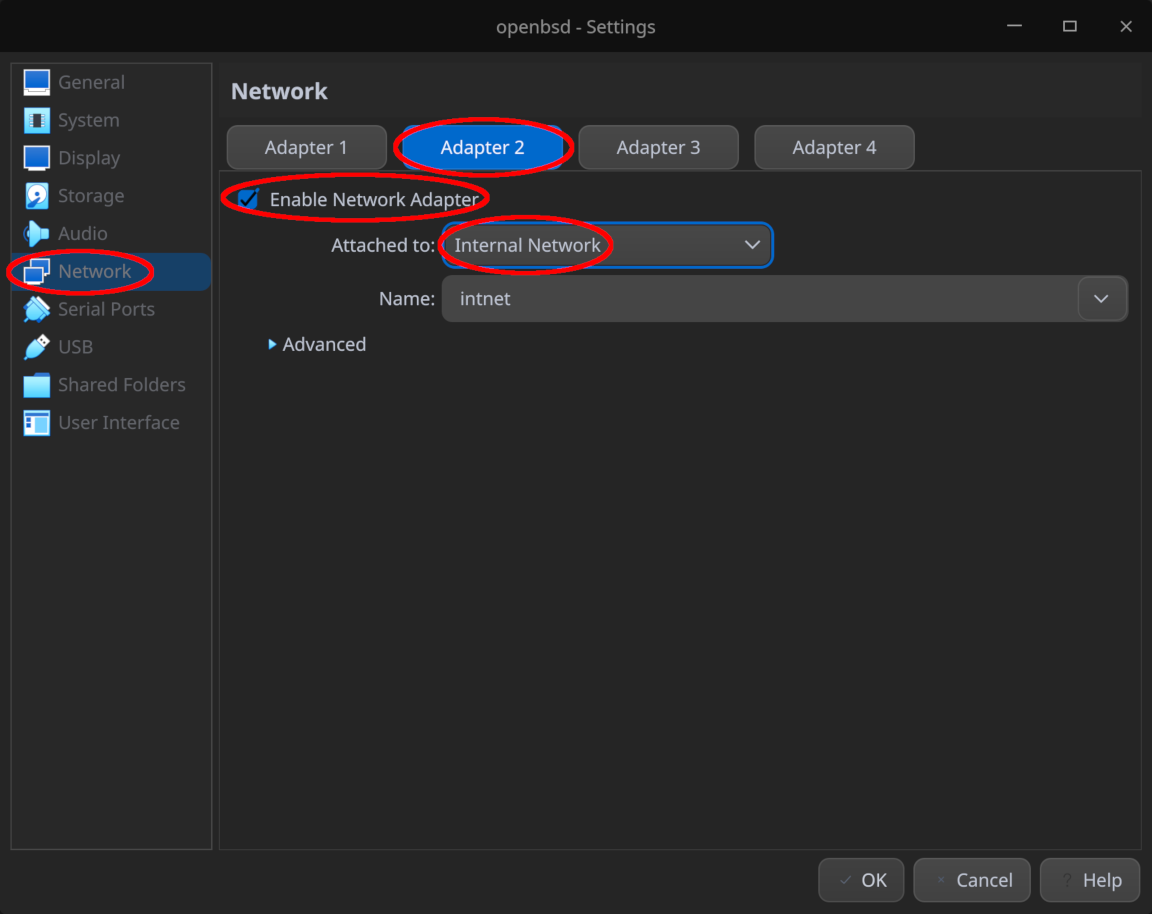
Remember to click “OK” at the bottom of the window to save your changes once the configuration is complete.
Now boot the virtual machine and follow the prompts to install OpenBSD, accepting the default options unless otherwise specified. Some options to take note of:
- Network interface
em0corresponds to “Adapter 1” andem1to “Adapter 2” under the “Network” section in the virtual machine settings. As per our simplified network diagram above, sinceem0is connected to the “external” network andem1to the internal network “intnet”, setem0‘s IP address to10.0.2.15andem1‘s IP address to192.168.100.1, both with a default netmask of255.255.255.0. Leave their IPv6 addresses blank and accept the default symbolic host name forem1 - Set the default route to
10.0.2.2- see User Networking (SLIRP) for a detailed explanation - Set the DNS nameserver to
8.8.8.8- this IP address corresponds to Google DNS - Answer “no” when prompted to run the X Window system since we won’t be needing a graphical interface
- You may wish to enable root SSH login for convenience in this demo, though note that this shouldn’t be enabled in production
- When reminded that “directory does not contain
SHA256.sig”, answer “yes” to continue without verification. While not the most secure option, it shouldn’t be a major issue for the purposes of this demo
Once prompted to reboot in order to finish the installation, remember to “Remove Disk from Virtual Drive” under the “Storage” section within the VM settings as shown in the screenshot below bebore proceeding with the reboot.

After the reboot, optionally configure port forwarding to forward SSH (TCP port 22) from your OpenBSD router to your local laptop / workstation for a more convenient command-line experience. You may also wish to boot the router in headless mode if connecting via SSH so VirtualBox doesn’t open a new window for the VM every time it boots.
Installing Ubuntu for our web server
Create a VM for installing Ubuntu as usual, though keep note of the following:
- Install the server edition since we won’t be needing a desktop environment
- Make sure to skip the unattended installation which is known to fail and cause issues
- Allocating 1024MB of RAM and 1 vCPU should suffice, or leave them at their defaults
- 16G of storage should suffice, or leave it at the default
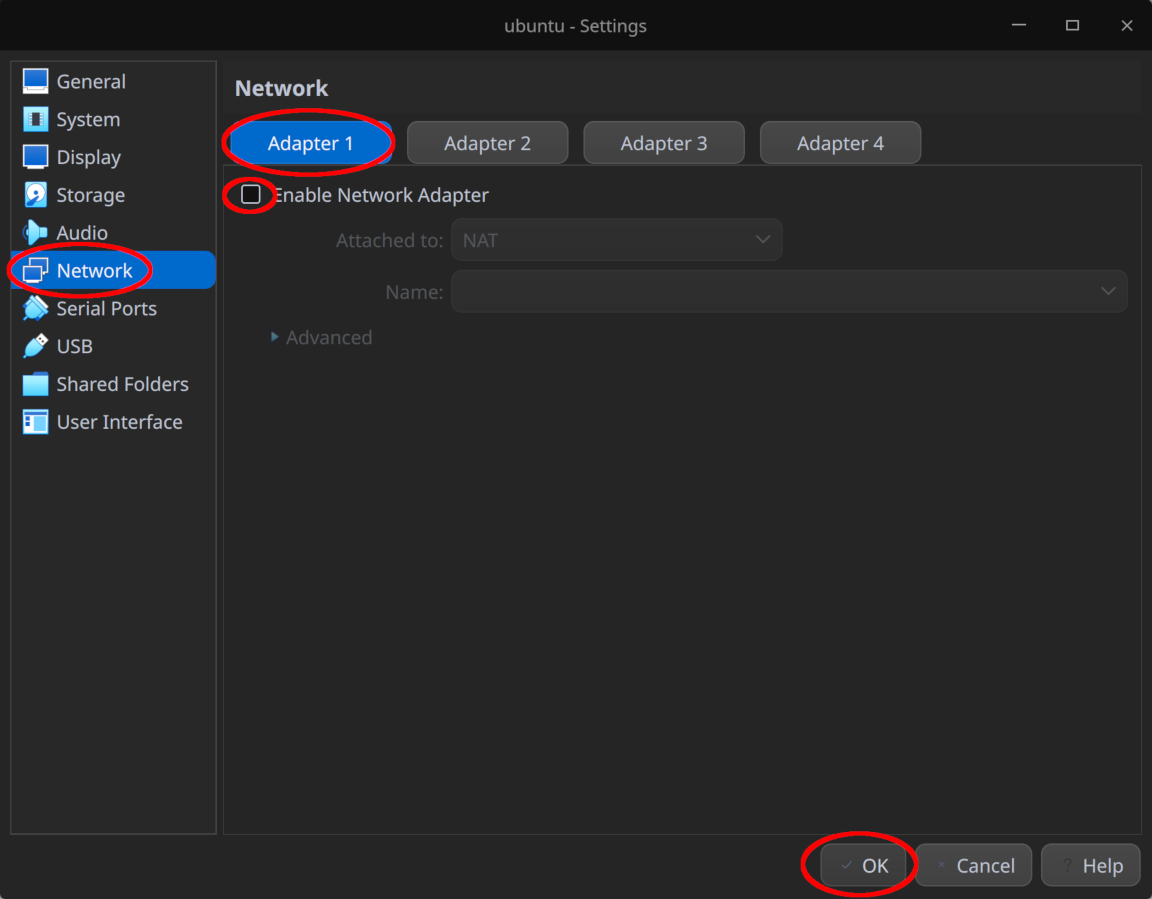
- Under “Settings > Network”, disable “Adapter 1” as shown in the screenshot below - we’ll configure the network adapter separately and enable Internet access after the installation
- During the OS installation, make sure “Install OpenSSH server” is selected so we can later start our web server in headless mode and configure it remotely via SSH
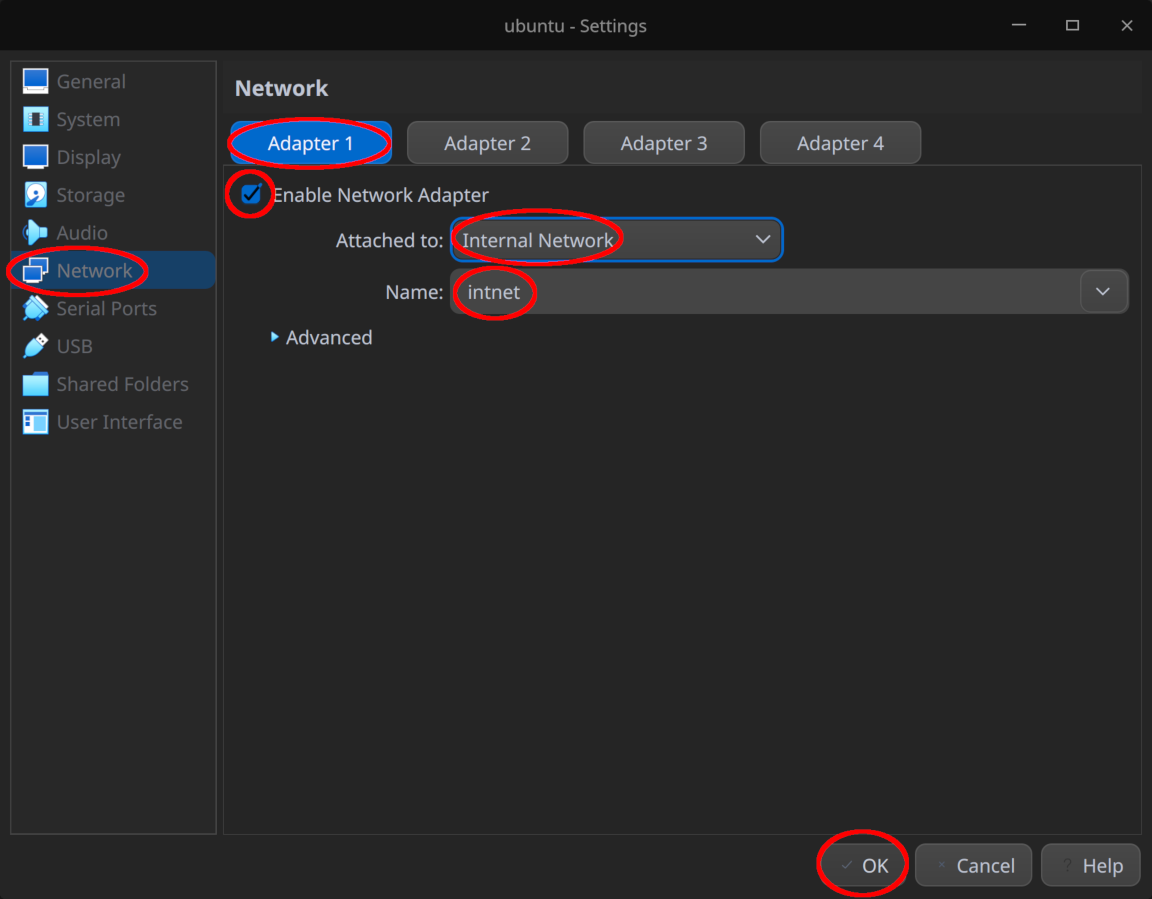
Once the installation is complete, shut down the VM and re-enable “Adapter 1” under “Settings > Network”, attaching it to “Internal Network” and leaving the name as the default intnet.
Now boot the VM normally (note that SSH is not usable yet), log in to the console and fill in /etc/netplan/00-installer-config.yaml with the following content:
network:
  version: 2
  ethernets:
    enp0s3:
      dhcp4: no
      addresses:
      - 192.168.100.2/24
      gateway4: 192.168.100.1
      nameservers:
        addresses:
        - 8.8.8.8
        - 8.8.4.4
This sets the IP address of our web server to 192.168.100.2 with our router 192.168.100.1 as the gateway and Google DNS for the nameservers.
Save the file and exit, then apply the changes with the following command:
sudo netplan apply
You may see a few warnings - as long as there are no errors, you should be fine :-)
Testing initial network connectivity for our web server and router
Now ensure both our Ubuntu web server and OpenBSD router are up and running, then proceed to log in to the OpenBSD router as the root user.
Confirm that our OpenBSD router is able to reach the Internet:
ping -c4 google.com
Sample output:
PING google.com (142.250.204.46): 56 data bytes
64 bytes from 142.250.204.46: icmp_seq=0 ttl=254 time=4.935 ms
64 bytes from 142.250.204.46: icmp_seq=1 ttl=254 time=6.977 ms
64 bytes from 142.250.204.46: icmp_seq=2 ttl=254 time=7.116 ms
64 bytes from 142.250.204.46: icmp_seq=3 ttl=254 time=7.138 ms

--- google.com ping statistics ---
4 packets transmitted, 4 packets received, 0.0% packet loss
round-trip min/avg/max/std-dev = 4.935/6.541/7.138/0.930 ms
Confirm also that our router is able to reach the web server:
ping -c4 192.168.100.2
Sample output:
PING 192.168.100.2 (192.168.100.2): 56 data bytes
64 bytes from 192.168.100.2: icmp_seq=0 ttl=64 time=0.489 ms
64 bytes from 192.168.100.2: icmp_seq=1 ttl=64 time=1.020 ms
64 bytes from 192.168.100.2: icmp_seq=2 ttl=64 time=0.915 ms
64 bytes from 192.168.100.2: icmp_seq=3 ttl=64 time=0.956 ms

--- 192.168.100.2 ping statistics ---
4 packets transmitted, 4 packets received, 0.0% packet loss
round-trip min/avg/max/std-dev = 0.489/0.845/1.020/0.209 ms
Now assume the user you created on the web server is named student. SSH into the web server via our router - replace the placeholder student as appropriate:
ssh student@192.168.100.2
Assuming the SSH login was successful, you should now see the shell prompt change to that of the web server.
Inside our web server, ping the internal IP address of our router 192.168.100.1 to confirm once more that it is reachable from our web server (though technically logging in from our router via SSH already proves that):
ping -c4 192.168.100.1
Sample output:
PING 192.168.100.1 (192.168.100.1) 56(84) bytes of data.
64 bytes from 192.168.100.1: icmp_seq=1 ttl=255 time=0.124 ms
64 bytes from 192.168.100.1: icmp_seq=2 ttl=255 time=0.268 ms
64 bytes from 192.168.100.1: icmp_seq=3 ttl=255 time=0.282 ms
64 bytes from 192.168.100.1: icmp_seq=4 ttl=255 time=0.609 ms

--- 192.168.100.1 ping statistics ---
4 packets transmitted, 4 received, 0% packet loss, time 3057ms
rtt min/avg/max/mdev = 0.124/0.320/0.609/0.177 ms
However, note that our web server currently has no Internet connectivity:
ping -c4 google.com
Sample output:
ping: google.com: Temporary failure in name resolution
Don’t worry - we’re going to change that in a moment ;-)
Enabling Internet connectivity for our web server
Our web server can’t reach the Internet since our router is not configured to forward traffic from our internal network to the Internet by default, so we just need to configure our router accordingly.
OpenBSD comes with a packet filter PF built into the kernel for the purposes of network routing, firewalls, network address translation (NAT), etc., which can be queried and configured via the pfctl command-line utility. For those familiar with the Linux networking stack, it’s essentially OpenBSD’s equivalent to iptables / nftables.
Take some time to go through the official PF introduction before we proceed.
Now set the kernel parameter net.inet.ip.forwarding to 1 and persist it on system boot so our router is able to forward any packets at all:
sysctl net.inet.ip.forwarding=1
echo 'net.inet.ip.forwarding=1' >> /etc/sysctl.conf
Next, log in to our router and append the following line to /etc/pf.conf, the main configuration file for PF:
pass out on em0 inet from 192.168.100.0/24 to any nat-to 10.0.2.15
Hint: the vi editor is available by default on OpenBSD
This line instructs PF to forward all requests from our internal network 192.168.100.0/24 through our router’s external interface em0, replacing the source IP address with our router’s external IP address 10.0.2.15 via NAT, regardless of the destination.
Now instruct PF to re-read our configuration file:
pfctl -f /etc/pf.conf
Back to our web server, notice that it is now able to connect to the Internet:
ping -c4 google.com
Sample output:
PING google.com (142.251.220.110) 56(84) bytes of data.
64 bytes from hkg07s52-in-f14.1e100.net (142.251.220.110): icmp_seq=1 ttl=55 time=5.51 ms
64 bytes from hkg07s52-in-f14.1e100.net (142.251.220.110): icmp_seq=2 ttl=55 time=4.90 ms
64 bytes from hkg07s52-in-f14.1e100.net (142.251.220.110): icmp_seq=3 ttl=55 time=5.06 ms
64 bytes from hkg07s52-in-f14.1e100.net (142.251.220.110): icmp_seq=4 ttl=55 time=4.42 ms

--- google.com ping statistics ---
4 packets transmitted, 4 received, 0% packet loss, time 3018ms
rtt min/avg/max/mdev = 4.416/4.971/5.513/0.392 ms
Congratulations, our web server is now able to reach the Internet!
Installing Apache on our web server
Now that our web server is able to reach the Internet, let’s install Apache and get our website up and running which should be trivial - simply install the apache2 package from the system repositories:
sudo apt update && sudo apt install -y apache2
Once installed, Apache should be enabled out of the box - let’s confirm this by visiting the website locally on our web server:
curl -s localhost | grep 'It works!'
Sample output:
It works!
Our website should also be reachable from our router via the internal IP 192.168.100.2 of our web server, but first install curl explicitly on our router which is not installed by default on OpenBSD:
pkg_add curl
Now curl the internal IP of our web server and confirm that it works:
curl -s 192.168.100.2 | grep 'It works!'
Sample output:
It works!
But now we want to expose our website to the Internet, which is currently not externally reachable since our web server is hidden behind an internal network. Fortunately, the solution is simple - we just need to forward the appropriate port on our router via NAT.
Exposing our website to the Internet
To ensure our website is reachable from external clients, i.e. those outside our private network 192.168.100.0/24, we need to expose an appropriate port on our router and forward requests from that port to the appropriate port on our web server. Since our Apache web server is a typical HTTP web server, we’ll need to forward requests to port 80 on our web server and let’s decide to expose this as port 8080 on our router.
So logically, we expect external clients to visit our website via the URL http://10.0.2.15:8080/ through a web browser (or curl, or otherwise), and then our router will translate this to http://192.168.100.2/ behind the scenes (the default TCP port 80 used for HTTP is implied), though our visitors should neither know nor care about this.
To enable this behavior, we need to append the following line to /etc/pf.conf on our router:
pass in on em0 proto tcp from any to 10.0.2.15 port 8080 rdr-to 192.168.100.2 port 80
Now instruct PF to re-read our configuration file once again:
pfctl -f /etc/pf.conf
With this port forwarding rule in place, let’s simulate a request from an external client. In our case, this will simply be the VirtualBox host, i.e. the laptop / workstation you are following this lab on.
Unfortunately, our laptop / workstation can’t actually see the IP address 10.0.2.15 directly since our virtual router is actually hidden behind the VirtualBox default NAT router as illustrated below:

So we need to configure an additional NAT port forwarding rule on the host level. For simplicity, let’s forward port 8080 on our host to port 8080 on our router.
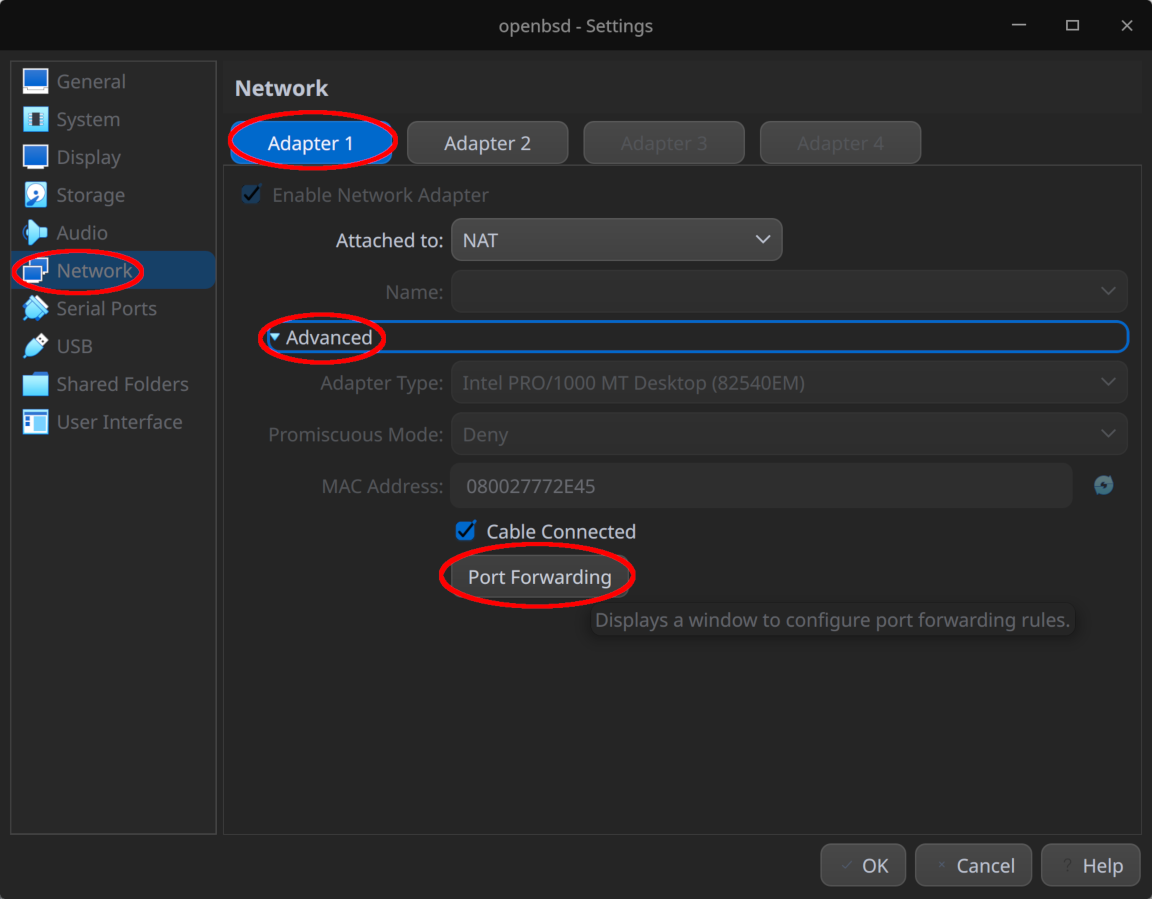
To do this, go to our router VM “Settings > Network > Adapter 1 > Advanced” and select “Port Forwarding” as shown in the screenshot below:
Next, add a rule to forward TCP port 8080 on the VirtualBox host to TCP port 8080 on our virtual router as shown below and click “OK” to confirm the changes:
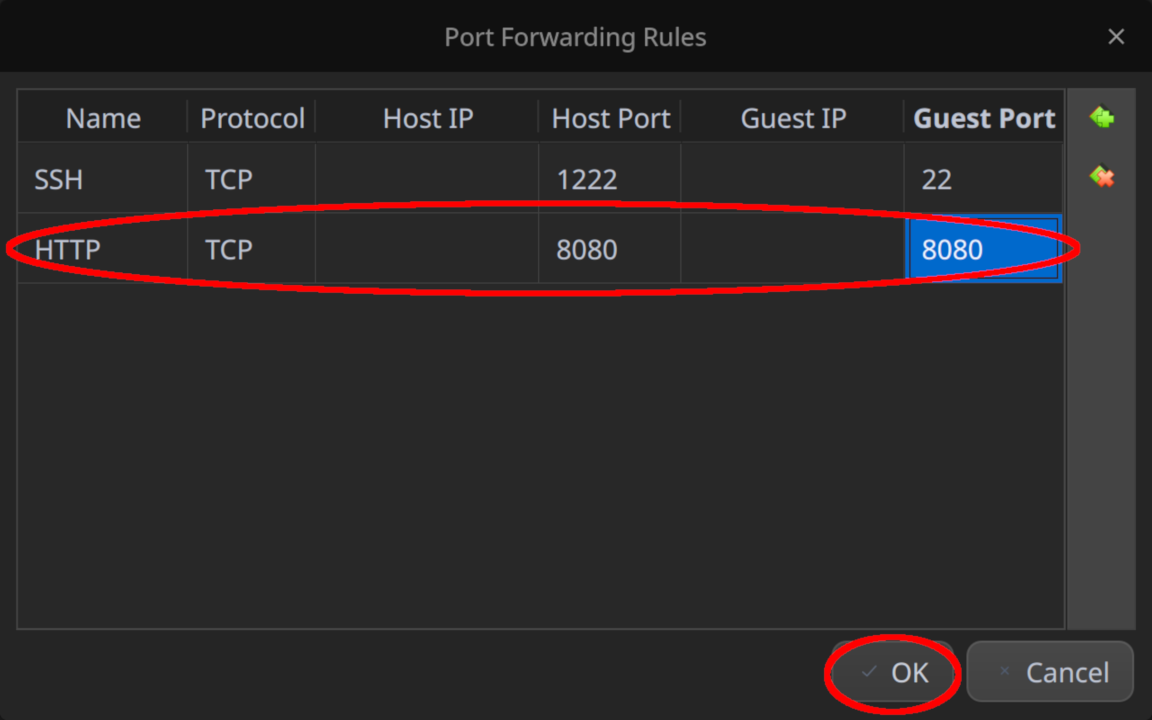
Don’t forget to click “OK” one more time to save the modified settings.
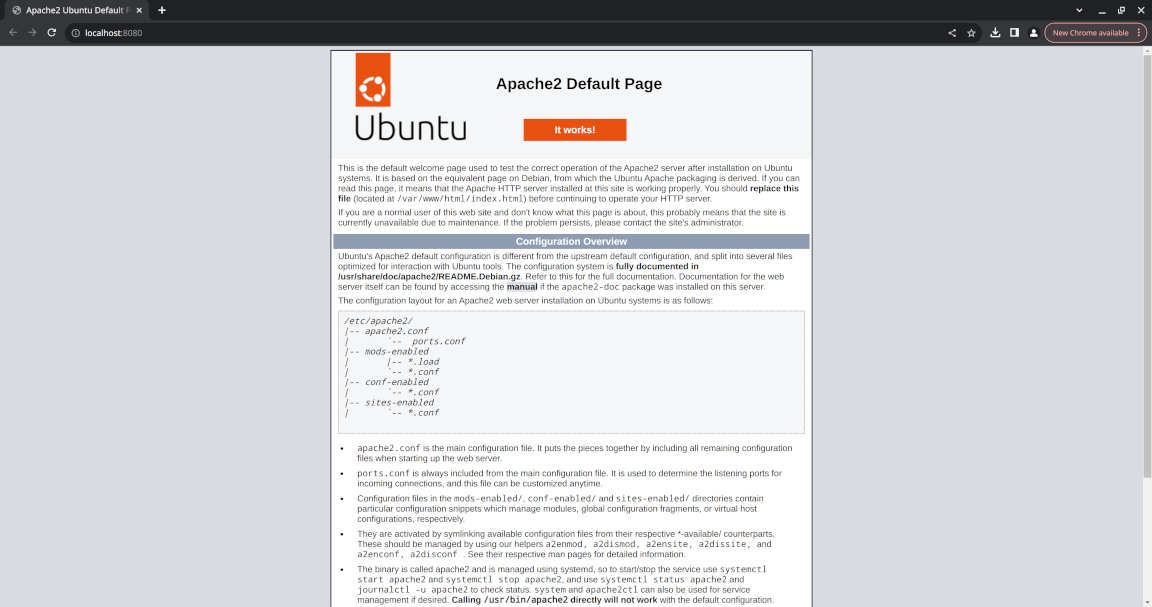
Now on your laptop / workstation, visit http://localhost:8080/ and voila - you should see Ubuntu’s version of the default Apache web page:
Concluding remarks and going further
We saw in this lab how to configure OpenBSD as a router using the built-in PF packet filter to forward requests from an internal network to the Internet, and how to configure NAT port forwarding with PF to expose internal services to external clients.
While this lab was (hopefully) fun and interesting, it barely scratches the surface of what OpenBSD is capable of so stay tuned for more content ;-)
Subscribe:
![]()
![]()
![[Valid RSS]](/assets/images/valid-rss-rogers.png)
![[Valid Atom 1.0]](/assets/images/valid-atom.png)