Deploying Keycloak on Fedora Workstation with Podman
Date: 2024-02-25
Keycloak is an open source identity provider (IdP) with single-sign on (SSO) capabilities. It supports the most widely used enterprise authentication protocols, namely OpenID Connect (OIDC), OAuth 2.0, and SAML. With Keycloak, users sign in once and share the same identity across multiple applications and platforms in a transparent manner. On the other hand, applications defer authentication to Keycloak using a standard protocol without managing the authentication flow themselves.
Keycloak boasts several advantages over competing solutions such as Dex and Authentik:
- Officially governed by the Cloud Native Computing Foundation (CNCF) as an Incubating project
- Offers an user-friendly web interface with extensive features for simplified administration
- Supports multi-tenancy out of the box via the concept of realms
- Offers direct integration with a multitude of IdP backends such as Active Directory and GitHub
- Supports the enforcement of multi-factor authentication (MFA) for both individual users and realms
This article will guide you through setting up Keycloak on Fedora Linux with SSL/TLS enabled using Podman. Once our Keycloak server is up and running, we will:
- Create our first realm
example-comrepresenting our organization - Enforce mandatory MFA for all users in our realm
- Create our first user
johndoerepresenting an employee in our organization - Create our first client
keycloak-spacorresponding to the Keycloak demo single-page application (SPA) - Log in to our Keycloak realm via the demo application to validate our configuration
System requirements
A physical or virtual machine running Fedora Workstation with the following specifications:
- Minimum 4G of RAM (8G+ recommended)
- Minimum 2 vCPU cores (4+ vCPU recommended)
- Sufficient available storage - a few GB should suffice
Generating certificates for SSL/TLS
Applications deferring authentication to Keycloak exchange sensitive credentials during the authentication process. As such, never run Keycloak with plain HTTP in production as it transmits credentials in plaintext over the network. Instead, we will generate the necessary SSL/TLS certificates, add our custom root certificate authority (CA) to the system trust and start Keycloak with HTTPs using our certificates to ensure a secure, encrypted connection.
Install the OpenSSL package used for generating SSL/TLS certificates:
sudo dnf install --refresh -y openssl
Next, create the directory $HOME/ssl/ for our certificates and enter it:
mkdir -p "$HOME/ssl/"
pushd "$HOME/ssl/"
Now generate a CA key and certificate for internal use within our organization example.com. We will use the CA key to sign certificate signing requests (CSRs) resulting in SSL/TLS certificates used to encrypt HTTPs traffic for internal websites and services, and use the CA certificate to verify the validity of the SSL/TLS certificates presented by internal websites and services. CAs serve as an anchor of trust so their certificates should be long lived, e.g. with a validity period of 10 years.
openssl req \
    -x509 \
    -new \
    -nodes \
    -keyout my-custom-ca.key \
    -sha256 \
    -days 3650 \
    -out my-custom-ca.crt \
    -subj '/CN=My custom CA/DC=localhost'
This creates a CA key my-custom-ca.key and the corresponding CA certificate my-custom-ca.crt.
Inspect the CA certificate with the following command:
openssl x509 -text -noout -in my-custom-ca.crt
Sample output:
Certificate:
    Data:
        Version: 3 (0x2)
        Serial Number:
            76:56:b9:13:b4:85:f4:36:0d:d0:2a:18:d3:de:f3:2f:25:76:f5:b0
        Signature Algorithm: sha256WithRSAEncryption
        Issuer: CN = My custom CA, DC = localhost
        Validity
            Not Before: Feb 25 02:11:46 2024 GMT
            Not After : Feb 22 02:11:46 2034 GMT
        Subject: CN = My custom CA, DC = localhost
        Subject Public Key Info:
            Public Key Algorithm: rsaEncryption
                Public-Key: (2048 bit)
                Modulus:
                    00:ba:0b:7e:fb:88:e6:6f:f3:c2:3b:cc:3c:5d:18:
                    cf:bc:c1:ff:e3:98:3a:52:2c:82:dc:d7:14:75:8a:
                    58:fc:26:d7:97:9e:ee:73:c0:56:79:77:5b:97:96:
                    5c:f9:6a:d1:0c:bc:96:4d:e3:48:4c:e8:91:77:1e:
                    58:22:23:b2:7d:50:2e:2e:5d:c5:7a:85:0e:e4:b4:
                    73:64:5d:85:2a:81:fe:e1:04:3d:6a:5d:0f:99:4b:
                    e8:82:7b:c4:06:36:3f:67:b7:19:08:1b:56:28:d0:
                    b1:0d:f5:52:55:06:88:97:87:a5:be:ba:11:a2:eb:
                    a4:da:6d:c7:3e:1f:5d:46:1f:da:a3:26:19:0a:ea:
                    42:67:8e:ab:7a:77:d5:db:c0:24:d1:c7:10:86:b9:
                    ef:0a:ad:3f:22:8d:17:f5:26:1e:38:23:ba:5f:7c:
                    6b:f6:e8:41:1f:ed:6a:a6:77:3e:f6:55:ef:06:08:
                    f3:a8:f3:a3:4f:9b:d4:2c:fe:b0:62:c1:1d:8e:c0:
                    6f:97:d9:e4:ec:a7:e6:6d:62:31:8a:f7:3e:9a:4f:
                    3b:92:c4:04:b6:2c:9b:b2:4d:b8:bc:8a:72:c1:67:
                    9f:8a:60:cf:a5:7f:84:75:a3:c9:48:60:dd:6a:b9:
                    e4:ec:91:3f:6d:cc:ec:a3:8a:44:ea:1c:62:01:92:
                    09:2d
                Exponent: 65537 (0x10001)
        X509v3 extensions:
            X509v3 Subject Key Identifier:
                69:0F:42:C2:FC:D7:BB:79:D3:B6:5A:31:D9:A9:B0:3C:DA:C3:78:1D
            X509v3 Authority Key Identifier:
                69:0F:42:C2:FC:D7:BB:79:D3:B6:5A:31:D9:A9:B0:3C:DA:C3:78:1D
            X509v3 Basic Constraints: critical
                CA:TRUE
    Signature Algorithm: sha256WithRSAEncryption
    Signature Value:
        8d:15:51:ae:d6:67:6f:18:b2:88:30:c2:91:a8:25:16:3c:97:
        19:f1:c6:d4:4a:95:0f:ec:21:97:f8:aa:ec:78:5d:22:66:4e:
        84:a6:e3:61:be:bd:a2:b3:6a:48:f7:0e:95:f5:95:02:14:63:
        28:cc:c8:6d:07:86:3d:9d:f1:f5:8b:5c:a9:4f:d2:98:0d:1a:
        26:cd:3e:ef:8c:e7:0c:e6:10:31:94:ad:c3:6c:83:82:d9:7e:
        fe:c7:85:c4:40:d7:36:7a:fb:6e:79:f9:c4:64:77:59:d6:6c:
        f5:24:36:fd:f4:2a:97:ec:58:0c:c2:6c:16:87:d6:4f:7e:88:
        9d:16:c8:fa:5f:aa:44:52:3b:36:99:34:64:e2:b9:a8:1b:e8:
        f2:94:95:ab:ae:12:42:ab:11:4d:9b:e5:c3:5c:85:07:2c:1e:
        7e:2e:ef:88:ad:44:eb:90:a0:b1:28:c5:a6:4f:0e:1c:47:6a:
        34:da:a0:5a:1a:9a:a9:b0:fe:77:f1:e3:99:90:59:47:4b:52:
        d2:e5:5d:9b:46:6e:04:fe:4f:87:75:13:ab:0a:a8:74:c4:c8:
        80:54:cd:6b:db:4a:ee:86:bc:5c:32:9e:5f:29:8b:50:3f:0c:
        ab:32:49:ff:ce:36:9c:cd:e4:4c:78:da:ce:a1:4d:a5:a3:84:
        51:41:52:49
Look out for the following fields when inspecting a CA certificate:
- Issuer: the subject of the authority who issued the certificate. In the case of a root CA, this is the CA itself
- Subject: who this certificate represents
- X509v3 extensions: metadata indicating the nature of the certificate (
CA:TRUE) and associated identity information
Be accustomed to inspecting certificates with the command shown above as it is useful for troubleshooting when certificates do not function as expected, e.g. when your browser warns that a certificate is invalid even though you already trust the root CA that signed it.
Before we proceed, add the CA certificate to our system trust. This ensures that any certificates issued by this CA are recognized as valid and trustworthy.
sudo trust anchor --store my-custom-ca.crt
sudo update-ca-trust
Now generate a CSR for our Keycloak instance which will be exposed on https://localhost:8443/.
openssl req \
    -new \
    -newkey rsa:2048 \
    -nodes \
    -keyout localhost.key \
    -sha256 \
    -out localhost.csr \
    -subj '/CN=My custom certificate/DC=localhost' \
    -addext 'subjectAltName=DNS:localhost' \
    -addext 'basicConstraints=critical,CA:FALSE' \
    -addext 'keyUsage=digitalSignature' \
    -addext 'extendedKeyUsage=serverAuth'
This generates a certificate key localhost.key and the corresponding CSR localhost.csr. The CSR is then handed over to the CA for signing which generates an SSL/TLS certificate for use in our Keycloak instance.
Inspect the CSR with a similar command:
openssl req -text -noout -in localhost.csr
Sample output:
Certificate Request:
    Data:
        Version: 1 (0x0)
        Subject: CN = My custom certificate, DC = localhost
        Subject Public Key Info:
            Public Key Algorithm: rsaEncryption
                Public-Key: (2048 bit)
                Modulus:
                    00:dc:15:3a:92:03:aa:26:c9:1f:b2:a7:fb:3a:70:
                    6a:64:cc:f7:2e:68:88:3b:44:88:d7:f7:59:86:4c:
                    94:c5:88:65:4d:4c:2c:f5:e3:6d:02:8b:e9:16:b8:
                    fc:b1:7b:e1:ca:dd:17:12:75:7e:3b:97:78:01:bd:
                    e9:e4:a2:9c:c3:62:74:e6:32:00:6a:3f:9a:4d:e6:
                    d5:46:b0:c3:79:40:d3:8c:18:6c:41:0b:b8:6f:84:
                    15:bf:37:29:7f:46:d9:5d:0f:2a:d9:06:21:1d:17:
                    64:fb:ec:9f:c1:62:0e:e5:df:48:cf:c9:0e:ea:3e:
                    47:4e:dd:00:95:ac:38:fb:03:bf:8b:13:34:57:49:
                    01:26:05:06:d5:dc:39:34:12:2e:2b:f5:a7:3a:d1:
                    03:94:ce:5c:2b:28:67:2e:2d:09:85:b6:53:0a:f3:
                    9b:00:62:29:d5:84:df:e0:b4:a9:0a:81:a1:f3:0a:
                    e3:fc:71:5d:fe:d7:c7:8b:f7:e5:bb:e6:51:0a:5f:
                    d5:06:5d:7f:cf:48:28:96:b6:d0:a4:60:6f:f5:08:
                    0f:ce:6f:a3:8f:c4:b7:db:c0:79:33:1b:02:e8:ad:
                    95:fc:df:b9:6a:ef:31:f2:1c:11:3c:56:4a:4c:07:
                    1e:53:24:d6:36:2a:e3:3e:4f:3b:b8:64:68:56:70:
                    81:29
                Exponent: 65537 (0x10001)
        Attributes:
            Requested Extensions:
                X509v3 Subject Alternative Name:
                    DNS:localhost
                X509v3 Basic Constraints: critical
                    CA:FALSE
                X509v3 Key Usage:
                    Digital Signature
                X509v3 Extended Key Usage:
                    TLS Web Server Authentication
    Signature Algorithm: sha256WithRSAEncryption
    Signature Value:
        ce:e7:20:cd:f4:86:86:0e:66:95:4d:59:1c:8b:94:9e:8b:dd:
        97:ac:96:8e:bd:ea:96:c7:e4:2f:a8:af:fa:71:e9:aa:ce:85:
        f1:bd:62:a5:8f:5b:07:f1:25:f0:c9:0f:b1:9e:ef:85:af:fc:
        cd:1b:09:e0:c5:41:0b:26:67:35:32:9e:8a:c8:b5:97:14:d6:
        74:e6:dc:9b:de:bf:06:b1:10:28:29:33:c0:48:7c:93:28:29:
        1b:92:43:ae:0c:2c:37:d0:ba:ac:bc:92:c9:61:e8:d1:ba:67:
        ab:36:ee:cb:ad:bc:df:7e:12:92:e4:95:34:a9:4c:c0:8d:3b:
        90:01:37:b0:bf:9b:41:94:52:a6:a9:a2:9b:87:f8:11:bf:80:
        4e:68:6a:37:11:82:12:50:56:f1:e8:fb:2c:1e:5d:e2:7f:27:
        f9:18:f0:32:e0:d8:75:e6:e2:be:4d:62:10:5d:ac:cb:fd:22:
        65:3d:84:74:cf:f6:34:78:ea:85:29:49:52:b2:5d:96:ff:40:
        cb:e7:cb:4d:0a:c3:da:8b:af:92:5d:51:74:98:49:7a:66:da:
        33:ef:5e:95:ca:f0:7a:2b:19:bd:82:56:2f:c1:08:8e:33:37:
        7a:76:88:cb:81:9c:56:77:dc:ac:6c:b4:a0:c2:8d:ff:8e:6e:
        a6:7e:dd:4f
Here, pay attention to the requested extensions, in particular the X509v3 Subject Alternative Name which defines the DNS domain name(s) for which the signed certificate will be valid for.
Pass this CSR over to our CA for signing. SSL/TLS certificates should be renewed on a regular basis so set the validity period to a shorter interval, e.g. 1 year.
openssl x509 \
    -req \
    -days 365 \
    -in localhost.csr \
    -CA my-custom-ca.crt \
    -CAkey my-custom-ca.key \
    -out localhost.crt \
    -set_serial 01 \
    -sha256 \
    -copy_extensions copy
The -copy-extensions copy option preserves the CSR requested extensions in the signed certificate localhost.crt. Confirm this is the case:
openssl x509 -text -noout -in localhost.crt
Sample output:
Certificate:
    Data:
        Version: 3 (0x2)
        Serial Number: 1 (0x1)
        Signature Algorithm: sha256WithRSAEncryption
        Issuer: CN = My custom CA, DC = localhost
        Validity
            Not Before: Feb 25 03:31:09 2024 GMT
            Not After : Feb 24 03:31:09 2025 GMT
        Subject: CN = My custom certificate, DC = localhost
        Subject Public Key Info:
            Public Key Algorithm: rsaEncryption
                Public-Key: (2048 bit)
                Modulus:
                    00:dc:15:3a:92:03:aa:26:c9:1f:b2:a7:fb:3a:70:
                    6a:64:cc:f7:2e:68:88:3b:44:88:d7:f7:59:86:4c:
                    94:c5:88:65:4d:4c:2c:f5:e3:6d:02:8b:e9:16:b8:
                    fc:b1:7b:e1:ca:dd:17:12:75:7e:3b:97:78:01:bd:
                    e9:e4:a2:9c:c3:62:74:e6:32:00:6a:3f:9a:4d:e6:
                    d5:46:b0:c3:79:40:d3:8c:18:6c:41:0b:b8:6f:84:
                    15:bf:37:29:7f:46:d9:5d:0f:2a:d9:06:21:1d:17:
                    64:fb:ec:9f:c1:62:0e:e5:df:48:cf:c9:0e:ea:3e:
                    47:4e:dd:00:95:ac:38:fb:03:bf:8b:13:34:57:49:
                    01:26:05:06:d5:dc:39:34:12:2e:2b:f5:a7:3a:d1:
                    03:94:ce:5c:2b:28:67:2e:2d:09:85:b6:53:0a:f3:
                    9b:00:62:29:d5:84:df:e0:b4:a9:0a:81:a1:f3:0a:
                    e3:fc:71:5d:fe:d7:c7:8b:f7:e5:bb:e6:51:0a:5f:
                    d5:06:5d:7f:cf:48:28:96:b6:d0:a4:60:6f:f5:08:
                    0f:ce:6f:a3:8f:c4:b7:db:c0:79:33:1b:02:e8:ad:
                    95:fc:df:b9:6a:ef:31:f2:1c:11:3c:56:4a:4c:07:
                    1e:53:24:d6:36:2a:e3:3e:4f:3b:b8:64:68:56:70:
                    81:29
                Exponent: 65537 (0x10001)
        X509v3 extensions:
            X509v3 Subject Alternative Name:
                DNS:localhost
            X509v3 Basic Constraints: critical
                CA:FALSE
            X509v3 Key Usage:
                Digital Signature
            X509v3 Extended Key Usage:
                TLS Web Server Authentication
            X509v3 Subject Key Identifier:
                F0:5D:A9:79:38:3B:83:EA:D0:C6:CF:91:0E:6F:67:72:DE:45:3A:04
            X509v3 Authority Key Identifier:
                A1:EA:2F:AB:B1:95:AE:9C:56:48:1C:B5:6B:42:8A:61:2C:0B:DB:18
    Signature Algorithm: sha256WithRSAEncryption
    Signature Value:
        c1:b0:c6:89:64:76:b1:ab:2e:bc:c7:fd:bd:d2:31:9f:20:8d:
        c0:8e:1d:d7:70:f1:a6:72:7d:49:23:33:f3:f5:e6:2d:eb:20:
        f4:c5:ea:a1:f2:1b:24:a2:ad:b9:b6:c9:03:66:03:dd:1b:41:
        f2:21:c7:ed:31:21:63:21:56:2d:a1:5d:31:cd:91:85:8f:ef:
        a3:84:b0:34:59:ba:30:2b:da:ec:c5:55:8e:5d:c9:a6:da:e4:
        24:9e:76:b5:ca:83:46:fb:91:33:43:26:53:93:5c:2f:52:c0:
        23:ce:63:3f:ab:1e:46:89:cf:6c:3c:a4:26:80:76:b1:d6:85:
        d6:84:9a:db:6b:93:fe:3b:51:1a:2e:b8:8b:c7:76:c0:e1:bd:
        2d:cb:1d:de:fe:13:a4:57:18:76:b9:76:dd:5a:6f:79:49:cf:
        ed:44:b8:4b:97:ac:81:87:55:1c:0b:30:3b:84:ae:27:8a:97:
        bc:72:c8:96:65:f1:bd:63:85:0e:4c:d7:9d:4e:e4:9d:4d:b0:
        a1:8c:13:53:6a:a3:ba:cf:eb:ae:08:28:b2:5a:ec:0a:f4:e0:
        23:14:2f:c0:35:8b:da:a4:31:42:61:c9:2d:f9:57:3e:16:36:
        09:6c:59:37:3b:2e:06:2c:ee:9b:2c:66:fd:38:92:47:8c:2e:
        b8:5e:7c:19
Now leave the $HOME/ssl/ directory:
popd
Deploying our Keycloak instance with Podman
Set an initial administrator username and password. You should replace the examples below with more secure defaults:
export KEYCLOAK_ADMIN="admin" # replace me!
export KEYCLOAK_ADMIN_PASSWORD="P@ssw0rd" # replace me!
Now fetch the latest Keycloak image from Quay.io and run it:
podman run \
    --rm \
    -d \
    -p 8443:8443 \
    -e KEYCLOAK_ADMIN="${KEYCLOAK_ADMIN}" \
    -e KEYCLOAK_ADMIN_PASSWORD="${KEYCLOAK_ADMIN_PASSWORD}" \
    -v "$HOME/ssl/:/ssl/:U,Z,ro" \
    --name keycloak \
    quay.io/keycloak/keycloak:latest \
    start \
    --hostname=localhost \
    --https-certificate-file=/ssl/localhost.crt \
    --https-certificate-key-file=/ssl/localhost.key
Our Keycloak instance binds to port 8443 and uses the certificate and key we generated in a previous step for SSL/TLS encryption, bind-mounted into the container read-only with the correct ownership and SELinux context (U,Z,ro).
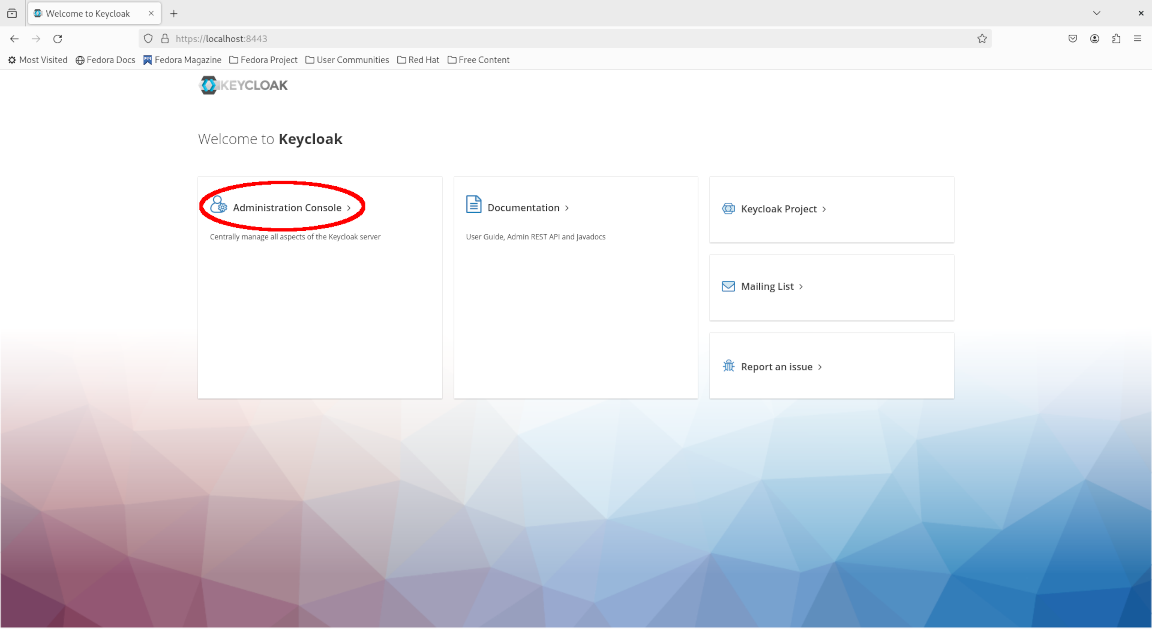
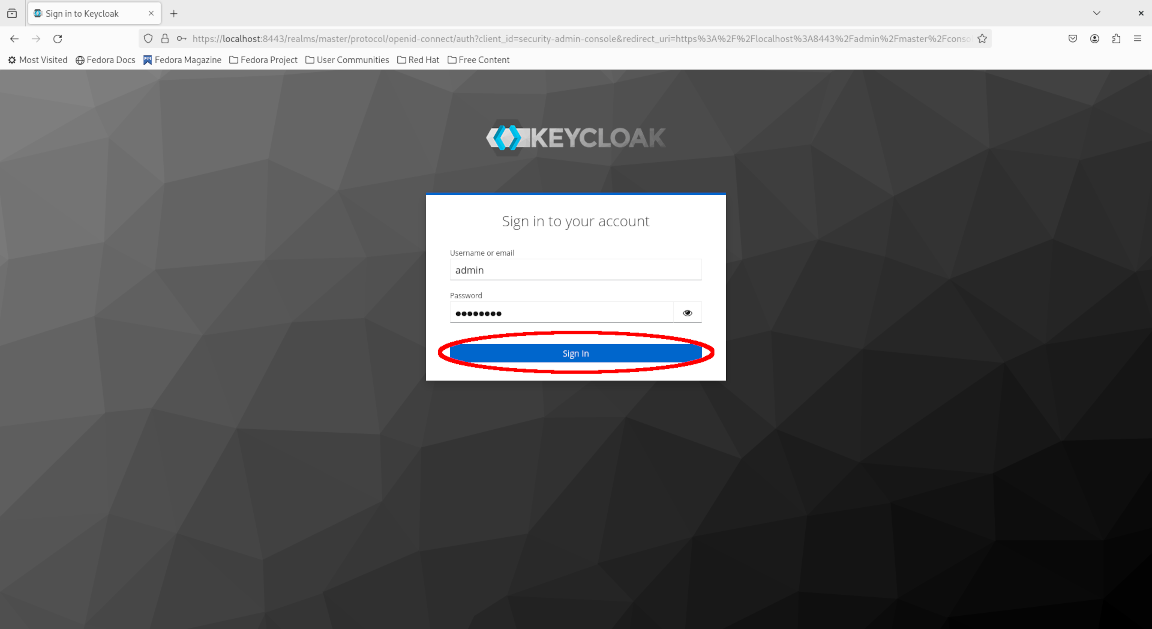
Visit https://localhost:8443/ in a web browser and click on “Administration Console” which presents a login portal. Enter your administrator credentials in the login portal and click “Sign In” which brings us to the administrator console.
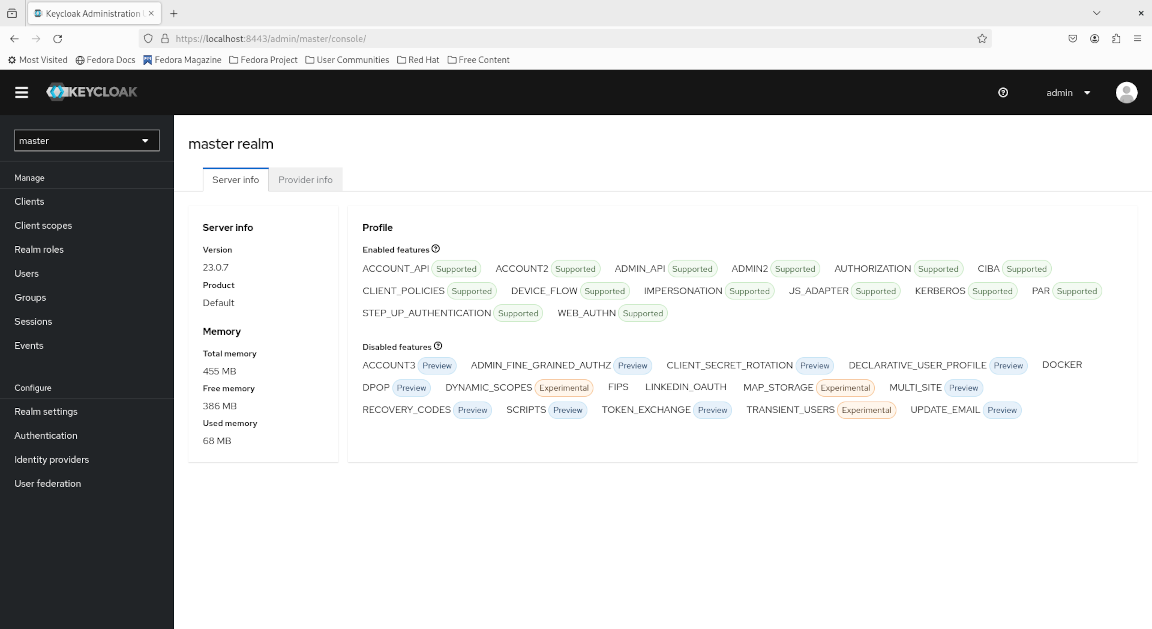
Notice that we are in the master realm. The master realm exists by default in Keycloak and should only be used to manage other realms. A realm in Keycloak is a tenant which represents different things depending on the context:
- In a service provider context where a Keycloak instance is accessible to enterprise customers as a managed service, a tenant is an independent organization with its own identity and access management (IAM)
- In an organizational context where a Keycloak instance is deployed for internal usage within the organization, a tenant is a department or organizational unit (OU) sharing a common base IdP such as the top-level corporate Active Directory domain
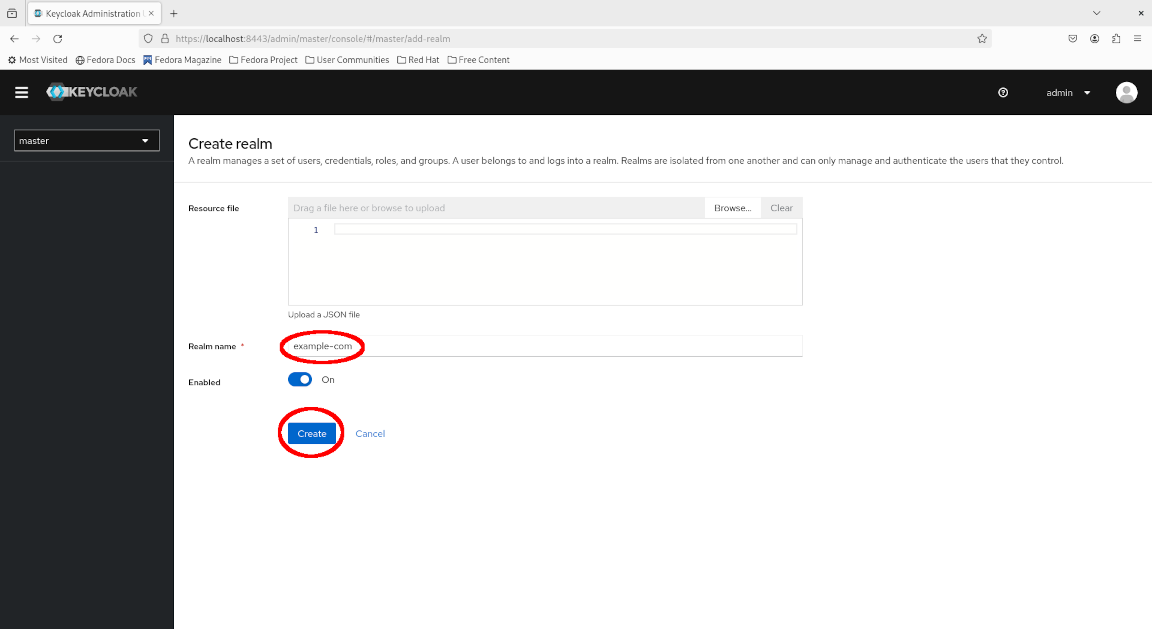
Creating a realm for our organization
Let’s create a realm for our example.com organization.
Click on the dropdown to the top left and select “Create realm”.
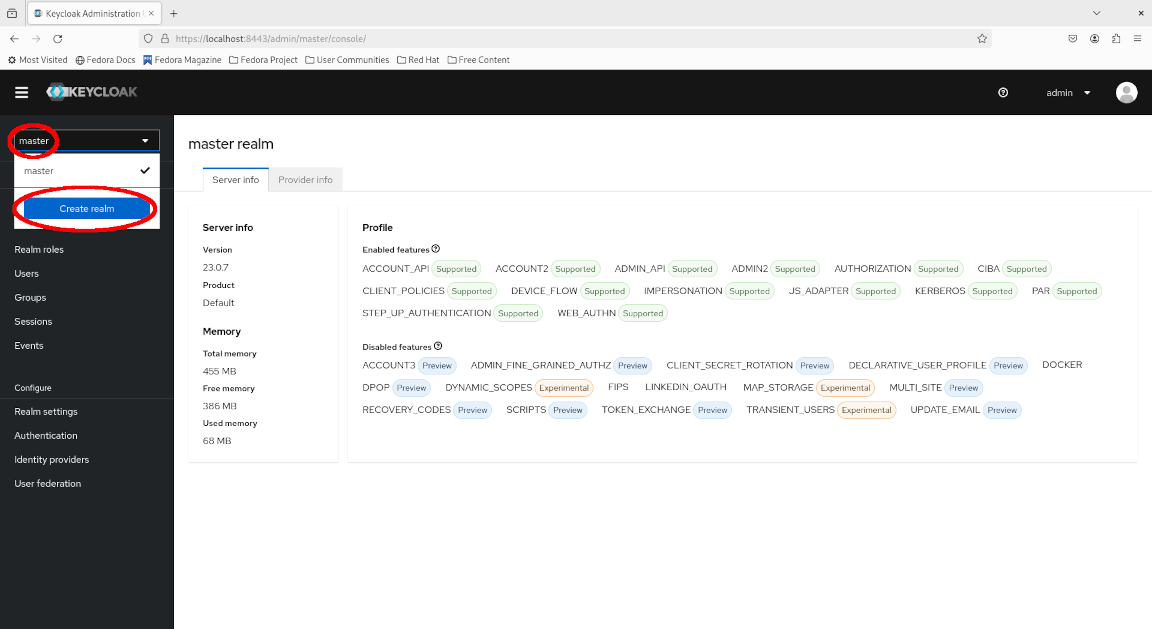
Fill in example-com as the realm name and click “Create”.
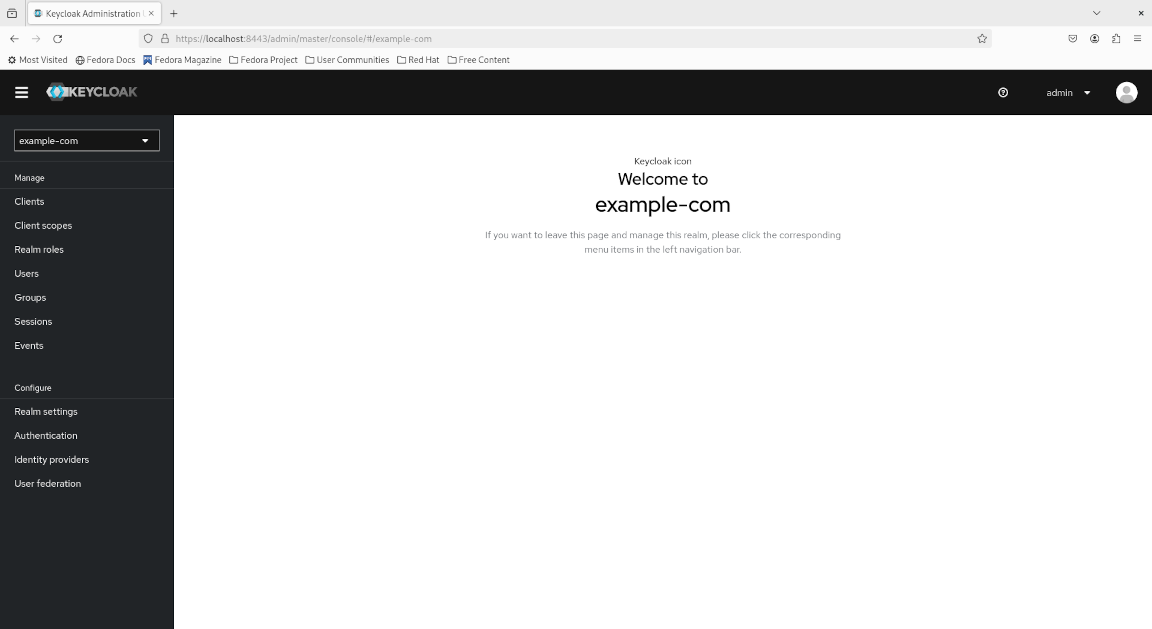
Observe that we are now in the administration console for the example-com realm.
Enforcing mandatory MFA for all users in our realm
MFA is the practice of adding a second layer of authentication and is widely employed by organizations. Instead of solely verifying what a person “knows” (the password), MFA also verifies what a person “has” to gain confidence in securely associating a natural entity with a digital identity, such as a time-based one-time password (TOTP) generated by a mobile hardware or software device. This provides an additional layer of protection for accounts which have their password compromised, though an account with a compromised password should change their password immediately in any case.
Keycloak supports enforcing mandatory MFA at both the user and realm level. Suppose our organization’s IT security policy mandates that all corporate accounts be secured via MFA. This policy can then be satisfied by enabling OTP as a required action at the realm level. We’ll also enforce that passwords be changed at initial login so only the account owner knows their own password.
Navigate to the menu to the left and click “Authentication”, then select “Required actions” and ensure both “Configure OTP” and “Update Password” are enabled as default actions.

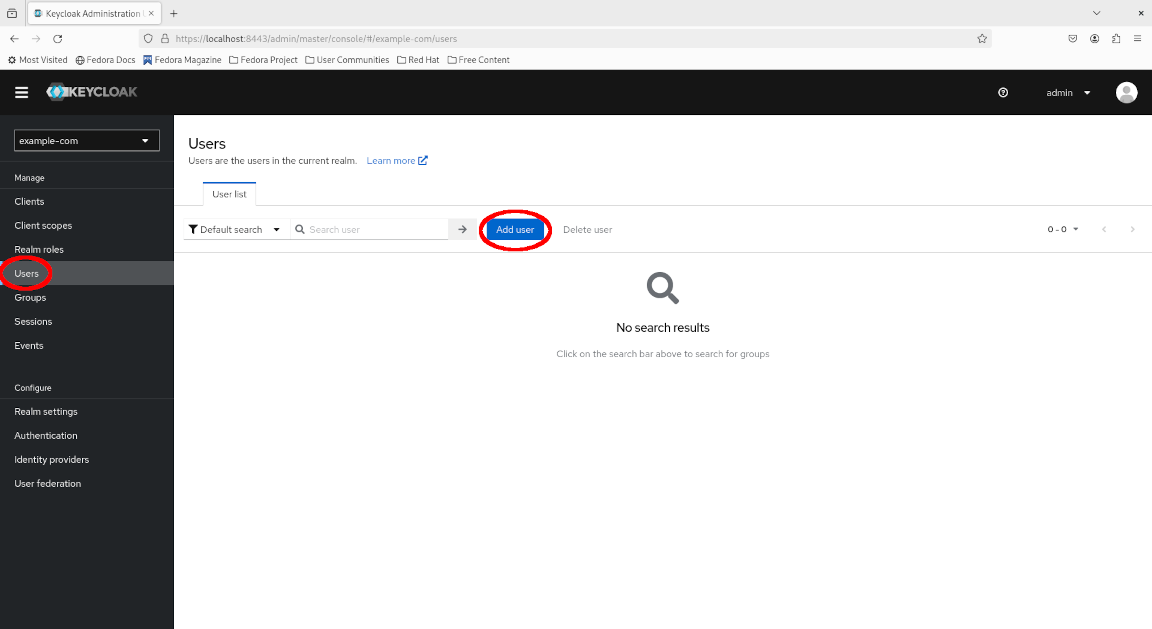
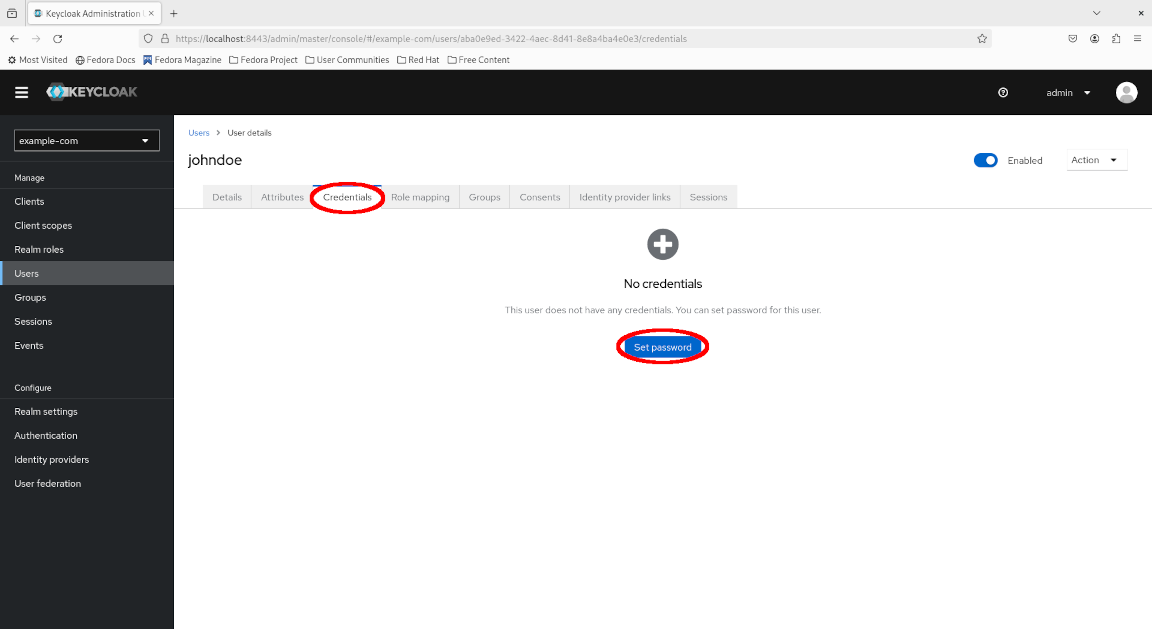
Creating an account for John Doe
John Doe has just joined our organization as a developer. As part of the onboarding process, let’s create an account for John Doe.
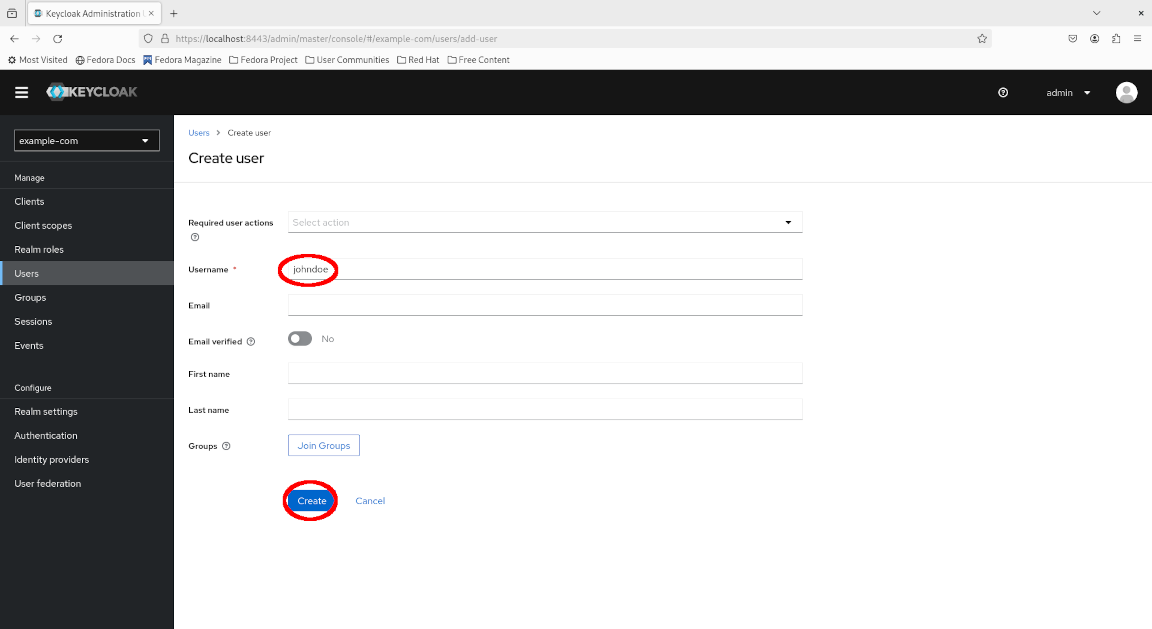
Select “Users > Add User”.
Fill in the username johndoe and any other fields as desired, then click “Create”.
Navigate to the “Credentials” tab and click “Set password”.
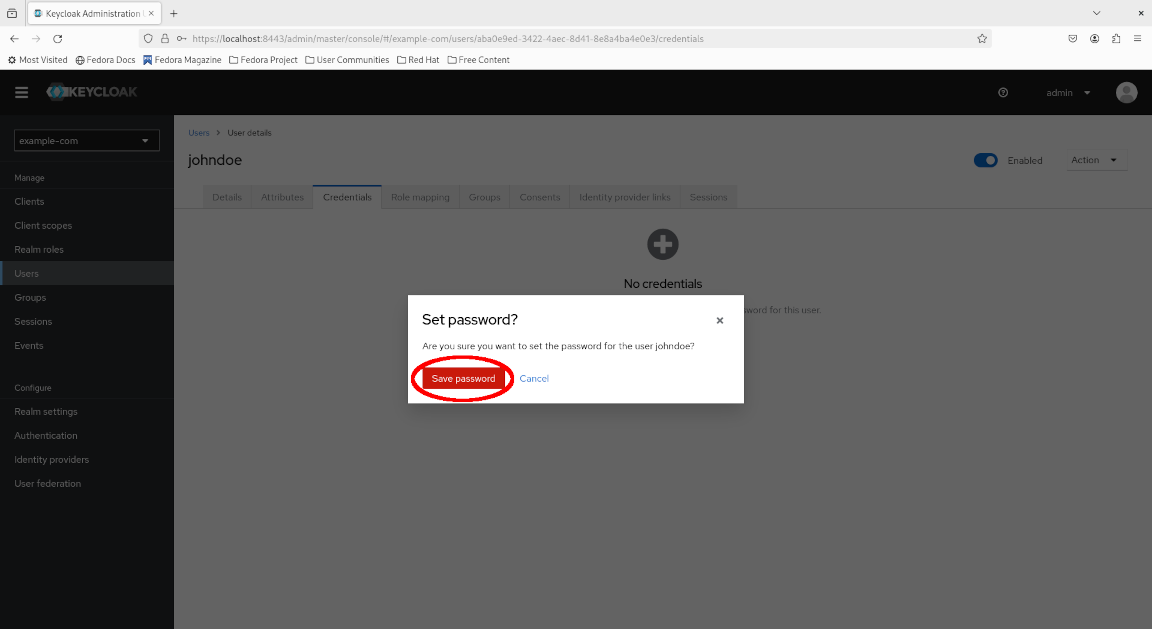
Fill in a suitable initial password for John Doe and click “Save”.

Click “Save password” to confirm the action.
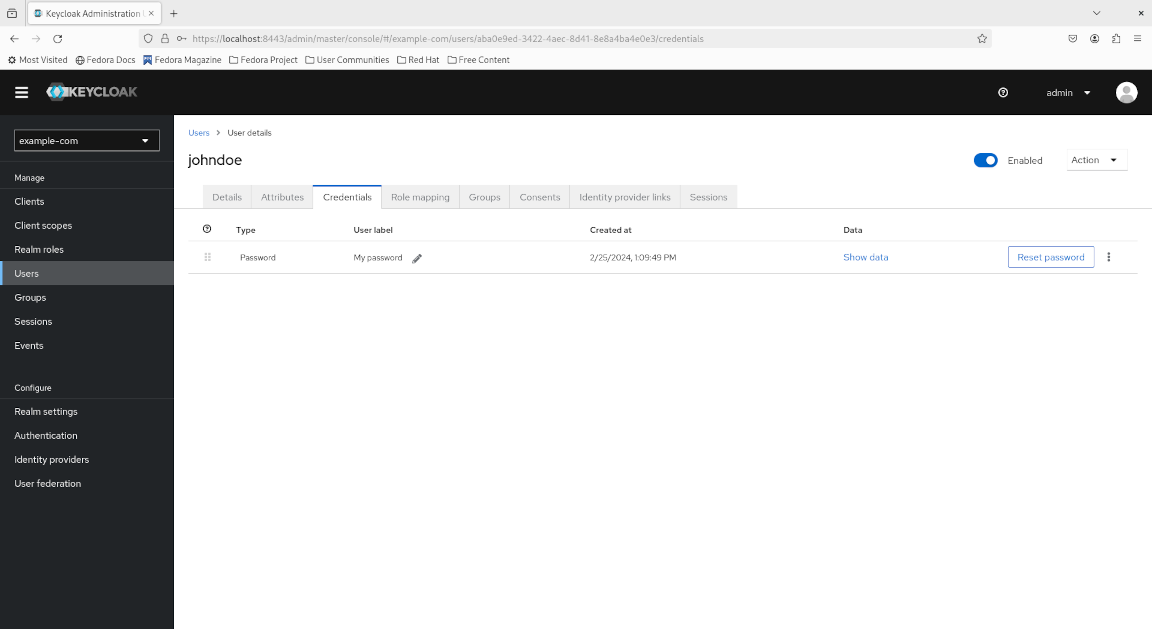
Congratulations, you have created an account for John Doe and set an initial password!
Creating a client for the Keycloak SPA demo application
Platforms and applications integrating with Keycloak do so via clients. A client represents an application from Keycloak’s perspective.
Let’s test our Keycloak instance using an application. Fortunately, the Keycloak project conveniently provides a demo application so we don’t have to write our own. But first, we need to create a client for the app.
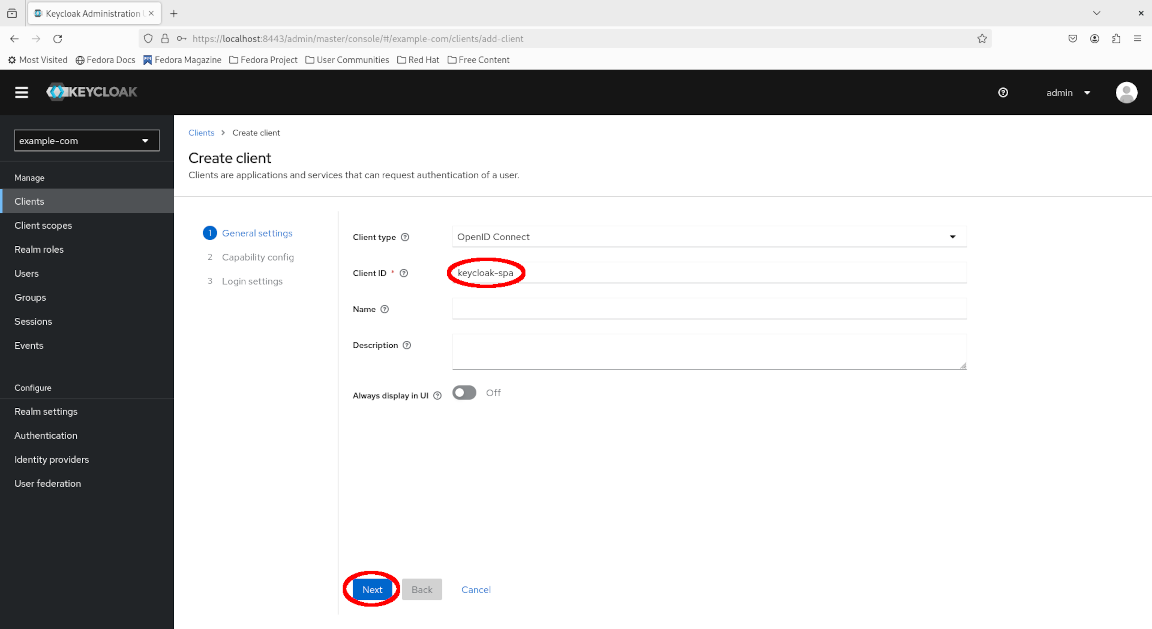
Select “Clients > Create client”.
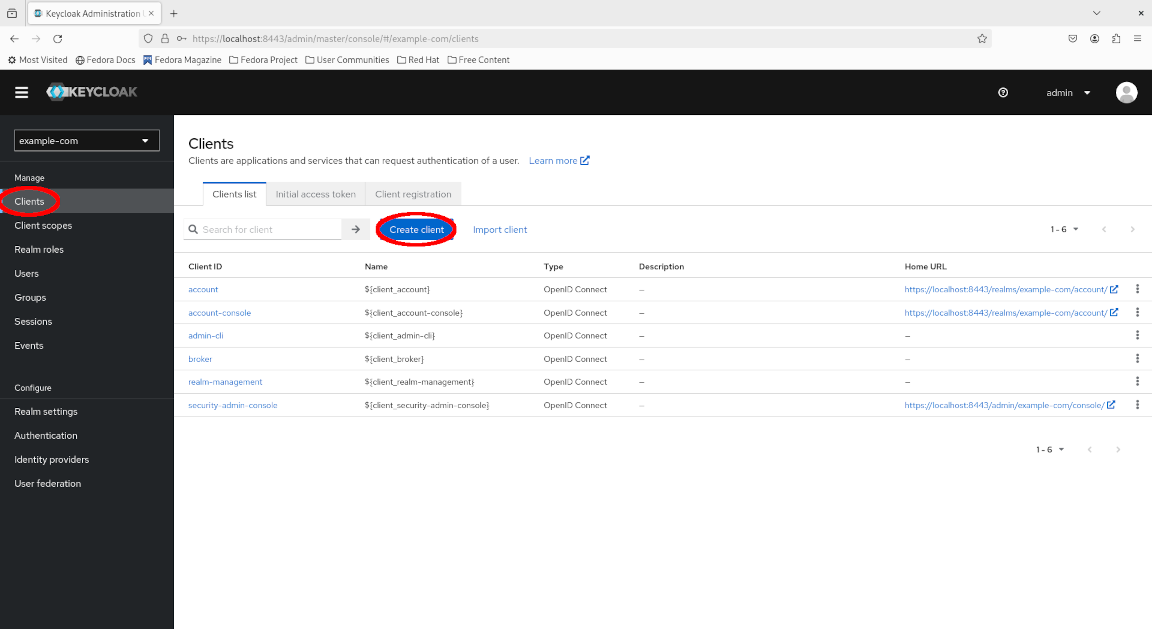
Preserve the client type as “OpenID Connect” and fill in the client ID as keycloak-spa, then click “Next”.
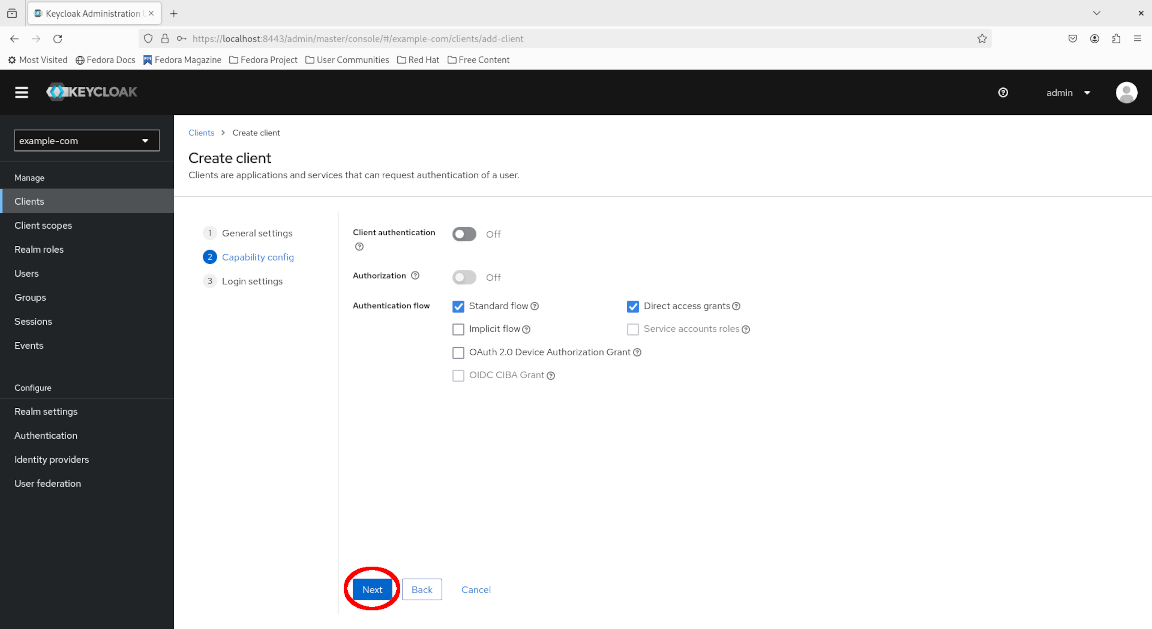
Ensure “Standard flow” is checked and click “Next”.
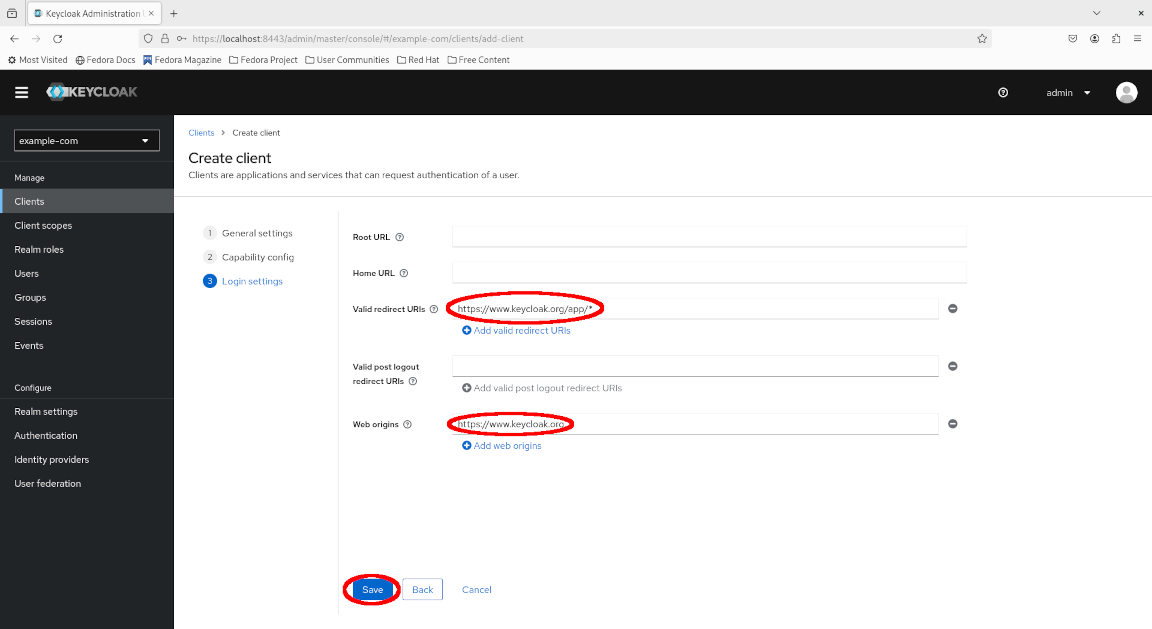
Now fill in the following details and click “Save”:
- Valid redirect URLs:
https://www.keycloak.org/app/* - Web origins:
https://www.keycloak.org(without the trailing slash)
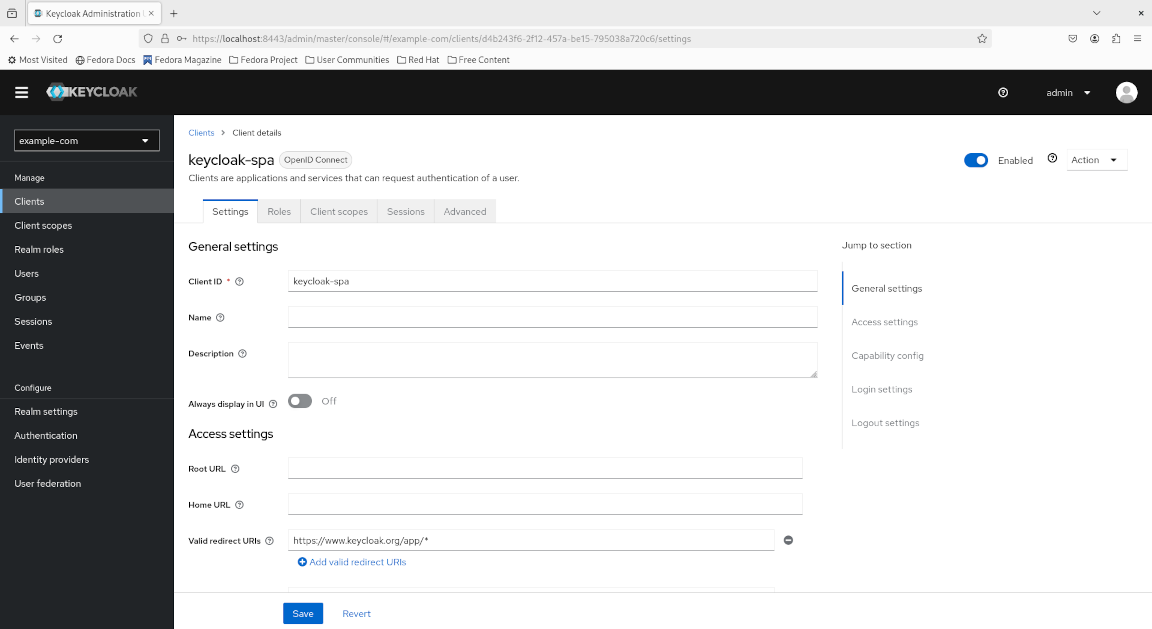
Congratulations, you have set up your first client on Keycloak!
Installing the Authenticator MFA app on Flathub
Before we proceed to log in as John Doe, remember that mandatory MFA is enabled so we’ll need an app to set it up during our first login.
Keycloak explicitly supports the following TOTP applications which can be installed on a mobile device:
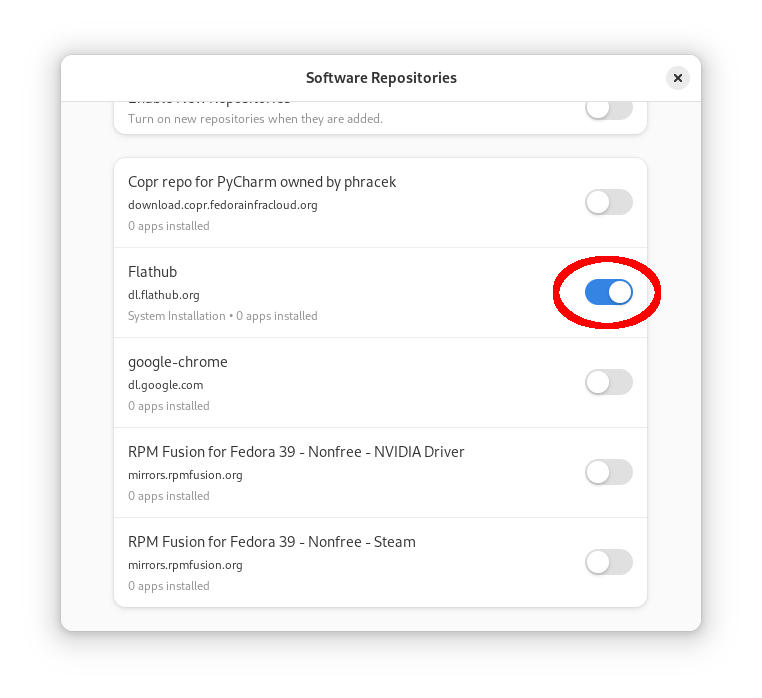
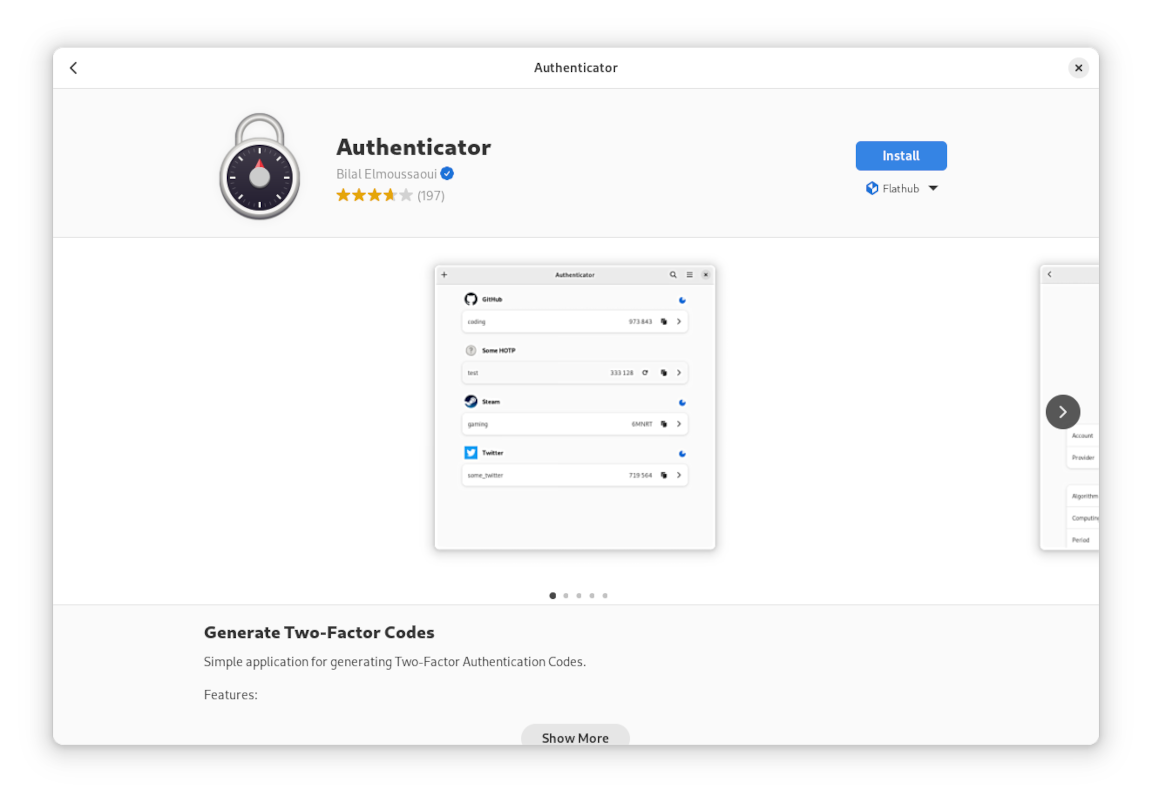
But for a change, let’s see a TOTP app available on Fedora Linux. Authenticator is an open source GNOME application for generating TOTP codes available under the copyleft GPLv3+ license. It is part of the GNOME Circle, readily available on Flathub and integrates well with Fedora Workstation. Just make sure that Flathub is enabled as a repository source in GNOME Software, then find and install the app.
Logging in as John Doe with SSO
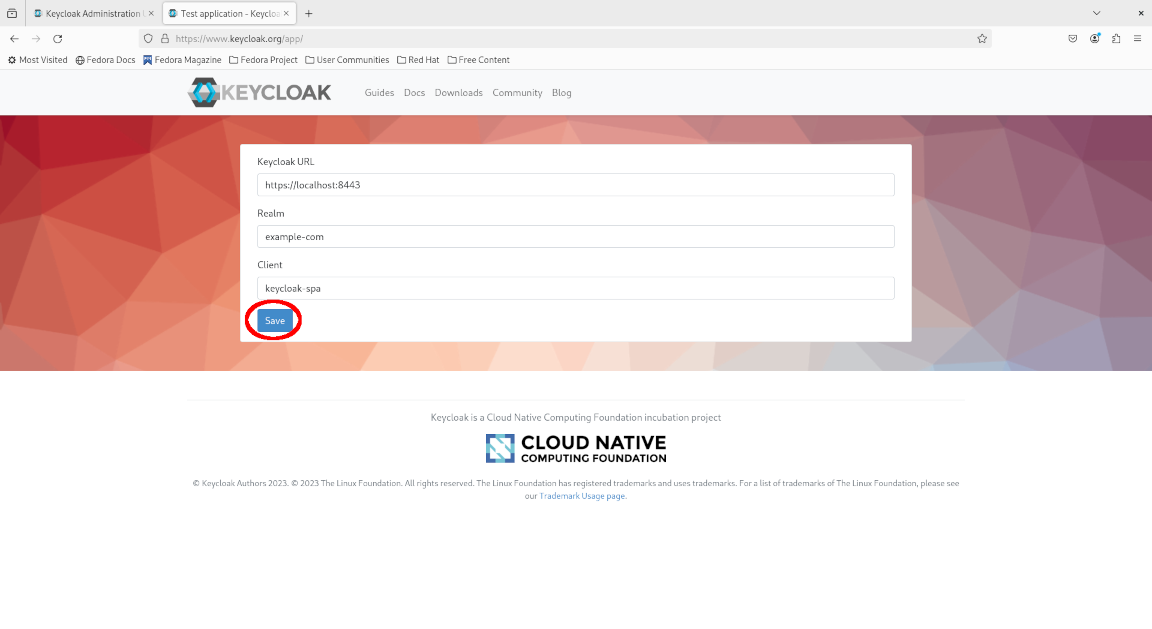
Now visit the demo application at https://www.keycloak.org/app/, fill in the configuration and click “Save”:
- Keycloak URL:
https://localhost:8443(without the trailing slash) - Realm:
example-com - Client:
keycloak-spa
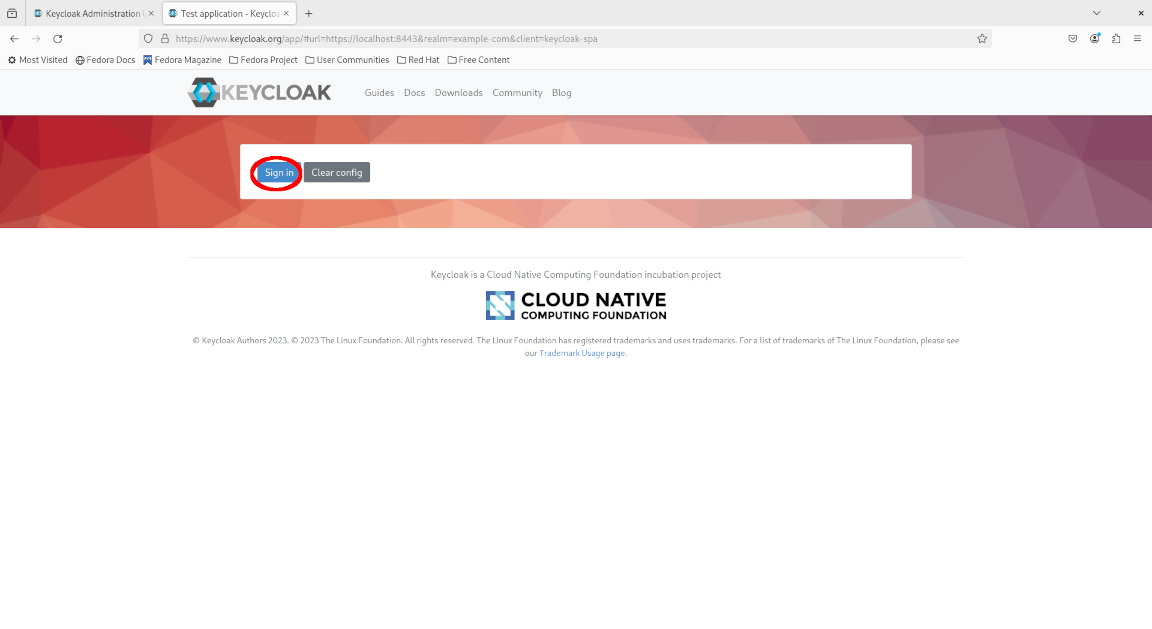
Click “Sign in”.
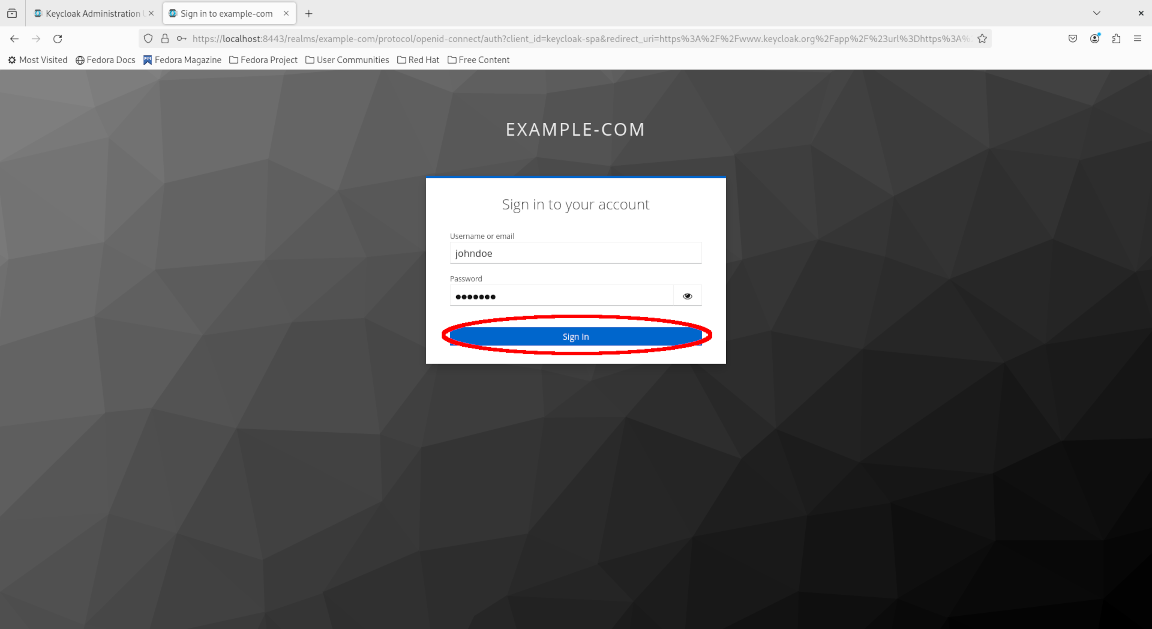
Fill in John Doe’s username and initial password, then click “Sign in”.
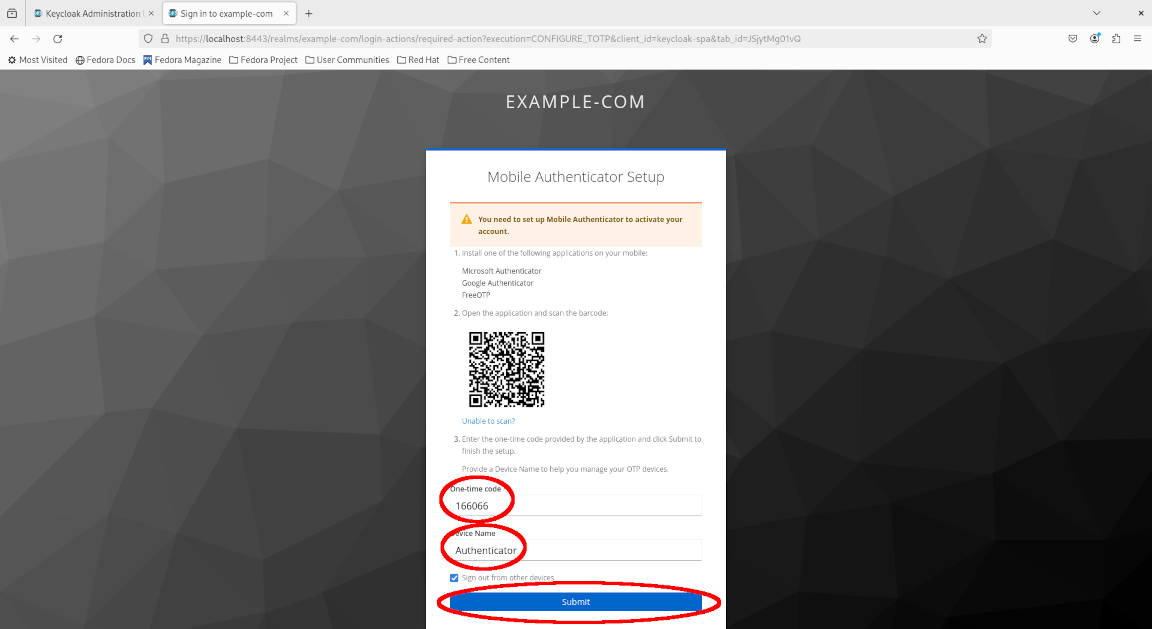
You will be prompted to configure MFA authentication based on TOTP. Open your Authenticator app, scan the QR code to add the application, then fill in the generated TOTP password and name the MFA device “Authenticator”. Click “Submit”.
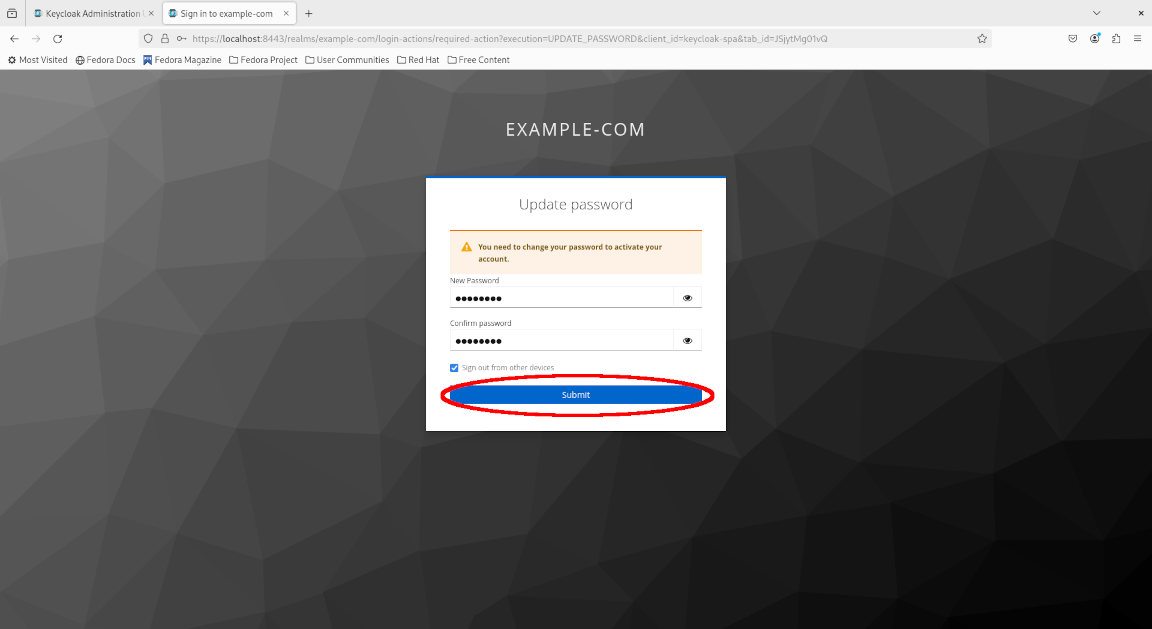
Reset the initial password and ensure it is strong and secure, then click “Submit”.
Congratulations, you are now logged in as John Doe in the Keycloak SPA demo app via your Keycloak instance!

Cleaning up
Stop the Keycloak instance, then delete the SSL/TLS certificates created earlier. The Keycloak container was configured to be deleted automatically once stopped via the --rm flag.
podman stop keycloak
sudo rm -rf "$HOME/ssl/"
Concluding remarks and going further
Keycloak is an open source, enterprise-ready IdP supporting the most widely used authentication protocols. This enables it to readily integrate with a wide range of applications and platforms, including enterprise-grade orchestration platforms such as Kubernetes. Furthermore, it can be readily deployed to a wide range of environments, including on traditional servers / VMs, as a standalone container with Podman (and Docker), and on container orchestration platforms such as Kubernetes and OpenShift.
We have barely scratched the surface of Keycloak configuration in this lab. Keycloak can act directly as an IdP backend as in this lab, or act as a connector to existing enterprise IdP backends such as LDAP and Active Directory. Furthermore, by associating users with groups and roles, platforms integrating with Keycloak for authentication can apply role-based access control (RBAC) to enterprise identities for a scalable method of managing access to resources in a centralized manner.
Subscribe:
![]()
![]()
![[Valid RSS]](/assets/images/valid-rss-rogers.png)
![[Valid Atom 1.0]](/assets/images/valid-atom.png)