Provisioning Ceph storage with cephadm
Date: 2025-09-21
Ceph is an open source, distributed storage system for providing block, file and object storage to applications. Under the hood, Ceph manages all storage as objects within RADOS (Reliable Autonomic Distributed Object Store) and uses the CRUSH (Controlled Replication Under Scalable Hashing) algorithm to determine object placement.
Common use cases of Ceph include:
- Providing distributed, resilient, highly available storage to traditional VM-based workloads
- Providing a unified storage layer for hyperconverged infrastructure (HCI) platforms such as Proxmox VE and OpenStack
- Providing on-demand storage for containerized workloads via the Rook orchestrator
Ceph provides many options for deployment such as with Ansible, Puppet or Rook. In this lab, we’ll deploy a Ceph cluster with cephadm consisting of 3 nodes and 3 disks which we’ll use to provision a block device mounted to an external host. Note that this minimal setup is for demonstration purposes only and is not suitable for production.
Ceph architecture overview
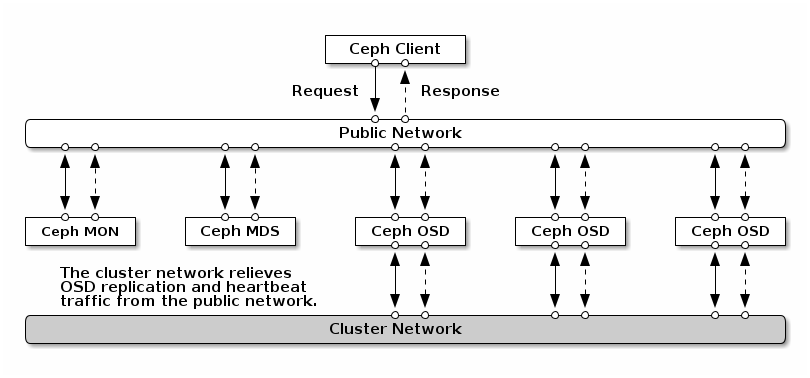
Source: Network Configuration Referece - Ceph Documentation
The following core components of Ceph are relevant in this lab for provisioning and managing RADOS block device (RBD) volumes:
- Monitors (MON): the brains of the cluster. Uses the Paxos algorithm for cluster quorum. An odd number of MONs is recommended for high availability, usually 3 or 5
- Managers (MGR): exposes a REST API for programmatic access and management operations. 2 is recommended for high availability
- Object Storage Daemons (OSD): manages the data on local storage. Exactly 1 OSD is created per raw storage device consumed by Ceph
Lab: Provisioning a minimal Ceph cluster with cephadm
Prerequisites
Proficiency in Linux administration is assumed. If in doubt, consult the resources below on an as-needed basis:
- LFS101x: Introduction to Linux
- LFS207: Linux System Administration Essentials
- RH124: Red Hat System Administration I
- RH134: Red Hat System Administration II
Setup
The following lab instructions were tested on 4 VMs with Ubuntu 24.04 LTS (Noble) server installed. Default options were used for the OS installation except the following day-2 customizations:
- Vim as the default editor
- Password-less
sudoconfigured - Remote login restricted to SSH public key authentication
- Swap disabled on each Ceph node
- The SSH public key of the non-root user on the
bastionhost copied to theauthorized_keysfile on all Ceph nodes for both non-root and root users for seamless access via SSH - The following environment variables configured on all hosts:
BASTION_IP: IP address of the bastion hostCEPH0_IP: IP address of the 1st Ceph nodeCEPH1_IP: IP address of the 2nd Ceph nodeCEPH2_IP: IP address of the 3rd Ceph node
| Host | CPU | Memory | OS disk | Data disk | Description |
|---|---|---|---|---|---|
bastion |
1 |
2Gi |
16Gi |
- | Bastion host used to connect to Ceph nodes. Also used as a client for mounting the block device provisioned by Ceph |
ceph0 |
2 |
4Gi |
16Gi |
32Gi |
The 1st Ceph node. Also the bootstrap node used to bootstrap the Ceph cluster |
ceph1 |
2 |
4Gi |
16Gi |
32Gi |
The 2nd Ceph node |
ceph2 |
2 |
4Gi |
16Gi |
32Gi |
The 3rd Ceph node |
Note that all data disks on Ceph nodes are unused, unformatted raw devices. This is required for Ceph to identify them as available and consume them to form the required storage pools.
In the lab instructions to follow, all actions should be performed on the bastion host unless otherwise specified.
Install required packages and tools
The following dependencies are required by cephadm as per the official documentation:
- Python 3
- Systemd
- Podman or Docker for running containers
- Time synchronization (such as Chrony or the legacy ntpd)
- LVM2 for provisioning storage devices
All of them are pre-installed in Ubuntu 24.04 except Podman / Docker.
Install Podman on each Ceph node. Run the following commands on each Ceph node:
ceph0ceph1ceph2
sudo apt update && sudo apt install -y podman
Now install cephadm for Ceph 19.2.3 (Squid). Run the following commands on each Ceph node:
CEPH_RELEASE=19.2.3
curl -k --silent --remote-name --location https://download.ceph.com/rpm-${CEPH_RELEASE}/el9/noarch/cephadm
sudo install -T cephadm /usr/local/bin/cephadm
Install the Ceph client binaries on the bastion host. Run the following commands:
sudo apt update && sudo apt install -y ceph-common
Bootstrap the Ceph cluster on ceph0
Bootstrap the Ceph cluster on ceph0 with cephadm bootstrap. Run the following commands on ceph0:
sudo cephadm bootstrap --mon-ip $CEPH0_IP
Wait until the command reports that the bootstrap is successful. The process should take under 5 minutes.
Bootstrap complete.
Verify the cluster status with the Ceph CLI. Run the following command on ceph0 to enter an interactive shell:
sudo cephadm shell
Observe the shell prompt change to root@ceph0:/#. You are dropped into a container with the Ceph CLI pre-installed and the relevant Ceph configuration files from the host bind-mounted into the container.
Verify the cluster status from within the cephadm shell:
ceph status
Sample output:
  cluster:
    id:     e24d2e8b-96dc-11f0-8b73-525400137312
    health: HEALTH_WARN
            OSD count 0 < osd_pool_default_size 3

  services:
    mon: 1 daemons, quorum ceph0 (age 2m)
    mgr: ceph0.pflfbk(active, since 62s)
    osd: 0 osds: 0 up, 0 in

  data:
    pools:   0 pools, 0 pgs
    objects: 0 objects, 0 B
    usage:   0 B used, 0 B / 0 B avail
    pgs:
Notice that the cluster health is in a HEALTH_WARN state since we haven’t added any OSDs yet. This is expected and we will add the OSDs at a later step.
It is normal to observe components such as Prometheus or Grafana progressing if running the ceph status command right after the bootstrap procedure. The Ceph components should stabilize within a few minutes.
Check the raw used and available capacity within the Ceph cluster.
Run the following command in the cephadm shell:
ceph df
Sample output:
--- RAW STORAGE ---
CLASS  SIZE  AVAIL  USED  RAW USED  %RAW USED
TOTAL   0 B    0 B   0 B       0 B          0

--- POOLS ---
POOL  ID  PGS  STORED  OBJECTS  USED  %USED  MAX AVAIL
We get 0 bytes as expected since no disks are available yet.
List the cluster nodes. In the cephadm shell, run:
ceph orch host ls
Sample output:
HOST   ADDR            LABELS  STATUS
ceph0  192.168.124.33  _admin
1 hosts in cluster
We only have 1 node ceph0 - for now.
Exit the cephadm shell:
exit
Note that we can run Ceph commands with cephadm shell in line, like so. For example, the command below prints the CRUSH map in human-readable format to standard output (STDOUT).
sudo cephadm shell -- \
    /bin/sh -c "ceph osd getcrushmap | crushtool -d -"
Sample output:
Inferring fsid e24d2e8b-96dc-11f0-8b73-525400137312
Inferring config /var/lib/ceph/e24d2e8b-96dc-11f0-8b73-525400137312/mon.ceph0/config
Using ceph image with id 'aade1b12b8e6' and tag 'v19' created on 2025-07-17 19:53:27 +0000 UTC
quay.io/ceph/ceph@sha256:af0c5903e901e329adabe219dfc8d0c3efc1f05102a753902f33ee16c26b6cee
1
# begin crush map
tunable choose_local_tries 0
tunable choose_local_fallback_tries 0
tunable choose_total_tries 50
tunable chooseleaf_descend_once 1
tunable chooseleaf_vary_r 1
tunable chooseleaf_stable 1
tunable straw_calc_version 1
tunable allowed_bucket_algs 54

# devices

# types
type 0 osd
type 1 host
type 2 chassis
type 3 rack
type 4 row
type 5 pdu
type 6 pod
type 7 room
type 8 datacenter
type 9 zone
type 10 region
type 11 root

# buckets
root default {
    id -1       # do not change unnecessarily
    # weight 0.00000
    alg straw2
    hash 0  # rjenkins1
}

# rules
rule replicated_rule {
    id 0
    type replicated
    step take default
    step chooseleaf firstn 0 type host
    step emit
}

# end crush map
The first few lines from standard error (STDERR) display the configuration mounted to the container and the OCI image used. To omit those lines, simply redirect STDERR to /dev/null, like so:
sudo cephadm shell -- \
    /bin/sh -c "ceph osd getcrushmap | crushtool -d -" \
    2> /dev/null
Add the remaining hosts to our Ceph cluster
During the bootstrap process, an SSH key pair was created for our Ceph cluster. The SSH public key is located at /etc/ceph/ceph.pub.
From the bastion host, copy the cluster SSH public key to the root user’s authorized_keys in ceph1 and ceph2:
scp $CEPH0_IP:/etc/ceph/ceph.pub .
ssh-copy-id -f -i ceph.pub root@$CEPH1_IP
ssh-copy-id -f -i ceph.pub root@$CEPH2_IP
Now log in to ceph0 and run the ceph orch host add command to add ceph1 to our cluster:
sudo cephadm shell -- ceph orch host add \
    ceph1 \
    $CEPH1_IP \
    --labels _admin 2> /dev/null
Sample output:
Added host 'ceph1' with addr '192.168.124.205'
Repeat for ceph2:
sudo cephadm shell -- ceph orch host add \
    ceph2 \
    $CEPH2_IP \
    --labels _admin 2> /dev/null
Sample output:
Added host 'ceph2' with addr '192.168.124.58'
Now list the hosts in our cluster again from ceph0:
sudo cephadm shell -- ceph orch host ls 2> /dev/null
Sample output:
HOST   ADDR             LABELS  STATUS
ceph0  192.168.124.33   _admin
ceph1  192.168.124.205  _admin
ceph2  192.168.124.58   _admin
3 hosts in cluster
Add available storage devices to the cluster
List the available storage devices on each Ceph node. On ceph0, run:
sudo cephadm shell -- ceph orch device ls 2> /dev/null
Sample output:
HOST   PATH      TYPE  DEVICE ID   SIZE  AVAILABLE  REFRESHED  REJECT REASONS
ceph0  /dev/vdb  hdd              32.0G  Yes        29m ago
ceph1  /dev/vdb  hdd              32.0G  Yes        29m ago
ceph2  /dev/vdb  hdd              32.0G  Yes        29m ago
The output above indicates that the device /dev/vdb is available on each Ceph node. Your output may be different, remember to adapt the commands accordingly.
Let’s add 1 OSD for /dev/vdb on ceph0 with ceph orch daemon add osd. On ceph0, run:
sudo cephadm shell -- \
    ceph orch daemon add osd \
    ceph0:/dev/vdb 2> /dev/null
Sample output:
Created osd(s) 0 on host 'ceph0'
Observe that the OSD is created with ceph osd ls. On ceph0, run:
sudo cephadm shell -- ceph osd ls 2> /dev/null
Sample output:
0
Let’s check the used and available raw capacity on each OSD with ceph osd df.
On ceph0, run:
sudo cephadm shell -- ceph osd df 2> /dev/null
Sample output:
ID  CLASS  WEIGHT   REWEIGHT  SIZE    RAW USE  DATA    OMAP     META    AVAIL   %USE  VAR   PGS  STATUS
 0    hdd  0.03119   1.00000  32 GiB   26 MiB  88 KiB    1 KiB  26 MiB  32 GiB  0.08  1.00    0      up
                       TOTAL  32 GiB   26 MiB  88 KiB  1.6 KiB  26 MiB  32 GiB  0.08
MIN/MAX VAR: 1.00/1.00  STDDEV: 0
Instead of manually identifying the available devices and adding the OSDs one by one, we can instruct Ceph to consume all available devices and create OSDs for them automatically.
On ceph0, run:
sudo cephadm shell -- \
    ceph orch apply osd \
    --all-available-devices 2> /dev/null
Sample output:
Scheduled osd.all-available-devices update...
Confirm that OSDs are created for the remaining devices. Use the ceph osd tree command on ceph0:
sudo cephadm shell -- ceph osd tree 2> /dev/null
Sample output:
ID  CLASS  WEIGHT   TYPE NAME       STATUS  REWEIGHT  PRI-AFF
-1         0.09357  root default
-3         0.03119      host ceph0
 0    hdd  0.03119          osd.0       up   1.00000  1.00000
-7         0.03119      host ceph1
 1    hdd  0.03119          osd.1       up   1.00000  1.00000
-5         0.03119      host ceph2
 2    hdd  0.03119          osd.2       up   1.00000  1.00000
Create an RBD pool
Let’s create an RBD pool using the available storage to provision block devices for our applications. This is a 2-step process:
- Create an OSD pool with the name
rbd - Initialize the RBD pool with the default name
rbd
List the existing OSD pools. For a newly configured Ceph cluster, there should just be 1 pool .mgr used by the MGRs internally.
Run the ceph osd pool ls command on ceph0:
sudo cephadm shell -- ceph osd pool ls 2> /dev/null
Sample output:
.mgr
Create the OSD pool rbd from ceph0 with ceph osd pool create:
sudo cephadm shell -- ceph osd pool create rbd 2> /dev/null
To use the OSD pool rbd for RBD block volumes, we need to initialize it with rbd pool init ${POOL_NAME}. If POOL_NAME is not specified then it is assumed to be the default rbd.
On ceph0, run:
sudo cephadm shell -- rbd pool init 2> /dev/null
List the available pools again from ceph0:
sudo cephadm shell -- ceph osd pool ls 2> /dev/null
Sample output:
.mgr
rbd
This time we see the rbd pool is listed.
Create a block device user for least-privilege client access
When running Ceph commands on the bootstrap node ceph0, the default authentication credentials used are as follows:
- Name:
client.admin - ID:
admin - Keyring:
/etc/ceph/ceph.client.admin.keyring
Here, “client” is a convention indicating the principal is a user as opposed to a service account. The ID “admin” is the username and the filename of the keyring is by convention ceph.${PRINCIPAL_TYPE}.${PRINCIPAL_NAME}.keyring.
This bootstrap user has unrestricted privileges on the Ceph cluster and is not suitable for sharing to external hosts, especially if all the external host requires is to create, manage and consume RBD volumes from a specific pool.
Let’s create a new user client.rbd with the following privileges:
- View cluster configuration and metadata but not modify the cluster configuration:
mon 'profile rbd' - Read-write permissions on data and metadata objects within the
rbdpool:osd 'profile rbd pool=rbd' - Perform RBD management API calls scoped to the
rbdpool:mgr 'profile rbd pool=rbd'
On ceph0, run:
sudo cephadm shell -- ceph auth get-or-create \
    client.rbd \
    mon 'profile rbd' \
    osd 'profile rbd pool=rbd' \
    mgr 'profile rbd pool=rbd' \
    > ceph.client.rbd.keyring \
    2> /dev/null
This creates the client.rbd user with the specified privileges and writes the keyring to ceph.client.rbd.keyring under the current directory. The keyring is used to authenticate to the Ceph cluster as the client.rbd user which we’ll copy to the bastion host in a moment.
Refer to Basic Block Device Commands - Ceph Documentation for more details.
Now on the bastion host, create the /etc/ceph configuration directory and copy the following files from ceph0 to under /etc/ceph on our bastion host:
- The
ceph.confCeph cluster configuration file - The
ceph.client.rbd.keyringkeyring for theclient.rbduser we just created onceph0
sudo mkdir -p /etc/ceph
scp $CEPH0_IP:/etc/ceph/ceph.conf .
scp $CEPH0_IP:~/ceph.client.rbd.keyring .
sudo mv ceph.conf ceph.client.rbd.keyring /etc/ceph/.
Create and use a block device provisioned from Ceph
Now to the interesting part - let’s create an RBD image from our pool, make it available on our bastion host as a block device and use it as if it were a local disk device!
Create an RBD image hello-rbd with size 1024Mi = 1Gi. Note that we specify the option -n client.rbd to authenticate as the client.rbd user:
rbd -n client.rbd create \
    hello-rbd \
    --size 1024
List the available RBD images in our pool:
rbd -n client.rbd ls
Sample output:
hello-rbd
View detailed info on our hello-rbd image:
rbd -n client.rbd info hello-rbd
Sample output:
rbd image 'hello-rbd':
    size 1 GiB in 256 objects
    order 22 (4 MiB objects)
    snapshot_count: 0
    id: acfb908ead87
    block_name_prefix: rbd_data.acfb908ead87
    format: 2
    features: layering, exclusive-lock, object-map, fast-diff, deep-flatten
    op_features:
    flags:
    create_timestamp: Sun Sep 21 13:55:15 2025
    access_timestamp: Sun Sep 21 13:55:15 2025
    modify_timestamp: Sun Sep 21 13:55:15 2025
The created image is 1Gi in size as expected.
Now map our RBD image to a block device:
sudo rbd -n client.rbd map hello-rbd
Sample output:
/dev/rbd0
Our hello-rbd image is mapped to the block device /dev/rbd0. Your output may differ; remember to adapt the commands accordingly.
Format the device with XFS and mount it under /mnt/hello-rbd:
sudo mkfs.xfs /dev/rbd0
sudo mkdir -p /mnt/hello-rbd
sudo mount /dev/rbd0 /mnt/hello-rbd
Let’s check if our block device actually works. Create a file 512Mi in size with dd:
sudo dd if=/dev/urandom of=/mnt/hello-rbd/testfile bs=1M count=512
Now verify the usage of our block device:
df -Th /dev/rbd0
Sample output:
Filesystem     Type  Size  Used Avail Use% Mounted on
/dev/rbd0      xfs   960M  564M  397M  59% /mnt/hello-rbd
About 50% of the 1Gi capacity of our block device is used as expected.
Verify the raw space used by our 512Mi test file on the Ceph cluster
Let’s check how much raw space our 512Mi test file has consumed on the cluster. Note the client.rbd user is permitted to query general information about the cluster but not modify the cluster configuration.
ceph -n client.rbd df
Sample output:
--- RAW STORAGE ---
CLASS    SIZE   AVAIL     USED  RAW USED  %RAW USED
hdd    96 GiB  94 GiB  1.6 GiB   1.6 GiB       1.71
TOTAL  96 GiB  94 GiB  1.6 GiB   1.6 GiB       1.71

--- POOLS ---
POOL  ID  PGS   STORED  OBJECTS     USED  %USED  MAX AVAIL
.mgr   1    1  449 KiB        2  1.3 MiB      0     30 GiB
rbd    2   32  514 MiB      141  1.5 GiB   1.66     30 GiB
Turns out our 512Mi file has occupied 1.5Gi raw space on the cluster! Let’s see why.
Query the size and min_size settings of our rbd pool with ceph osd pool get:
ceph -n client.rbd osd pool get rbd size
ceph -n client.rbd osd pool get rbd min_size
Sample output:
size: 3
min_size: 2
The size is 3 and min_size is 2. size determines the number of data replicas to maintain and min_size determines the minimum number of data replicas to tolerate before Ceph halts all I/O activity for the pool during a partial cluster failure or outage. By default, we have 3-way replication and Ceph halts all I/O when it detects data blocks in the pool with fewer than 2 replicas, e.g. due to a failed OSD. So the usable capacity of the RBD pool is by default just 33% the raw capacity.
We can view all the tunable parameters of each OSD pool with ceph osd pool ls detail:
ceph -n client.rbd osd pool ls detail
Sample output:
pool 1 '.mgr' replicated size 3 min_size 2 crush_rule 0 object_hash rjenkins pg_num 1 pgp_num 1 autoscale_mode on last_change 20 flags hashpspool stripe_width 0 pg_num_max 32 pg_num_min 1 application mgr read_balance_score 3.00
pool 2 'rbd' replicated size 3 min_size 2 crush_rule 0 object_hash rjenkins pg_num 32 pgp_num 32 autoscale_mode on last_change 28 lfor 0/0/26 flags hashpspool,selfmanaged_snaps stripe_width 0 application rbd read_balance_score 1.31
The meaning of each configurable option is outside the scope of this lab exercise.
Mount the RBD image at system boot
It’s great we can make the RBD image available as a block device and mount it locally, but it’s not much use if we must manually map the RBD image and mount the device every time the system reboots. Let’s make our configuration persistent so our bastion host maps the RBD image as a block device and automatically mounts it under /mnt/hello-rbd at system boot.
Append the following line to /etc/ceph/rbdmap. This instructs the rbdmap.service systemd unit to automatically map the hello-rbd image as a block device on system boot:
hello-rbd id=rbd,keyring=/etc/ceph/ceph.client.rbd.keyring
Now append the following file system entry under /etc/fstab:
/dev/rbd/rbd/hello-rbd /mnt/hello-rbd xfs defaults,nofail 0 0
/dev/rbd0 is not a stable identifier and may change across reboots. Instead, we use the stable identifier of the form /dev/rbd/${POOL_NAME}/${IMAGE_NAME}. Also note the nofail option - Ubuntu tries to mount the mapped device before rbdmap runs so let’s allow it to fail - rest assured the mount will eventually succeed after rbdmap runs and the device is successfully mounted once the system is fully booted.
Reboot the system now:
sudo systemctl reboot
Wait up to 1 minute for the system to reboot. Now log in to the bastion host again and confirm the device is available and mounted:
df -Th /dev/rbd/rbd/hello-rbd
Sample output:
Filesystem     Type  Size  Used Avail Use% Mounted on
/dev/rbd0      xfs   960M  563M  398M  59% /mnt/hello-rbd
Congratulations, you provisioned a Ceph cluster, created an RBD image and mapped it to an external host as a block volume for application access!
Demo
An asciicast recording of this hands-on lab is available on Asciinema.
Concluding remarks and going further
This lab only scratches the surface of what’s possible with Ceph. Check out the following resources to learn more about Ceph:
- CL260: Red Hat Ceph Storage for OpenStack: this course dives into the details of Ceph administration and how to integrate Ceph with OpenStack for a hyperconverged platform
- DO370: Enterprise Kubernetes Storage with Red Hat OpenShift Data Foundation: this course dives into provisioning Ceph storage on Kubernetes with the Rook orchestrator and using Ceph to provision block, file and object storage for Kubernetes applications, among other tasks
I hope you enjoyed the lab and stay tuned for updates! ;-)
Subscribe:
![]()
![]()
![[Valid RSS]](/assets/images/valid-rss-rogers.png)
![[Valid Atom 1.0]](/assets/images/valid-atom.png)