Configuring an IPsec VPN connection with OpenIKED
Date: 2023-09-16
From the Wikipedia page on virtual private networks (VPN):
A virtual private network (VPN) is a mechanism for creating a secure connection between a computing device and a computer network, or between two networks, using an insecure communication medium such as the public Internet.
VPNs are commonly used by businesses for enabling employees to work remotely e.g. during business trips or bad weather as they enable employees to connect to and access corporate resources securely from a remote network over the Internet. Another common use case for VPNs is for privacy-oriented individuals to conceal their true location and identity since all network requests are tunneled through the VPN and appear as if originating from the VPN server itself instead of the user’s laptop / workstation.
Now consider the following description of the IPsec protocol provided by Cloudflare:
IPsec is a group of protocols for securing connections between devices. IPsec helps keep data sent over public networks secure. It is often used to set up VPNs, and it works by encrypting IP packets, along with authenticating the source where the packets come from.
IPsec is commonly employed by enterprise-grade VPN solutions such as FortiGate for its excellent security and richness of features, though open-source implementations such as OpenIKED and strongSwan also exist. It uses Internet Key Exchange (IKE) under the hood which is further divided into IKEv1 and IKEv2, the latter a more modern and secure version of the former.
In the lab to follow, we will construct two disjoint networks on VirtualBox and demonstrate how OpenIKED can be configured as both a server and client to establish an IPsec VPN connection between the two networks.
Lab: Constructing two disjoint networks on VirtualBox and establishing a VPN connection between them with OpenIKED
Prerequisites
Familiarity with Unix/Linux networking and administration is assumed. If not, refer to my previous article Configuring a simple router with OpenBSD for recommended training and resources. It is also recommended that you follow and complete the lab in the previous article individually before proceeding with this lab, as the previous lab covers the basics of installing and configuring OpenBSD as a gateway device.
System requirements
A laptop / workstation with hardware virtualization enabled, a minimum of 2 CPU cores and 8G of RAM is required, though 16G or more RAM is recommended.
Overview
Here’s the network we’ll be constructing:
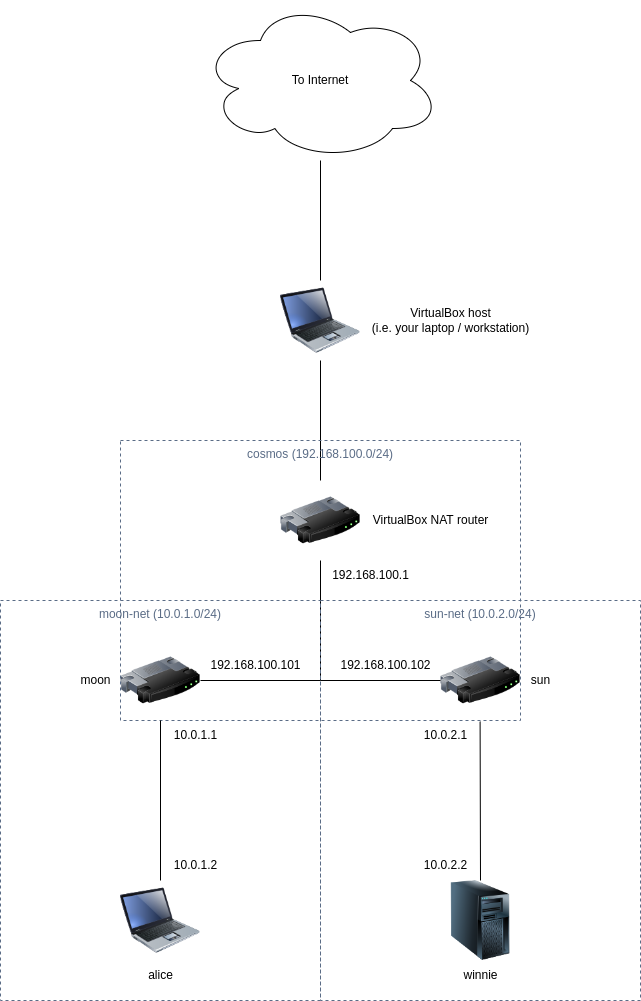
As illustrated in the diagram above, there are two networks moon-net and sun-net that cannot directly communicate with each other since they are separated by an “external” network cosmos and no routing rule exists between the two networks by default. Here, sun-net represents a corporate network where winnie hosts a web server only intended to be accessed internally by employees and sun is the gateway device acting as a router and firewall, while moon-net represents Alice’s home network with a personal laptop / workstation alice hidden behind a home router moon.
The requirement, then, is of course that Alice be able to establish a VPN connection to the corporate network and access the web server from the comfort of her home in order to perform her job duties as a diligent employee even when she is unable to return to office due to extreme weather.
To accurately model this network, we’ll leverage VirtualBox’s rich networking capabilities to construct moon-net and sun-net as internal networks and cosmos as a NAT network - the rest will be handled transparently by VirtualBox. We’ll then install and configure four virtual machines moon, sun, alice and winnie accordingly, using OpenBSD for our gateway devices moon, sun and Ubuntu Server for our client alice and web server winnie.
Initial VirtualBox networking configuration
The NAT network cosmos with subnet/netmask 192.168.100.0/24 needs to be created in advance, though the two internal networks moon-net and sun-net do not need to be explicitly created as VirtualBox groups together network interfaces connected to an internal network of identical name and automatically connects them to the same virtual switch which places them in the same virtual network.
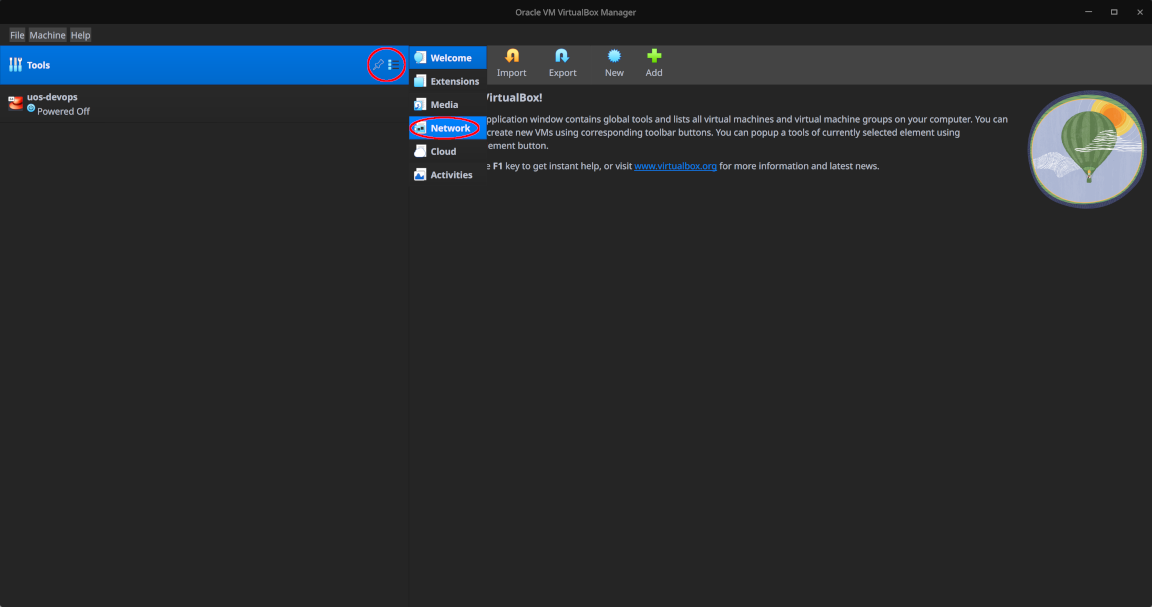
To create the NAT network cosmos, select “Tools > Network > NAT Networks”, then click “Create” and fill in the details as shown in the next two screenshots:
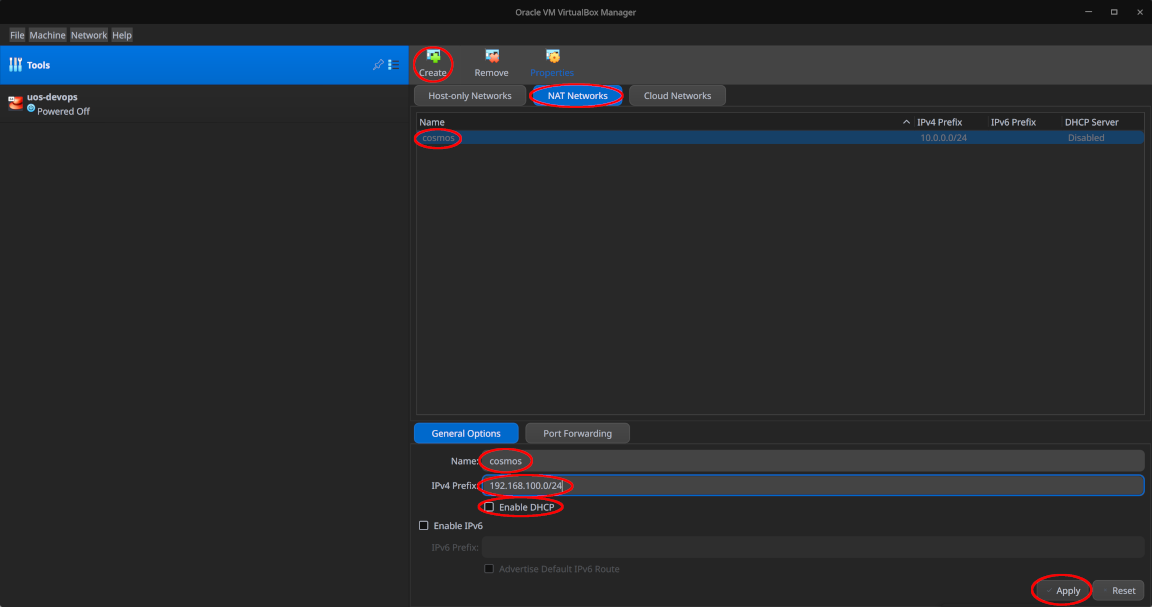
Feel free to disable the DHCP server since we won’t be using it - instead, we will assign static IP addresses to all interfaces and hosts.
Creating and initializing our virtual machines
Let’s create and initialize our virtual machines in the following order, though note that the order of creation and initialization shouldn’t matter:
sunmoonwinniealice
Creating and installing OpenBSD on sun
Fetch the latest stable version of OpenBSD from the official website, then use that ISO to create a virtual machine named sun with 1024MB memory, 1 vCPU and 16G of storage.
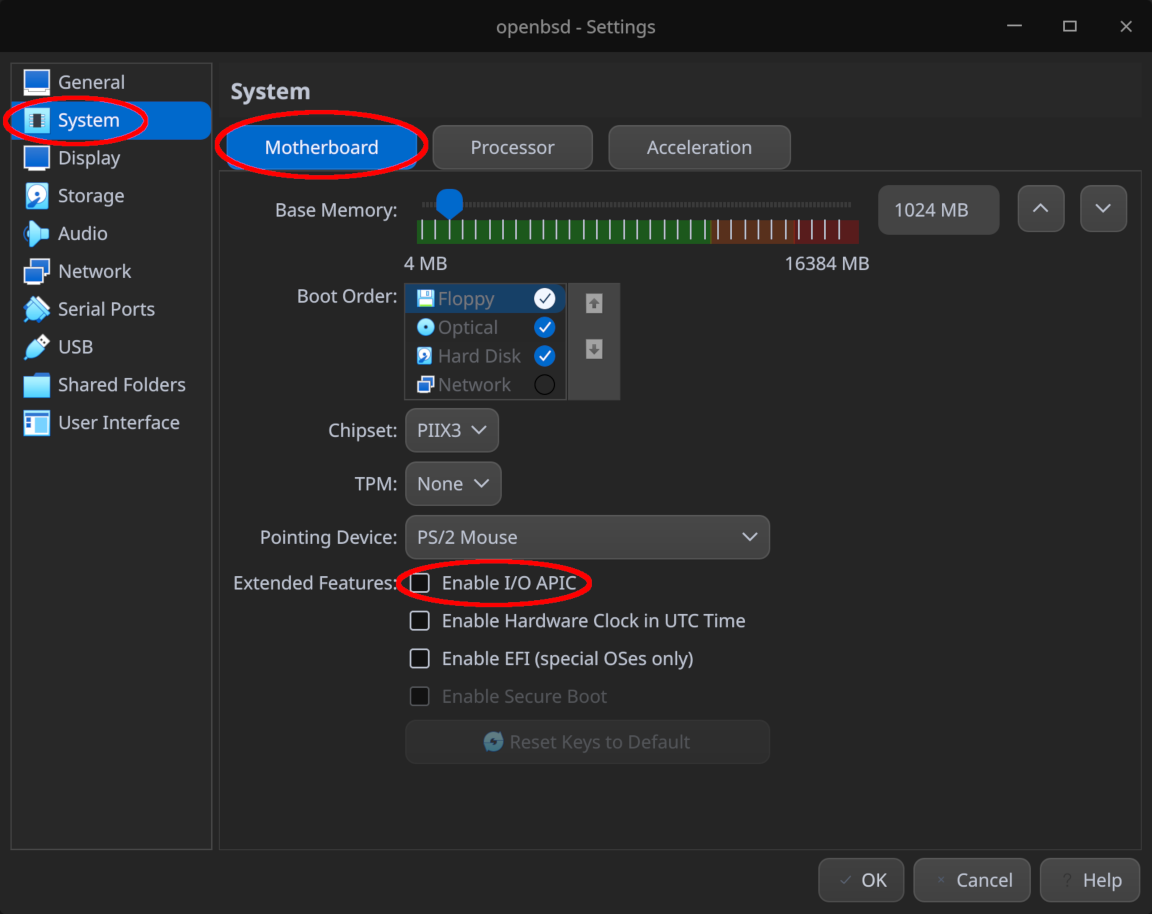
Before booting sun for the first time, configure the settings for this VM as follows:
- Make sure “Enable I/O APIC” is unchecked under “System > Motherboard” as OpenBSD does not support paravirtualization and leaving this option checked is known to cause kernel panics
- For “Adapter 1” under “Network”, attach it to “NAT Network” and select the previously created network
cosmos, ensuring that “Promiscuous Mode” is set to “Allow VMs” as well - Make sure “Network > Adapter 2” is enabled and attached to the “Internal Network”
sun-net
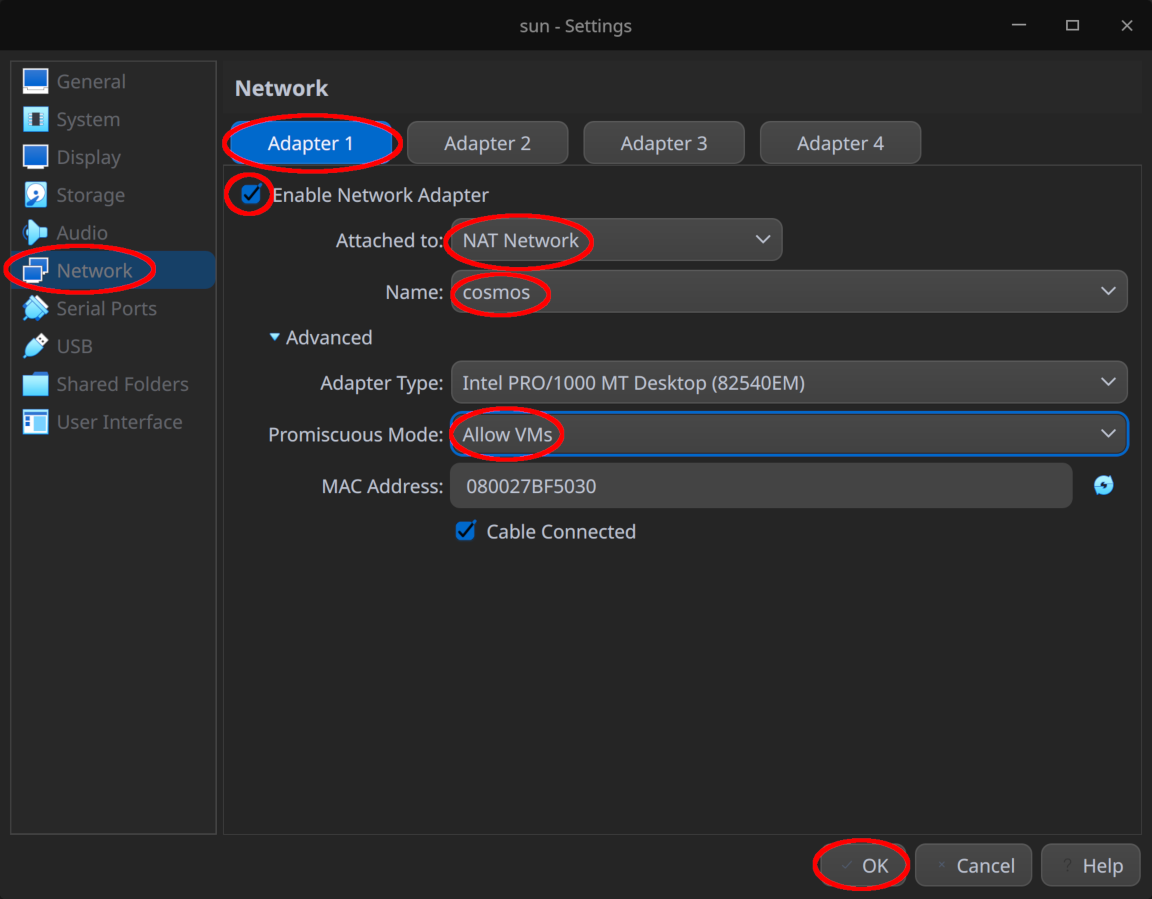
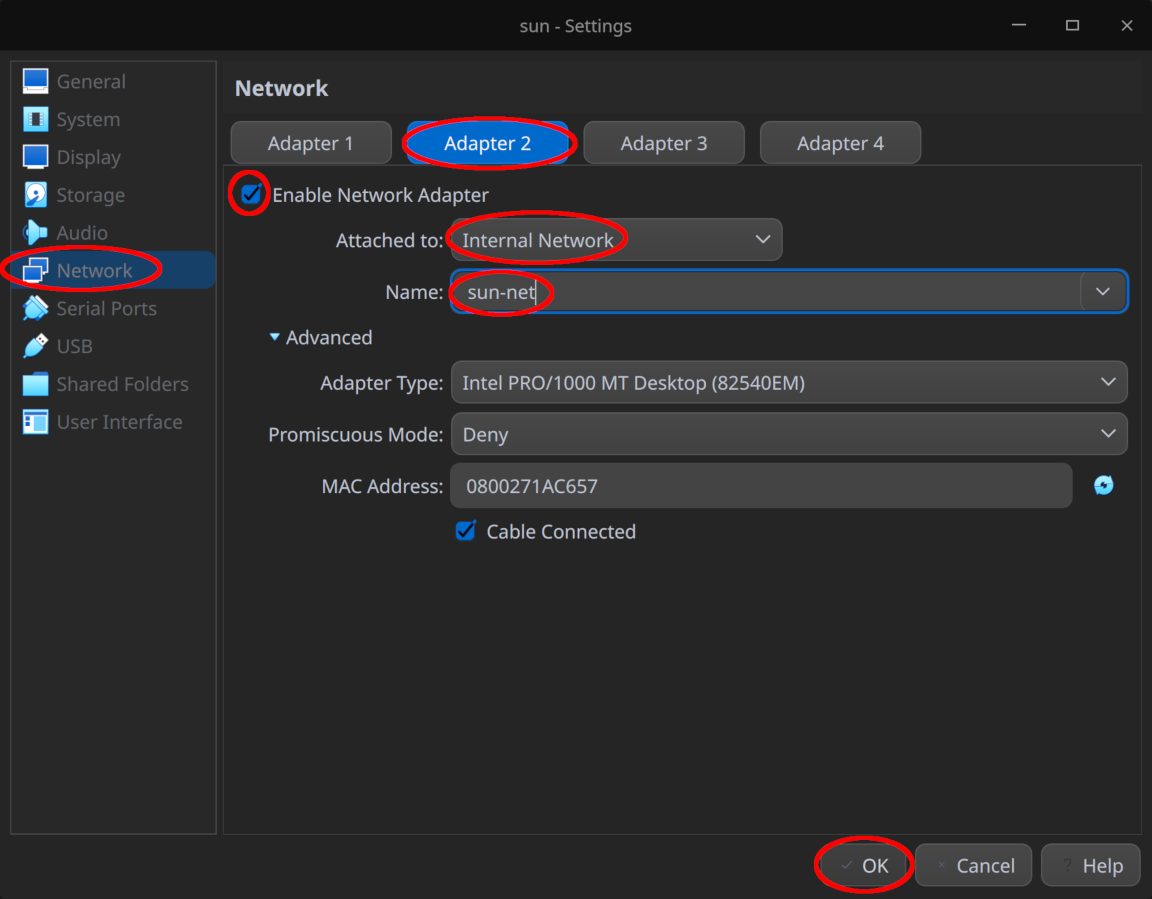
Click “OK” afterwards to save the settings and boot the VM normally.
Set the following parameters during installation:
- Hostname:
sun em0IPv4 address:192.168.100.102em1IPv4 address:10.0.2.1- Default route:
192.168.100.1 - Nameserver:
8.8.8.8 - Run X Window system:
no - Allow root SSH login:
yes - Continue without verification:
yes
Remember to remove the installation ISO from the virtual drive explicitly before rebooting.
Creating and installing OpenBSD on moon
This is much the same as creating and installing OpenBSD on sun, except connect Adapter 2 to the internal network moon-net and set the following parameters during installation:
- Hostname:
moon em0IPv4 address:192.168.100.101em1IPv4 address:10.0.1.1- Default route:
192.168.100.1 - Nameserver:
8.8.8.8 - Run X Window system:
no - Allow root SSH login:
yes - Continue without verification:
yes
Remember to remove the installation ISO from the virtual drive explicitly before rebooting.
Creating and installing Ubuntu Server on winnie
Fetch the latest LTS release of Ubuntu Server from the official website, then use that ISO to create a virtual machine winnie with 1024MB memory, 1 vCPU and 16G of storage. Make sure to skip the unattended installation which is known to fail and cause issues.
Before booting winnie for the first time, configure “Adapter 1” under “Network” such that it is connected to the internal network sun-net.
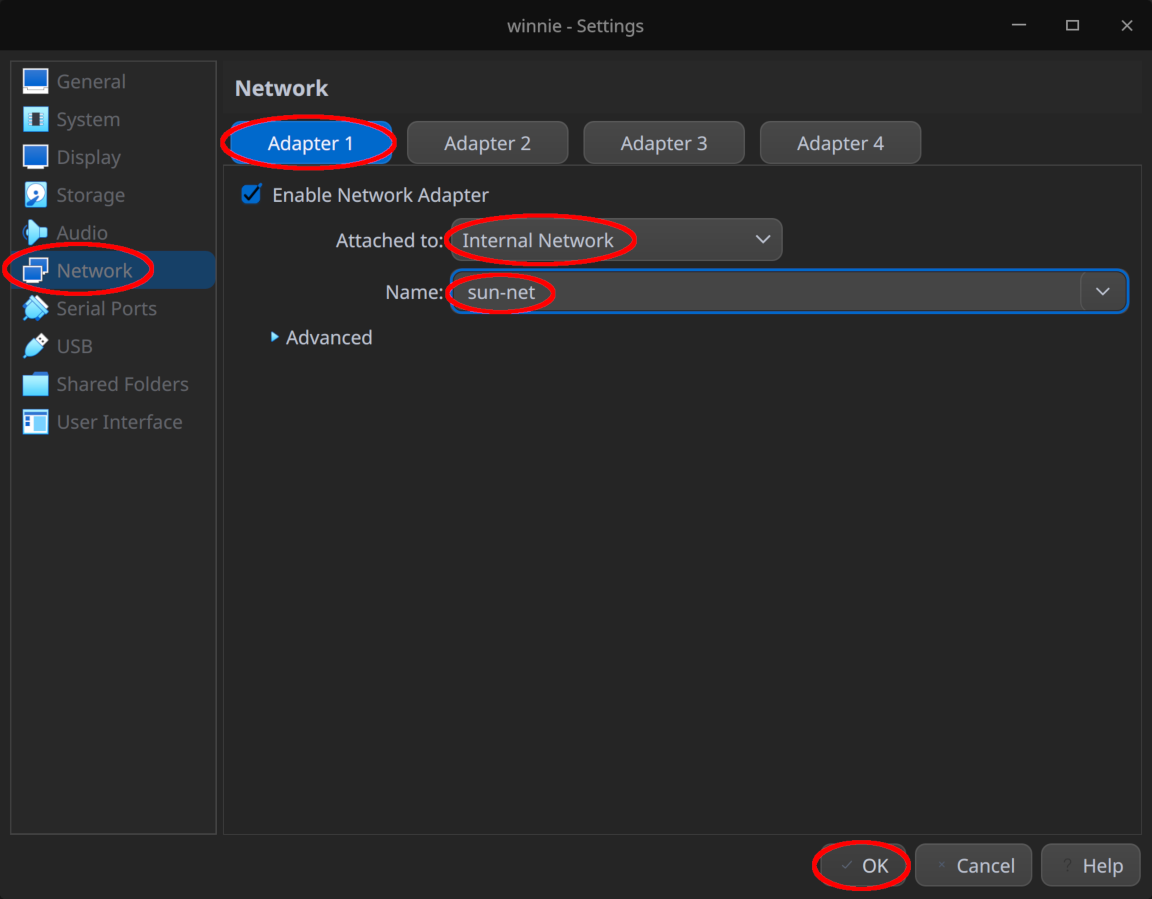
Click “OK” to save the modified settings.
Now boot the VM normally and set the following parameters during installation:
- IPv4 Method: Disabled
- Hostname:
winnie - Username:
student - Make sure “Install OpenSSH server” is checked
After the reboot, log in to the console directly (note that remote SSH login is not usable yet) and fill in the following content for /etc/netplan/00-installer-config.yaml:
# This is the network config written by 'subiquity'
network:
  version: 2
  ethernets:
    enp0s3:
      dhcp4: no
      addresses:
      - 10.0.2.2/24
      gateway4: 10.0.2.1
      nameservers:
        addresses:
        - 8.8.8.8
        - 8.8.4.4
Now run the following command to configure the network:
sudo netplan apply
Creating and installing Ubuntu Server on alice
This is similar to winnie, except connect Adapter 1 to the internal network moon-net and set the following parameters during installation:
- IPv4 Method: Disabled
- Hostname:
alice - Username:
student - Make sure “Install OpenSSH server” is checked
After the reboot, log in to the console directly and fill in the following content for /etc/netplan/00-installer-config.yaml:
# This is the network config written by 'subiquity'
network:
  version: 2
  ethernets:
    enp0s3:
      dhcp4: no
      addresses:
      - 10.0.1.2/24
      gateway4: 10.0.1.1
      nameservers:
        addresses:
        - 8.8.8.8
        - 8.8.4.4
Now run the following command to configure the network:
sudo netplan apply
Configuring host-level NAT for logging in to sun and moon via SSH
Since our gateway devices moon and sun are hidden behind a VirtualBox NAT router, we need to set the following NAT port forwarding rules at the host level to enable logging in to them remotely via SSH:
- Add a rule
moon-sshwhich forwards TCP port 1322 on the host to TCP port 22 on192.168.100.101 - Add a rule
sun-sshwhich forwards TCP port 1222 on the host to TCP port 22 on192.168.100.102
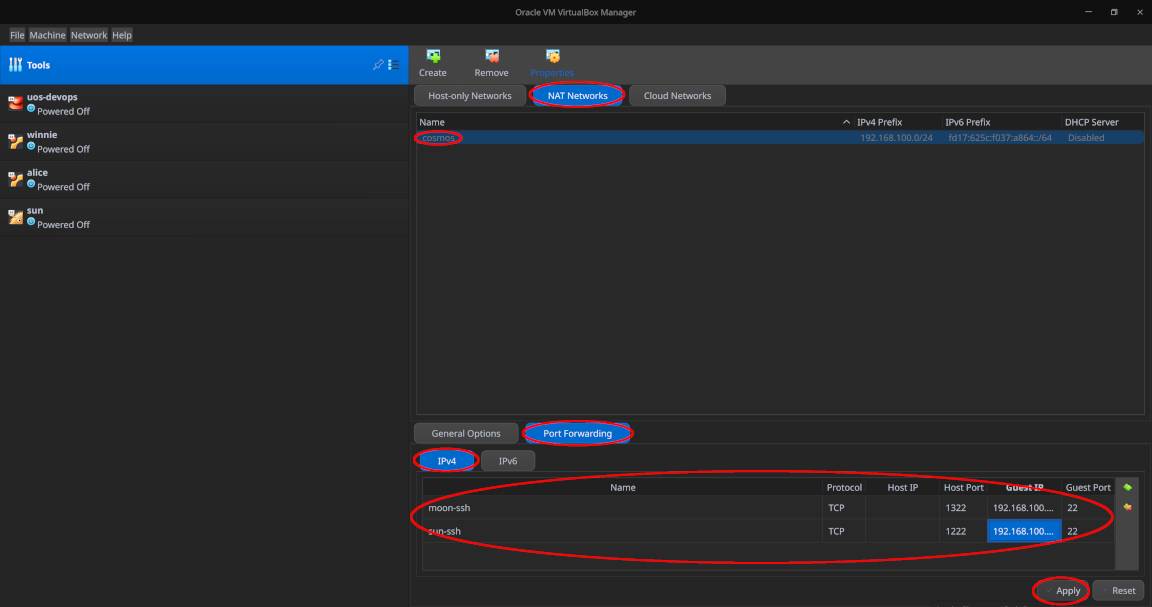
You may use any other ports on the host as desired, as long as they are both above 1024, distinct and not already bound by other services on your laptop / workstation.
With these port forwarding rules set, you should be able to start all VMs in headless mode and log in to them via SSH (or nested SSH with the appropriate gateway device as the intermediate host, for logging in to alice and winnie hidden behind an internal network).
Enable Internet access for both internal networks
Log in to sun via SSH (or directly via the console, or otherwise) and run the following commands to allow our “corporate firewall” to start forwarding packets:
sysctl net.inet.ip.forwarding=1
echo 'net.inet.ip.forwarding=1' >> /etc/sysctl.conf
Now append the following line to /etc/pf.conf:
pass out on em0 inet from 10.0.2.0/24 to any nat-to 192.168.100.102
Instruct PF to re-read the configuration file with the following command:
pfctl -f /etc/pf.conf
Now log in to moon via SSH and run the same commands:
sysctl net.inet.ip.forwarding=1
echo 'net.inet.ip.forwarding=1' >> /etc/sysctl.conf
Append the following line to /etc/pf.conf:
pass out on em0 inet from 10.0.1.0/24 to any nat-to 192.168.100.101
Instruct PF to re-read its configuration file:
pfctl -f /etc/pf.conf
Now log in to winnie with SSH via sun and confirm that it is able to reach the Internet:
ping -c4 google.com
Sample output:
PING google.com (172.217.24.78) 56(84) bytes of data.
64 bytes from hkg07s46-in-f14.1e100.net (172.217.24.78): icmp_seq=1 ttl=55 time=5.64 ms
64 bytes from hkg07s33-in-f14.1e100.net (172.217.24.78): icmp_seq=2 ttl=55 time=4.64 ms
64 bytes from sin10s06-in-f14.1e100.net (172.217.24.78): icmp_seq=3 ttl=55 time=4.74 ms
64 bytes from hkg07s46-in-f14.1e100.net (172.217.24.78): icmp_seq=4 ttl=55 time=4.86 ms

--- google.com ping statistics ---
4 packets transmitted, 4 received, 0% packet loss, time 3004ms
rtt min/avg/max/mdev = 4.637/4.968/5.637/0.394 ms
Repeat the same test with alice, by first logging in with SSH via moon.
With Internet access, we’re all set to install Apache on our web server winnie.
Install Apache on winnie
This step should be trivial:
sudo apt update && sudo apt install -y apache2
Confirm Apache is up and running:
curl -s localhost | grep 'It works!'
Sample output:
It works!
Except now, note that alice is not able to reach winnie yet (run the command below on alice).
ping -c4 10.0.2.2
Sample output:
PING 10.0.2.2 (10.0.2.2) 56(84) bytes of data.

--- 10.0.2.2 ping statistics ---
4 packets transmitted, 0 received, 100% packet loss, time 3055ms
Configuring an IPsec VPN connection between the two networks
For Alice to reach Winnie, we’ll need to establish a VPN connection between the two networks so they can see and communicate with each other directly.
An IPsec VPN connection consists of two components:
- The responder (server) listens for VPN connection requests in a passive manner
- The initiator (client) reaches out to a specified responder with a VPN connection request in an active manner
We’ll use OpenIKED for establishing our IPsec VPN connection which can be configured as both a responder and an initiator.
Configuring sun as a responder
Perform the steps below on sun to configure it as an IKEv2 responder. Note that OpenIKED only supports IKEv2 which is more modern and secure than IKEv1 anyway.
First open up some firewall rules allowing inbound connections from moon to UDP ports 500 (isakmp) and 4500 (ipsec-nat-t) as well as the ESP protocol. Append the following lines to /etc/pf.conf:
pass in log on em0 proto udp from 192.168.100.101 to 192.168.100.102 port {isakmp, ipsec-nat-t} tag IKED
pass in log on em0 proto esp from 192.168.100.101 to 192.168.100.102 tag IKED
The OpenBSD FAQ on VPNs provides an explanation for these rules:
To enable the initiator to reach the responder, the isakmp UDP port should be open on the responder. If one of the peers is behind NAT, the ipsec-nat-t UDP port should also be open on the responder. If both peers have public IPs, then the ESP protocol should be allowed.
Allow PF to re-read its configuration file:
pfctl -f /etc/pf.conf
Next, fill in /etc/iked.conf as follows:
ikev2 'responder_psk' passive esp \
        from 10.0.2.0/24 to 10.0.1.0/24 \
        local 192.168.100.102 peer 192.168.100.101 \
        psk 'P@ssw0rd'
Here, we instruct OpenIKED to listen for VPN connection requests in passive mode and construct a flow from sun-net (10.0.2.0/24) to moon-net (10.0.1.0/24) upon a successful VPN connection. The local “external” IP address is 192.168.100.102 as per our network diagram and the remote “external” IP address is that of moon, i.e. 192.168.100.101. For authentication, we use a pre-shared key (PSK) of P@ssw0rd which isn’t the most secure key or password out there but suffices for the purposes of this demo. Furthermore, it should be noted that a more secure method of authentication using RSA key pairs exists but it out of the scope of this lab, and PSKs are not that uncommon in real-world enterprise scenarios despite its weaker security.
Now ensure that /etc/iked.conf has its file permissions set to 0600, otherwise OpenIKED will simply refuse to start:
chmod 0600 /etc/iked.conf
Now start the iked service (OpenIKED):
rcctl -f start iked
Sample output:
iked(ok)
And enable iked to auto-start on system boot:
rcctl enable iked
Configuring moon as an initiator
The steps here are similar - fill in /etc/iked.conf with the appropriate configuration, set its file permissions to 0600, start the iked service and enable it to auto-start on system boot.
/etc/iked.conf:
ikev2 'initiator_psk' active esp \
        from 10.0.1.0/24 to 10.0.2.0/24 \
        peer 192.168.100.102 \
        psk 'P@ssw0rd'
Notice that the initiator starts in active mode, from and to are swapped (since we’re on the other end of the VPN connection), local is not specified, the peer is swapped and the PSK is identical between the responder and initiator which is how the latter identifies itself to the former.
Now run the remaining commands on moon:
chmod 0600 /etc/iked.conf
rcctl -f start iked
rcctl enable iked
Verifying our IPsec VPN connection
Now run the following command on either sun or moon to view the IPsec flows:
ipsecctl -sa
Sample output:
FLOWS:
flow esp in from 10.0.1.0/24 to 10.0.2.0/24 peer 192.168.100.101 srcid FQDN/sun.my.domain dstid FQDN/moon.my.domain type require
flow esp out from 10.0.2.0/24 to 10.0.1.0/24 peer 192.168.100.101 srcid FQDN/sun.my.domain dstid FQDN/moon.my.domain type require

SAD:
esp tunnel from 192.168.100.101 to 192.168.100.102 spi 0x30d83f18 enc aes-128-gcm
esp tunnel from 192.168.100.102 to 192.168.100.101 spi 0x7d37a775 enc aes-128-gcm
The first 3 lines of output demonstrate that bi-directional flows have been successfully established between the two subnets and hosts in both subnets should now be able to communicate with each other freely via the newly established VPN tunnel.
Let’s confirm this by logging in to both alice and winnie, and run some commands.
On winnie, ping the IP of alice to verify that it is reachable:
ping -c4 10.0.1.2
Sample output:
PING 10.0.1.2 (10.0.1.2) 56(84) bytes of data.
64 bytes from 10.0.1.2: icmp_seq=1 ttl=62 time=1.58 ms
64 bytes from 10.0.1.2: icmp_seq=2 ttl=62 time=1.46 ms
64 bytes from 10.0.1.2: icmp_seq=3 ttl=62 time=2.54 ms
64 bytes from 10.0.1.2: icmp_seq=4 ttl=62 time=1.75 ms

--- 10.0.1.2 ping statistics ---
4 packets transmitted, 4 received, 0% packet loss, time 3005ms
rtt min/avg/max/mdev = 1.455/1.831/2.536/0.420 ms
Now, on alice, ping the IP address of winnie to verify that it is reachable:
ping -c4 10.0.2.2
Sample output:
PING 10.0.2.2 (10.0.2.2) 56(84) bytes of data.
64 bytes from 10.0.2.2: icmp_seq=1 ttl=62 time=0.575 ms
64 bytes from 10.0.2.2: icmp_seq=2 ttl=62 time=0.776 ms
64 bytes from 10.0.2.2: icmp_seq=3 ttl=62 time=1.83 ms
64 bytes from 10.0.2.2: icmp_seq=4 ttl=62 time=2.50 ms

--- 10.0.2.2 ping statistics ---
4 packets transmitted, 4 received, 0% packet loss, time 3041ms
rtt min/avg/max/mdev = 0.575/1.419/2.496/0.783 ms
Finally and most importantly, confirm that Alice is able to visit the internal webpage hosted by Winnie:
curl -s 10.0.2.2 | grep 'It works!'
Sample output:
It works!
Concluding remarks and going further
We’ve seen how OpenIKED can be configured as both an IPsec VPN server (responder) and client (initiator) for establishing VPN connections in a semi real-world scenario, but note that there are two major caveats:
- This lab assumes that all hosts and interfaces are assigned static IP addresses and thus known in advance, though in a real-world scenario, the public IP of a home router is likely dynamically allocated by an Internet Service Provider (ISP) via DHCP, and similarly, the private IP of
alicewill likely be dynamically allocated via DHCP as well - This lab configures both the IKEv2 responder and initiator on the gateway devices
moonandsun, though in a real-world scenario, Alice will likely configure the VPN client directly on her laptopalicein a road warrior configuration and not directly on her home routermoon
While this lab was hopefully interesting and educational, it only covers the most basic use case for OpenIKED and there is much left to uncover. For a deeper dive in OpenIKED, consider going through the remaining sections of the OpenBSD FAQ on VPNs (this lab only touches the first section) and adapt this lab for the road warrior configuration which is closer to how IPsec VPNs are typically configured and used in a real-world scenario.
I hope you enjoyed this article and see you in a future article ;-)
Subscribe:
![]()
![]()
![[Valid RSS]](/assets/images/valid-rss-rogers.png)
![[Valid Atom 1.0]](/assets/images/valid-atom.png)