Configuring Rook with external Ceph storage
Date: 2025-09-23
Ceph is a distributed, scalable, fault-tolerant solution for provisioning block, file and object storage to applications.
- In Provisioning Ceph storage with cephadm, we provisioned a minimal Ceph cluster with
cephadmand configured an RBD pool to provision block storage for applications - In Running stateful workloads on Kubernetes with Rook Ceph, we deployed Ceph to Kubernetes with Rook using mostly default settings and provisioned block storage for MinIO with minimal effort
While deploying Ceph to Kubernetes with Rook is simple and is sufficient for most Kubernetes use cases, certain scenarios may benefit from configuring Rook with an external Ceph cluster instead or as an additional option:
- Enables storage (Ceph) to scale independently of compute (Kubernetes)
- For large-scale deployments with high storage performance requirements best served by a dedicated Ceph cluster
- Sharing a Ceph cluster between Kubernetes clusters for multi-tenancy and maximizing storage utilization
- Deploying and managing Ceph separately from Kubernetes to separate administration duties among teams
- Providing additional storage capacity to Kubernetes workloads by deploying Ceph both internally and externally
In the lab instructions to follow, we’ll configure a Ceph cluster with cephadm and configure Rook to connect to the external Ceph cluster.
Lab: Configuring Rook with an external Ceph cluster for Kubernetes workloads
Prerequisites
Proficiency in Linux administration is assumed. Familiarity with Kubernetes is assumed.
Setup
The following lab instructions were tested on 4 VMs with Ubuntu 24.04 LTS (Noble) server installed. Default options were used for the OS installation except the following day-2 customizations:
- Vim as the default editor
- Password-less
sudoconfigured - Remote login restricted to SSH public key authentication
- Swap disabled on each host
- The SSH public key of
ceph0(Ceph bootstrap node) copied to theauthorized_keysfile on all hosts for both non-root and root users enabling seamless SSH access - The following environment variables configured on all hosts:
CEPH0_IP: IP address of the Ceph bootstrap nodeCEPH1_IP: IP address of the 2nd Ceph nodeCEPH2_IP: IP address of the 3rd Ceph nodeKIND_IP: IP address of the Docker host running the kind Kubernetes clusterRGW_IP: IP address of the ingress service for Ceph RADOS Gateway (RGW). RGW exposes an S3-compatible object storage service for Ceph.
| Host | CPU | Memory | OS disk | Data disk | Description |
|---|---|---|---|---|---|
ceph0 |
2 |
3Gi |
16Gi |
32Gi |
Ceph bootstrap node |
ceph1 |
2 |
3Gi |
16Gi |
32Gi |
2nd Ceph node |
ceph2 |
2 |
3Gi |
16Gi |
32Gi |
3rd Ceph node |
kind |
4 |
5Gi |
32Gi |
- | Docker host for running Kubernetes with kind |
Note that all data disks on Ceph nodes are unused, unformatted raw devices. This is required for Ceph to identify them as available and consume them to form the required storage pools.
In the lab instructions to follow, all actions should be performed on the Ceph bootstrap node ceph0 unless otherwise specified.
Install required packages and tools
Install the following on each Ceph node:
- Podman
cephadm19.2.3 (Squid)
sudo apt update && sudo apt install -y podman
CEPH_RELEASE=19.2.3
curl -k --silent --remote-name --location https://download.ceph.com/rpm-${CEPH_RELEASE}/el9/noarch/cephadm
sudo install -T cephadm /usr/local/bin/cephadm
Install the following on kind:
sudo apt update && sudo apt install -y docker.io jq
sudo usermod -aG docker "${USER}"
# For AMD64 / x86_64
[ $(uname -m) = x86_64 ] && curl -Lo ./kind https://kind.sigs.k8s.io/dl/v0.30.0/kind-linux-amd64
# For ARM64
[ $(uname -m) = aarch64 ] && curl -Lo ./kind https://kind.sigs.k8s.io/dl/v0.30.0/kind-linux-arm64
chmod +x ./kind
sudo mv ./kind /usr/local/bin/kind
sudo wget -qO /usr/local/bin/kubectl https://dl.k8s.io/release/v1.34.1/bin/linux/amd64/kubectl
sudo chmod +x /usr/local/bin/kubectl
sudo wget -qO /usr/local/bin/yq https://github.com/mikefarah/yq/releases/download/v4.47.2/yq_linux_amd64
sudo chmod +x /usr/local/bin/yq
wget https://get.helm.sh/helm-v3.19.0-linux-amd64.tar.gz
tar xvf helm-v3.19.0-linux-amd64.tar.gz
chmod +x linux-amd64/helm
sudo mv linux-amd64/helm /usr/local/bin/helm
Bootstrap the cluster
Bootstrap the cluster with cephadm:
sudo cephadm bootstrap --mon-ip "${CEPH0_IP}"
Distribute the cluster’s SSH public key to the remaining Ceph nodes:
ssh-copy-id -f -i /etc/ceph/ceph.pub root@$CEPH1_IP
ssh-copy-id -f -i /etc/ceph/ceph.pub root@$CEPH2_IP
Join the remaining Ceph nodes to the cluster:
sudo cephadm shell -- \
    ceph orch host add \
    ceph1 \
    "${CEPH1_IP}" 2> /dev/null
sudo cephadm shell -- \
    ceph orch host add \
    ceph2 \
    "${CEPH2_IP}" 2> /dev/null
Consume all available disks for OSDs:
sudo cephadm shell -- \
    ceph orch apply osd \
    --all-available-devices 2> /dev/null
Wait a few minutes - our cluster should be ready:
sudo cephadm shell -- \
    ceph status 2> /dev/null
Sample output:
  cluster:
    id:     7fee1a8c-9853-11f0-9854-525400befb56
    health: HEALTH_OK

  services:
    mon: 3 daemons, quorum ceph0,ceph1,ceph2 (age 1.51568s)
    mgr: ceph0.jndcfg(active, since 6m), standbys: ceph1.vjepiq
    osd: 3 osds: 3 up (since 1.43009s), 3 in (since 22s)

  data:
    pools:   0 pools, 0 pgs
    objects: 0 objects, 0 B
    usage:   479 MiB used, 96 GiB / 96 GiB avail
    pgs:
Create an RBD pool
Create an RBD pool - let’s call it kind-rbd:
sudo cephadm shell -- ceph osd pool create kind-rbd 2> /dev/null
sudo cephadm shell -- rbd pool init kind-rbd 2> /dev/null
Confirm the pool is listed:
sudo cephadm shell -- \
    ceph osd pool ls 2> /dev/null
Sample output:
.mgr
kind-rbd
Create a Ceph file system
Ceph File System (CephFS) provides distributed, reliable, scalable, POSIX-compliant file storage for applications with RADOS as the backing store. This is achieved through its revolutionary architecture:
- Filesystem metadata and data are stored in separate OSD pools
- Metadata servers (MDS) handle POSIX filesystem calls and record filesystem activity to a journal on RADOS which is periodically flushed to the metadata pool
- Clients perform I/O operations by writing data blocks directly to the data pool without a gateway or broker
Refer to the official documentation for more details.
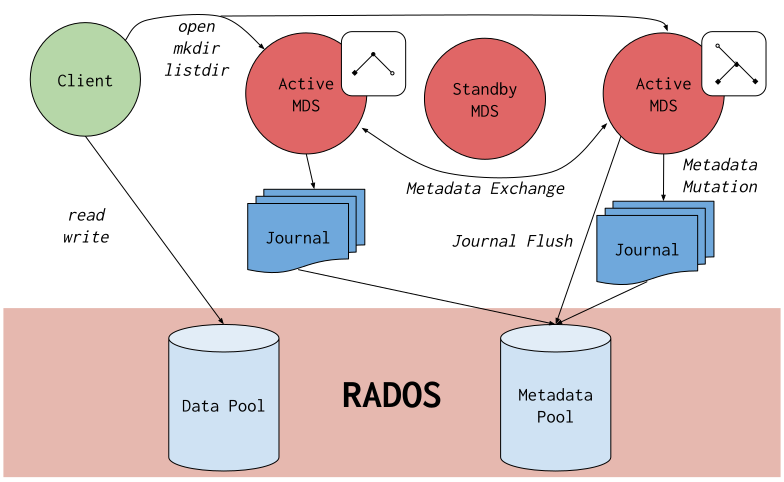
Source: Ceph File System - Ceph Documentation
Create a CephFS volume kind-cephfs. With modern versions of Ceph, it’s as simple as ceph fs volume create:
sudo cephadm shell -- \
    ceph fs volume create kind-cephfs 2> /dev/null
Confirm the volume is created with ceph fs volume ls:
sudo cephadm shell -- ceph fs volume ls 2> /dev/null
Sample output:
[
    {
        "name": "kind-cephfs"
    }
]
Configure Ceph RADOS Gateway (RGW)
Ceph RADOS Gateway (RGW) provides an S3-compatible REST API for accessing Ceph storage as buckets and objects. It also provides a Swift-compatible interface for accessing Ceph storage as OpenStack Swift object storage which is not covered in this lab.
Refer to the official documentation for details.
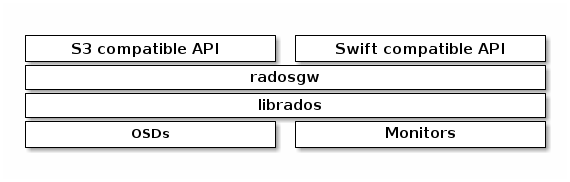
Source: Ceph Object Gateway - Ceph Documentation
Let deploy an RGW with the default of 2 daemons. Call our RGW kind-rgw and ensure it listens at port 8080/tcp.
Use the ceph orch apply rgw command:
sudo cephadm shell -- \
    ceph orch apply rgw kind-rgw --port=8080 2> /dev/null
Sample output:
Scheduled rgw.kind-rgw update...
Confirm the RGW daemons are running:
sudo cephadm shell -- ceph status 2> /dev/null
Sample output:
  cluster:
    id:     7fee1a8c-9853-11f0-9854-525400befb56
    health: HEALTH_OK

  services:
    mon: 3 daemons, quorum ceph0,ceph1,ceph2 (age 36m)
    mgr: ceph0.jndcfg(active, since 42m), standbys: ceph1.vjepiq
    mds: 1/1 daemons up, 1 standby
    osd: 3 osds: 3 up (since 36m), 3 in (since 36m)
    rgw: 2 daemons active (2 hosts, 1 zones)

  data:
    volumes: 1/1 healthy
    pools:   8 pools, 243 pgs
    objects: 220 objects, 457 KiB
    usage:   150 MiB used, 96 GiB / 96 GiB avail
    pgs:     243 active+clean
Configure ingress for our RGW
The ingress service provides a stable, highly available endpoint for RGW in the form of a floating virtual IP. It uses HAProxy and keepalived for the backing implementation.
Refer to the official documentation for details.
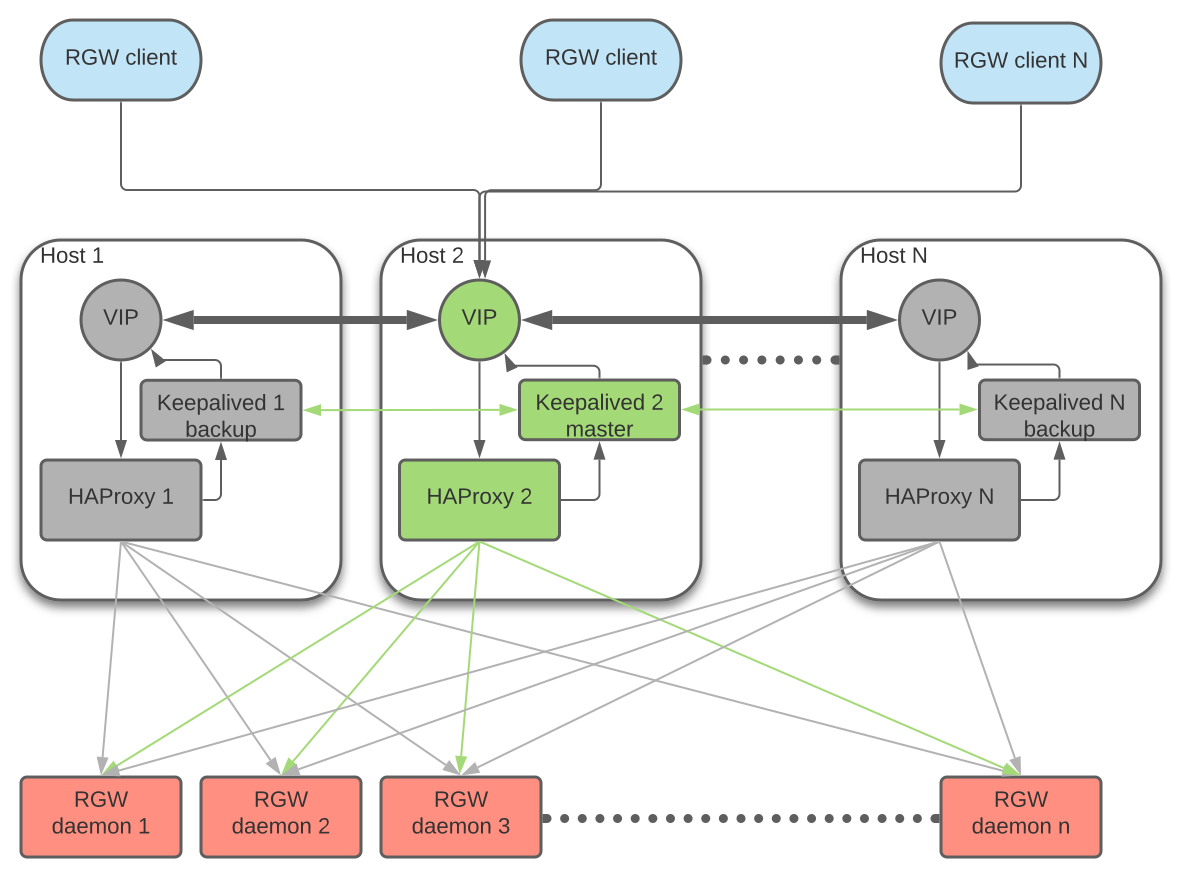
Source: RGW Service - Ceph Documentation
Create a dedicated directory ceph-toolbox/ for the Ceph toolbox container and make it your working directory:
mkdir -p $HOME/ceph-toolbox/
pushd $HOME/ceph-toolbox/
Create an ingress service specification file kind-rgw-ingress.yaml for our kind-rgw RGW. Replace the ${xxxxx_IP} placeholders with your corresponding IP addresses.
service_type: ingress
service_id: kind-rgw
spec:
  backend_service: rgw.kind-rgw
  virtual_ip: ${RGW_IP}/24
  frontend_port: 80
  monitor_port: 1967
Apply the file with ceph orch apply. Use the --mount option of cephadm shell to mount the Ceph toolbox directory into the container under /mnt:
sudo cephadm shell --mount "$HOME/ceph-toolbox/" -- \
    ceph orch apply -i /mnt/kind-rgw-ingress.yaml 2> /dev/null
Sample output:
Scheduled ingress.kind-rgw update...
Check the ingress is up and ready:
sudo cephadm shell -- ceph status 2> /dev/null
Sample output:
  cluster:
    id:     a84ddfe3-9860-11f0-a350-525400befb56
    health: HEALTH_OK

  services:
    mon: 3 daemons, quorum ceph0,ceph2,ceph1 (age 4m)
    mgr: ceph0.wwavuz(active, since 5m), standbys: ceph2.vhpuyd
    mds: 1/1 daemons up, 1 standby
    osd: 3 osds: 3 up (since 4m), 3 in (since 4m)
    rgw: 2 daemons active (2 hosts, 1 zones)

  data:
    volumes: 1/1 healthy
    pools:   8 pools, 243 pgs
    objects: 220 objects, 457 KiB
    usage:   150 MiB used, 96 GiB / 96 GiB avail
    pgs:     243 active+clean
Confirm our ingress service for RGW is reachable:
nc -vz "${RGW_IP}" 80
Sample output:
Connection to 192.168.124.37 80 port [tcp/http] succeeded!
Return to the home directory:
popd
Create our Kubernetes cluster
Now onto the interesting part - let’s create a Kubernetes cluster with kind, deploy the Rook orchestrator and configure it to connect to our Ceph cluster!
Log in to kind and run:
kind create cluster
Wait for the node to become ready:
kubectl wait \
  --for=condition=Ready \
  nodes \
  --all \
  --timeout=300s
Sample output:
node/kind-control-plane condition met
Let’s delete the standard default StorageClass and the corresponding namespace local-path-storage since we won’t be needing them.
kubectl delete sc --all
kubectl delete ns local-path-storage
Deploy the Rook operator
Reference: External Storage Cluster - Rook Ceph Documentation
Install Rook 1.18.2 from the official Helm chart repository. On kind, run:
helm repo add rook https://charts.rook.io/release
helm repo update
helm -n rook-ceph install \
    rook-ceph \
    rook/rook-ceph \
    --version 1.18.2 \
    --create-namespace \
    --wait
Sample output:
NAME: rook-ceph
LAST DEPLOYED: Tue Sep 23 11:18:20 2025
NAMESPACE: rook-ceph
STATUS: deployed
REVISION: 1
TEST SUITE: None
NOTES:
The Rook Operator has been installed.

Visit https://rook.io/docs/rook/latest for instructions on how to create and configure Rook clusters

Important Notes:
- You must customize the 'CephCluster' resource in the sample manifests for your cluster.
- Each CephCluster must be deployed to its own namespace, the samples use `rook-ceph` for the namespace.
- The sample manifests assume you also installed the rook-ceph operator in the `rook-ceph` namespace.
- The helm chart includes all the RBAC required to create a CephCluster CRD in the same namespace.
- Any disk devices you add to the cluster in the 'CephCluster' must be empty (no filesystem and no partitions).
- The CSI operator will manage the CSI driver lifecycle for RBD, CephFS, and NFS drivers.
Confirm the Rook operator and associated deployments are ready:
kubectl -n rook-ceph wait \
    --for=condition=Available \
    deploy \
    --all \
    --timeout=300s
Sample output:
deployment.apps/ceph-csi-controller-manager condition met
deployment.apps/rook-ceph-operator condition met
Export the configuration from our Ceph cluster
Reference: Export config from the Ceph provider cluster - Rook Ceph Documentation
Log in to ceph0 and enter the $HOME/ceph-toolbox/ directory we created in an earlier step:
pushd $HOME/ceph-toolbox/
Clone the release-1.18 branch of rook/rook from GitHub:
git clone -b release-1.18 https://github.com/rook/rook.git
Export the config to ceph-export.sh with the provided script rook/deploy/examples/external/create-external-cluster-resources.py and the following options:
--rbd-data-pool-name kind-rbd: use thekind-rbdRBD pool--cephfs-filesystem-name kind-cephfs: use thekind-cephfsCephFS volume--rgw-endpoint ${RGW_IP}:80: use the ingress service endpoint we created for thekind-rgwRGW service--namespace rook-ceph: our CephCluster and Rook components will run in therook-cephnamespace--k8s-cluster-name kind: the Kubernetes cluster we created has the namekindby default--restricted-auth-permission true: enable multi-tenancy so multiple Kubernetes clusters can connect to our Ceph cluster--format bash: export the configuration as a Bash script
sudo cephadm shell --mount "$HOME/ceph-toolbox/" -- \
    python3 \
    /mnt/rook/deploy/examples/external/create-external-cluster-resources.py \
    --rbd-data-pool-name kind-rbd \
    --cephfs-filesystem-name kind-cephfs \
    --rgw-endpoint ${RGW_IP}:80 \
    --namespace rook-ceph \
    --k8s-cluster-name kind \
    --restricted-auth-permission true \
    --format bash > ceph-export.sh 2> /dev/null
Inspect the generated ceph-export.sh script.
cat ceph-export.sh
Sample output:
export ARGS="[Configurations]
k8s-cluster-name = kind
namespace = rook-ceph
rgw-pool-prefix = default
restricted-auth-permission = true
format = bash
cephfs-filesystem-name = kind-cephfs
cephfs-metadata-pool-name = cephfs.kind-cephfs.meta
cephfs-data-pool-name = cephfs.kind-cephfs.data
rbd-data-pool-name = kind-rbd
rgw-endpoint = 192.168.124.37:80
"
export NAMESPACE=rook-ceph
export ROOK_EXTERNAL_FSID=c014ad7b-9877-11f0-9bc6-525400befb56
export ROOK_EXTERNAL_USERNAME=client.healthchecker
export ROOK_EXTERNAL_CEPH_MON_DATA=ceph0=192.168.124.42:6789
export ROOK_EXTERNAL_USER_SECRET=AQDgmNJoPTNWMRAA2cNm+rbe5jZ3TFzxafkC1w==
export ROOK_EXTERNAL_DASHBOARD_LINK=https://192.168.124.42:8443/
export CSI_RBD_NODE_SECRET=AQDgmNJowvv2MhAAiQnooIlpaS4qZUnmRU4npg==
export CSI_RBD_NODE_SECRET_NAME=csi-rbd-node-kind-kind-rbd
export CSI_RBD_PROVISIONER_SECRET=AQDgmNJo8eaLNBAA7wy+W71EWh0HL9Un942p5Q==
export CSI_RBD_PROVISIONER_SECRET_NAME=csi-rbd-provisioner-kind-kind-rbd
export CEPHFS_POOL_NAME=cephfs.kind-cephfs.data
export CEPHFS_METADATA_POOL_NAME=cephfs.kind-cephfs.meta
export CEPHFS_FS_NAME=kind-cephfs
export RESTRICTED_AUTH_PERMISSION=true
export CSI_CEPHFS_NODE_SECRET=AQDgmNJoHK8SNhAAie5DGIp2NaH4J4plwBC9fA==
export CSI_CEPHFS_PROVISIONER_SECRET=AQDgmNJowLwXOBAAU/uO8lngQwCrpB2+45Cp5g==
export CSI_CEPHFS_NODE_SECRET_NAME=csi-cephfs-node-kind-kind-cephfs
export CSI_CEPHFS_PROVISIONER_SECRET_NAME=csi-cephfs-provisioner-kind-kind-cephfs
export MONITORING_ENDPOINT=192.168.124.42
export MONITORING_ENDPOINT_PORT=9283
export RBD_POOL_NAME=kind-rbd
export RGW_POOL_PREFIX=default
export RGW_ENDPOINT=192.168.124.37:80
export RGW_ADMIN_OPS_USER_ACCESS_KEY=60JFMQV3220XB72TTUV8
export RGW_ADMIN_OPS_USER_SECRET_KEY=TDFTbjpIxoosAMpHXPdAImvnPdk12XmOwSdt3dsI
WARNING: the generated script contains access credentials and other sensitive information. Do not share it with others!
For the purposes of this lab, the Ceph cluster will be destroyed afterwards so it is fine to display the credentials here.
Copy the ceph-export.sh script to our Kubernetes host kind:
scp ceph-export.sh "${KIND_IP}:~"
Return to your home directory:
popd
Import the configuration to Rook
Reference: Import Ceph configuration to the Rook consumer cluster - Rook Ceph Documentation
Log in to kind and clone the release-1.18 branch of rook/rook from GitHub:
git clone -b release-1.18 https://github.com/rook/rook.git
Enter the rook/ project directory:
pushd rook/
Deploy version 1.18.2 of the rook-ceph-cluster chart with the values specified in deploy/charts/rook-ceph-cluster/values-external.yaml:
helm -n rook-ceph install \
    -f deploy/charts/rook-ceph-cluster/values-external.yaml \
    rook-ceph-cluster \
    rook/rook-ceph-cluster \
    --version 1.18.2 \
    --wait
Sample output:
NAME: rook-ceph-cluster
LAST DEPLOYED: Tue Sep 23 13:13:58 2025
NAMESPACE: rook-ceph
STATUS: deployed
REVISION: 1
TEST SUITE: None
NOTES:
The Ceph Cluster has been installed. Check its status by running:
  kubectl --namespace rook-ceph get cephcluster

Visit https://rook.io/docs/rook/latest/CRDs/Cluster/ceph-cluster-crd/ for more information about the Ceph CRD.

Important Notes:
- You can only deploy a single cluster per namespace
- If you wish to delete this cluster and start fresh, you will also have to wipe the OSD disks using `sfdisk`
Confirm that the rook-ceph CephCluster resource is in the Connecting phase. This indicates that it is waiting to connect to an external Ceph cluster.
kubectl -n rook-ceph get cephcluster rook-ceph -o json | \
    jq '.status.phase' --raw-output
Sample output:
Connecting
Leave the rook/ project directory and return to your home directory:
popd
Source the ceph-export.sh script we generated earlier to populate our shell with the environment variables required by the import script at a later step.
source ./ceph-export.sh
Now mark the deploy/examples/external/import-external-cluster.sh script under the Rook repository as executable and run it.
chmod +x ./rook/deploy/examples/external/import-external-cluster.sh
./rook/deploy/examples/external/import-external-cluster.sh
Sample output:
cluster namespace rook-ceph already exists
secret/rook-ceph-mon created
configmap/rook-ceph-mon-endpoints created
configmap/external-cluster-user-command created
secret/rook-csi-rbd-node-kind-kind-rbd created
secret/rook-csi-rbd-provisioner-kind-kind-rbd created
secret/rgw-admin-ops-user created
secret/rook-csi-cephfs-node-kind-kind-cephfs created
secret/rook-csi-cephfs-provisioner-kind-kind-cephfs created
storageclass.storage.k8s.io/ceph-rbd created
storageclass.storage.k8s.io/cephfs created
Now wait for the rook-ceph CephCluster resource to become Connected - this may take a while:
kubectl -n rook-ceph wait \
    --for=condition=Connected \
    cephcluster \
    --all \
    --timeout=300s
Sample output:
cephcluster.ceph.rook.io/rook-ceph condition met
Inspect and use the available storage classes
Log in to kind and list the storage classes created by Rook:
kubectl get sc
Sample output:
NAME       PROVISIONER                     RECLAIMPOLICY   VOLUMEBINDINGMODE   ALLOWVOLUMEEXPANSION   AGE
ceph-rbd   rook-ceph.rbd.csi.ceph.com      Delete          Immediate           true                   12m
cephfs     rook-ceph.cephfs.csi.ceph.com   Delete          Immediate           true                   12m
Two storage classes were created:
ceph-rbd: provisions block storage with Ceph RBDcephfs: provisions file storage with CephFS volumes
Notice a storage class for Ceph RGW is missing. Configuring a Ceph RGW storage class with Rook and consuming object storage from Kubernetes is left as an exercise to the reader.
Let’s create two PersistentVolumeClaims - one for block storage and one for file storage.
Create a file ceph-block-file-pvc.yaml with the following content:
---
apiVersion: v1
kind: PersistentVolumeClaim
metadata:
  name: ceph-block-pvc
spec:
  accessModes:
    - ReadWriteOnce
  resources:
    requests:
      storage: 1Gi
  storageClassName: ceph-rbd
  volumeMode: Filesystem
---
apiVersion: v1
kind: PersistentVolumeClaim
metadata:
  name: ceph-file-pvc
spec:
  accessModes:
    - ReadWriteMany
  resources:
    requests:
      storage: 1Gi
  storageClassName: cephfs
  volumeMode: Filesystem
Create a dummy application namespace and create the PVC resources:
kubectl create ns busybox
kubectl -n busybox create -f ceph-block-file-pvc.yaml
Sample output:
namespace/busybox created
persistentvolumeclaim/ceph-block-pvc created
persistentvolumeclaim/ceph-file-pvc created
Confirm both PVCs are bound:
kubectl -n busybox get pvc \
    -o custom-columns='NAME:metadata.name,PHASE:status.phase'
Sample output:
NAME             PHASE
ceph-block-pvc   Bound
ceph-file-pvc    Bound
Optional: create a dummy pod with the docker.io/library/busybox:latest image and mount both PVCs to the pod. Confirm that the pod can read from and write to both volumes. This is left as an exercise to the reader.
Congratulations, you’ve successfully configured Rook to provision block and file storage for Kubernetes applications from an external Ceph cluster!
Demo
An asciicast recording of this hands-on lab is available on Asciinema.
Concluding remarks and going further
I hope you enjoyed this lab as much as I did preparing it :-)
Dive deeper into Ceph storage and Kubernetes with the following resources:
- CL260: Red Hat Ceph Storage for OpenStack dives into the details of Ceph administration and how to integrate Ceph with OpenStack for a hyperconverged platform
- DO370: Enterprise Kubernetes Storage with Red Hat OpenShift Data Foundation dives into provisioning Ceph storage on Kubernetes with the Rook orchestrator and using Ceph to provision block, file and object storage for Kubernetes applications, among other tasks
Stay tuned for updates! ;-)
Subscribe:
![]()
![]()
![[Valid RSS]](/assets/images/valid-rss-rogers.png)
![[Valid Atom 1.0]](/assets/images/valid-atom.png)